 Nik Tomazic
In this tutorial, we'll look at how to configure GitHub Actions to continuously deploy a Django and Docker application to Linode.
Contents
Objectives
By the end of this tutorial you should be able to:
- Deploy a Django application to Linode
- Use GitHub packages to store Docker images
- Set up a Linode CPU instance and a Linode managed database
- Enable passwordless, SSH authentication
- Use GitHub actions to continuously deploy your app
Project Setup
Start by cloning the GitHub repo and changing your current directory to its root:
$ git clone [email protected]:testdrivenio/django-github-linode.git --branch base --single-branch
$ cd django-github-linode
Curious about how this project was developed? Check out the Dockerizing Django with Postgres, Gunicorn, and Nginx blog post.
To test locally, build the images and spin up the containers:
$ docker-compose up -d --build
If your container exits with
exec /usr/src/app/entrypoint.sh: no such file or directory, open app/entrypoint.sh script and perform an EOL conversion fromCR LFtoLF. After that, rundocker-compose up -d --buildagain.
Navigate to http://localhost:8000/. You should see:
{
  "hello": "world"
}
GitHub Packages
GitHub Packages is a platform for hosting and managing packages, including containers and other dependencies. It allows you to host your software packages on GitHub next to the source code. We'll use it to store Docker images.
To work with GitHub packages, you'll first have to create a personal access token. Navigate to Developer settings and select "Personal access tokens". Click on "Generate new token".
Give it a name/note -- e.g., "GitHub actions" -- and add the following permissions:
write:packagesread:packagesdelete:packages
Next, click on the "Generate token" button.
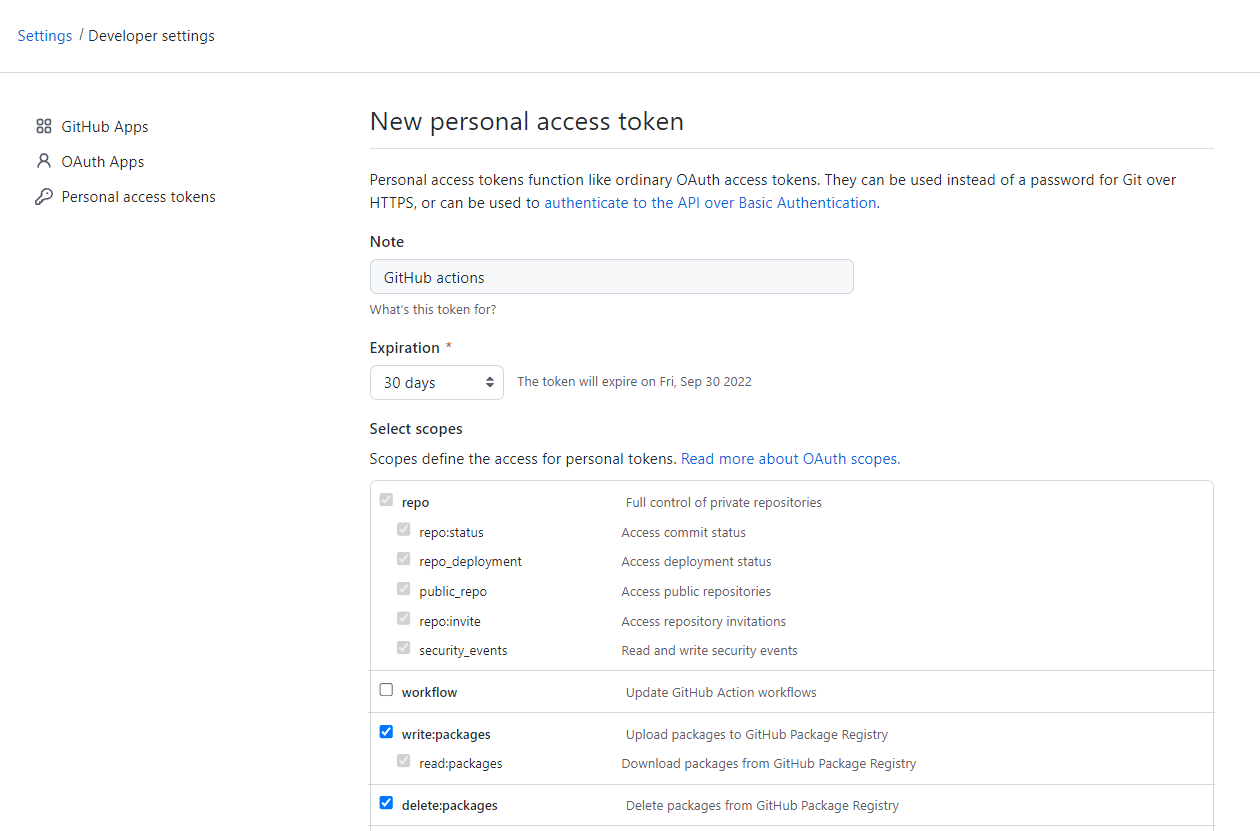
You're only going to be able to see the token once, so store it somewhere safe.
Build and tag the container:
$ docker build -f app/Dockerfile -t ghcr.io/<USERNAME>/<REPOSITORY_NAME>/web:latest ./app

# Example
$ docker build -f app/Dockerfile -t ghcr.io/testdrivenio/django-github-linode/web:latest ./app
Next, use your personal access token to login into GitHub packages:
$ docker login ghcr.io -u <USERNAME> -p <TOKEN>

# Example
$ docker login ghcr.io -u testdrivenio -p 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
Lastly, push the image to Container registry on GitHub packages.
$ docker push ghcr.io/<USERNAME>/<REPOSITORY_NAME>/web:latest

# Example
$ docker push ghcr.io/testdrivenio/django-github-linode/web:latest
You should now be able to see the package at one of the following URLs (depending on if you're using your personal account or an org):
# Personal account
https://github.com/<USERNAME>?tab=packages

# Organization
https://github.com/orgs/<ORGANIZATION_NAME>/packages
Linode CPU
If you do not have a Linode account yet, navigate to their site and click on "Sign up".
First, we need to create a Linode CPU instance.
Log into the Linode dashboard and select "Linodes" on the sidebar. Then click on "Create Linode".
To create a Linode with Docker preinstalled, we can use the Linode Marketplace. In the navigation bar select "Marketplace" and for the app select "Docker."
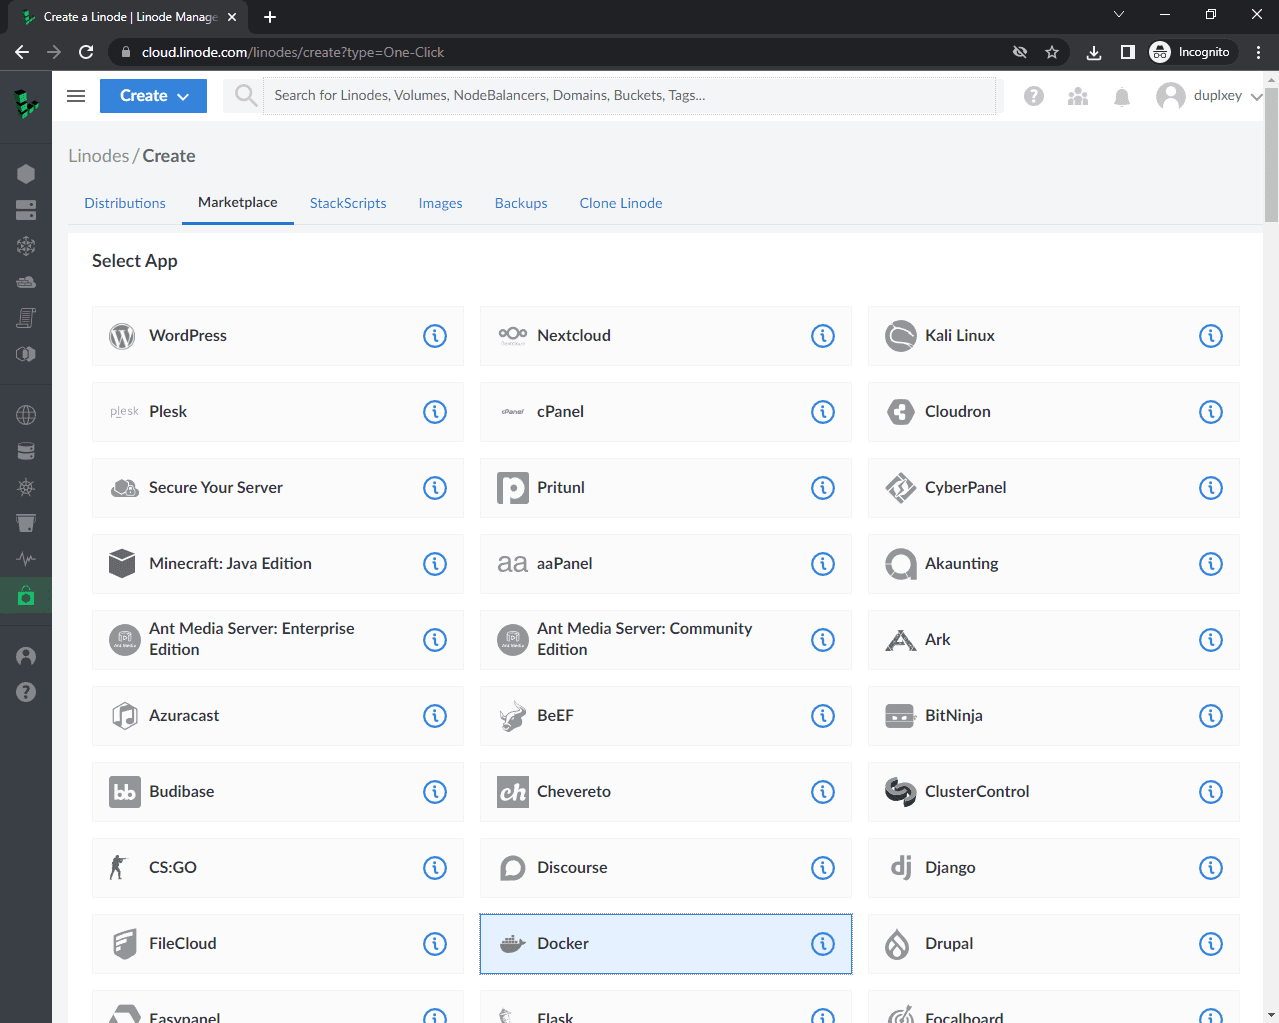
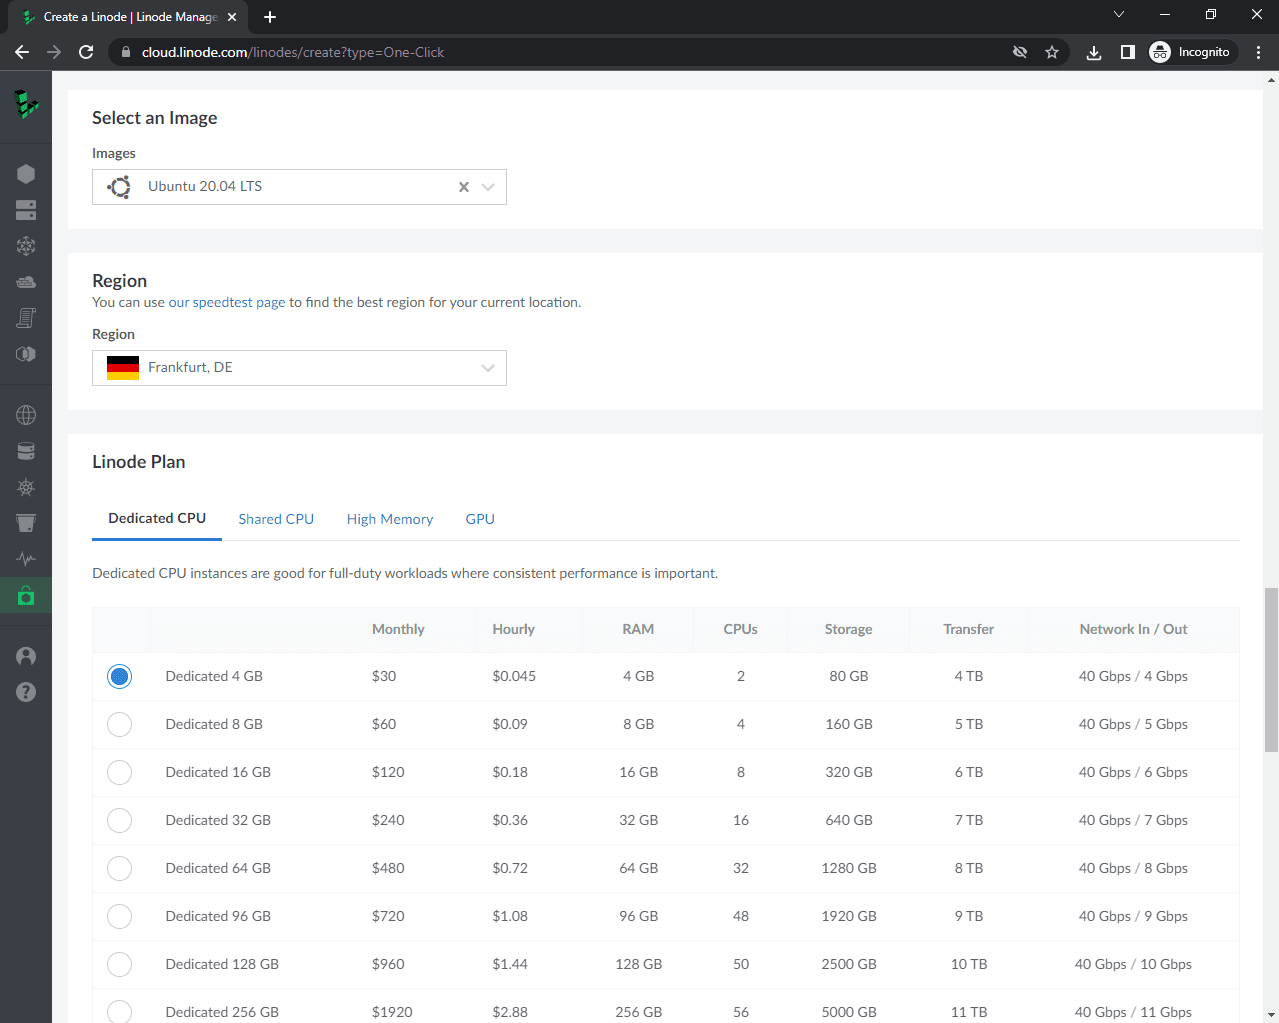
Scroll down to "Select an Image". For the image, pick "Ubuntu 20.04 LTS". For the region, select the region that's the closest to your customers. Then select a "Linode Plan" based on your project requirements.
If you're deploying a CPU-intensive web application opt for a dedicated CPU. If you're on a budget and are deploying a simple web application feel free to use a shared CPU. For more information take a look at Dedicated vs Shared CPU Instances.
Let's name our Linode "django-docker". Leave the tags empty. Then pick a strong root password. You should write it down, but there's no need to memorize it since we'll enable passwordless SSH shortly.
For authentication purposes, we'll use an SSH key. To generate the keys run:
$ ssh-keygen -t rsa
Save the key to /root/.ssh/id_rsa and don't set the passphrase. This will generate a public and private key -- id_rsa and id_rsa.pub, respectively. To set up passwordless SSH login, copy the public key over to the authorized_keys file and set the proper permissions:
Feel free to use an existing SSH key if you'd prefer.
$ cat ~/.ssh/id_rsa.pub
$ vi ~/.ssh/authorized_keys
$ chmod 600 ~/.ssh/authorized_keys
$ chmod 600 ~/.ssh/id_rsa
Navigate back to the Linode dashboard and click on "Add an SSH key". Give it a label and paste in your public key.

Leave everything else blank and scroll to the bottom. Click on "Create Linode".
You'll be redirected to your Linode details. It will take a few minutes for the Linode to provision. Once it's ready, its status will change to "Running".

Grab the Linode's IP and let's test if everything works.
To connect to the newly created Linode instance and check the Docker version run:
$ ssh -o StrictHostKeyChecking=no root@<YOUR_INSTANCE_IP> docker --version

Docker version 20.10.17, build 100c701
It may take a few more minutes after the instance is running for Docker to finish installing.
Then, create a new directory for the app:
$ ssh -o StrictHostKeyChecking=no root@<YOUR_INSTANCE_IP> mkdir /app
Great, the Linode CPU instance is now ready. In the next step, we'll set up a managed database.
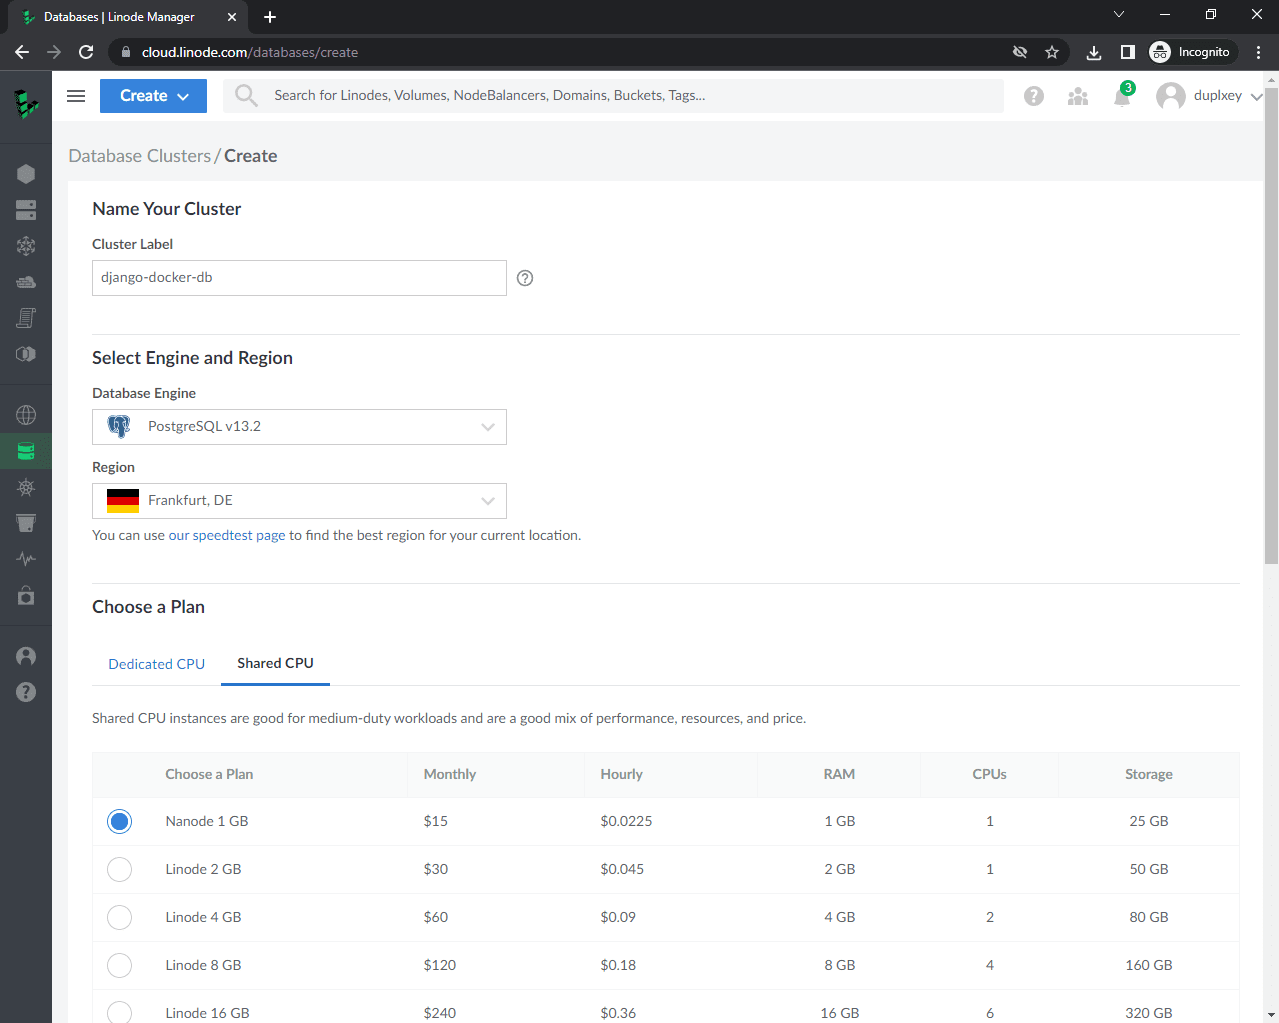
Database
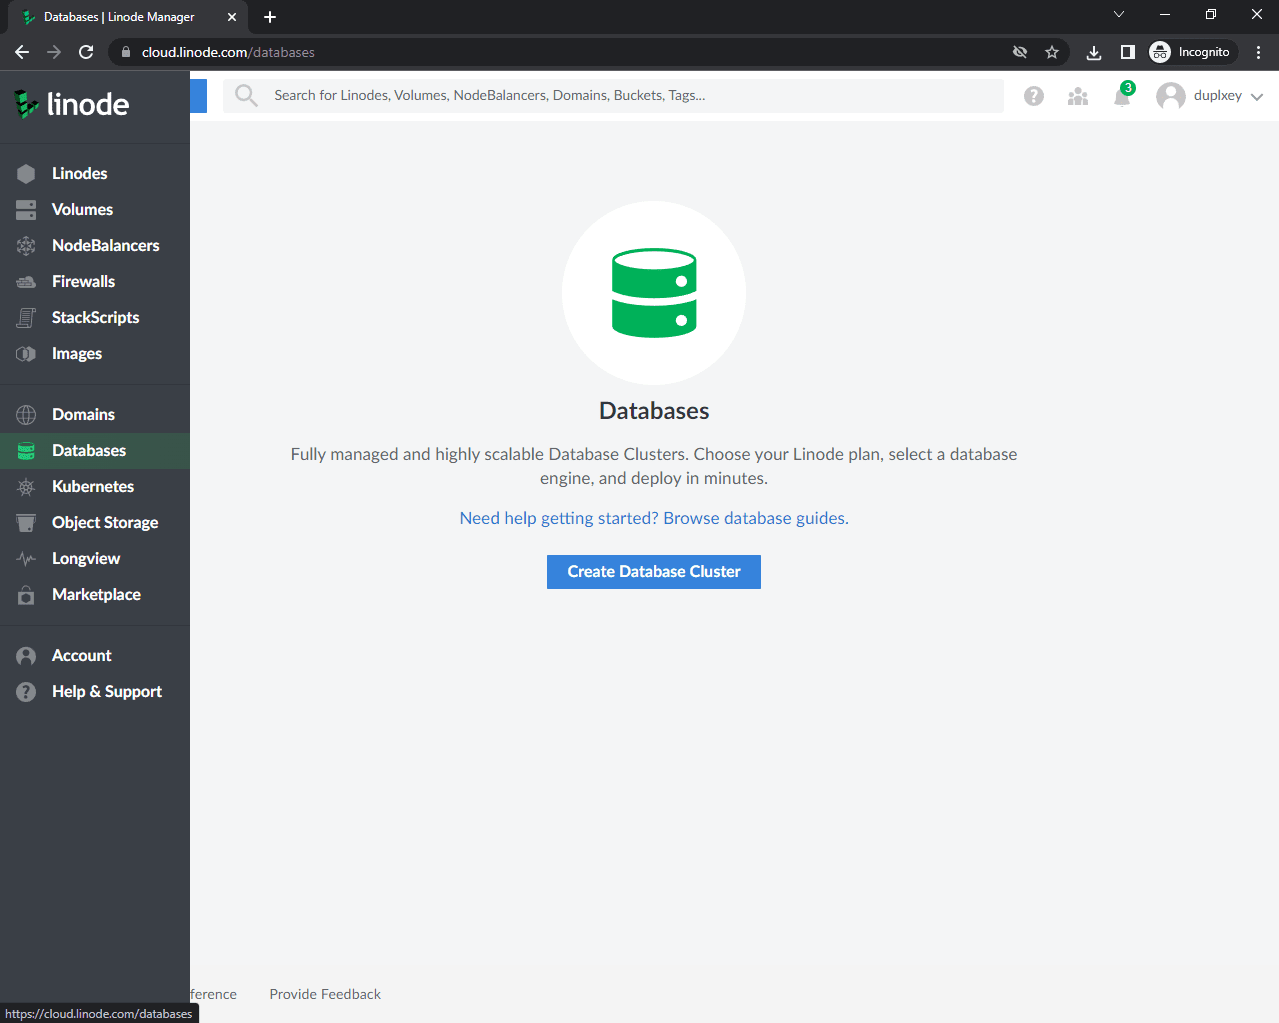
To host our database, we'll use Linode Databases.
On the sidebar navigate to "Databases" and click on "Create Database Cluster".
Label it "django-docker-db", select "PostgreSQL v13.2" as the engine, and for the region pick the one closest to your customers. Select a CPU plan based on your project requirements.
For a toy project go with a shared CPU, since dedicated CPU databases are pretty expensive.
One node should be more than enough. For access control, add your Linode CPU instance IP address.
To allow any IP to connect to the database, you can add
0.0.0.0/0to the access control list. Just keep in mind that this is bad security practice and should only be done for testing purposes. Do NOT expose production data like this.
Click "Create Database Cluster". It'll take about 10-15 minutes for the database to spin up. Once it's ready grab its connection details.

GitHub Actions
GitHub Actions allows you to automate, customize, and execute software development workflows right in your GitHub repository. We'll use it to build and deploy a Docker image when code is pushed to the GitHub repo.
To configure GitHub Actions, you first need to create a ".github" directory within your project root. Next, create a "workflows" directory within that directory and main.yml within "workflows":
.github
└── workflows
    └── main.yml
Build Job
Let's start by creating the build job.
Put the following contents in .github/workflows/main.yml:
name: Continuous Integration and Delivery

on: [push]

env:
  WEB_IMAGE: ghcr.io/$(echo $GITHUB_REPOSITORY | tr '[:upper:]' '[:lower:]')/web
  NGINX_IMAGE: ghcr.io/$(echo $GITHUB_REPOSITORY | tr '[:upper:]' '[:lower:]')/nginx

jobs:

  build:
    name: Build Docker Images
    runs-on: ubuntu-latest
    steps:
      - name: Checkout master
        uses: actions/checkout@v1
      - name: Add environment variables to .env
        run: |
          echo "DEBUG=0" >> .env
          echo "SQL_ENGINE=django.db.backends.postgresql" >> .env
          echo "DATABASE=postgres" >> .env
          echo "SECRET_KEY=${{ secrets.SECRET_KEY }}" >> .env
          echo "SQL_DATABASE=${{ secrets.SQL_DATABASE }}" >> .env
          echo "SQL_USER=${{ secrets.SQL_USER }}" >> .env
          echo "SQL_PASSWORD=${{ secrets.SQL_PASSWORD }}" >> .env
          echo "SQL_HOST=${{ secrets.SQL_HOST }}" >> .env
          echo "SQL_PORT=${{ secrets.SQL_PORT }}" >> .env
      - name: Set environment variables
        run: |
          echo "WEB_IMAGE=$(echo ${{env.WEB_IMAGE}} )" >> $GITHUB_ENV
          echo "NGINX_IMAGE=$(echo ${{env.NGINX_IMAGE}} )" >> $GITHUB_ENV
      - name: Log in to GitHub Packages
        run: echo ${PERSONAL_ACCESS_TOKEN} | docker login ghcr.io -u ${{ secrets.NAMESPACE }} --password-stdin
        env:
          PERSONAL_ACCESS_TOKEN: ${{ secrets.PERSONAL_ACCESS_TOKEN }}
      - name: Pull images
        run: |
          docker pull ${{ env.WEB_IMAGE }} || true
          docker pull ${{ env.NGINX_IMAGE }} || true
      - name: Build images
        run: |
          docker-compose -f docker-compose.ci.yml build
      - name: Push images
        run: |
          docker push ${{ env.WEB_IMAGE }}
          docker push ${{ env.NGINX_IMAGE }}
First, we named the workflow and defined when it should run with on. Next, we set the environment variables and defined the build job. A job consists of one or multiple commands that run sequentially.
To avoid leaking private variables like passwords and secret keys, we used secrets. So, in order for this job to complete successfully, you need to add a few secrets to your GitHub repository.
Navigate to:
https://github.com/<USERNAME|ORGANIZATION_NAME>/<REPOSITORY_NAME></settings

# Example
https://github.com/testdrivenio/django-github-linode/settings
Click on "Secrets" then "Actions" and add the following secrets:
SECRET_KEY:^8!w90zymm9_0z3h4!_n637hw$^-7g%5-l0npq+zbmqz!v22q9SQL_DATABASE:postgresSQL_USER:linpostgresSQL_PASSWORD:yjNajtqytZU1mp1tSQL_HOST:lin-7098-1320-pgsql-primary.servers.linodedb.netSQL_PORT:5432NAMESPACE: your GitHub username or your organization namePERSONAL_ACCESS_TOKEN: your GitHub personal access token
Make sure to replace the SQL connection info with your own credentials.

Next, add your Linode's IP address to ALLOWED_HOSTS in the Django settings:
# app/hello_django/settings.py

ALLOWED_HOSTS = ['localhost', '127.0.0.1', '<your Linode IP>']
Commit your changes and push your code up to GitHub to trigger a new build. Ensure that it completes successfully.
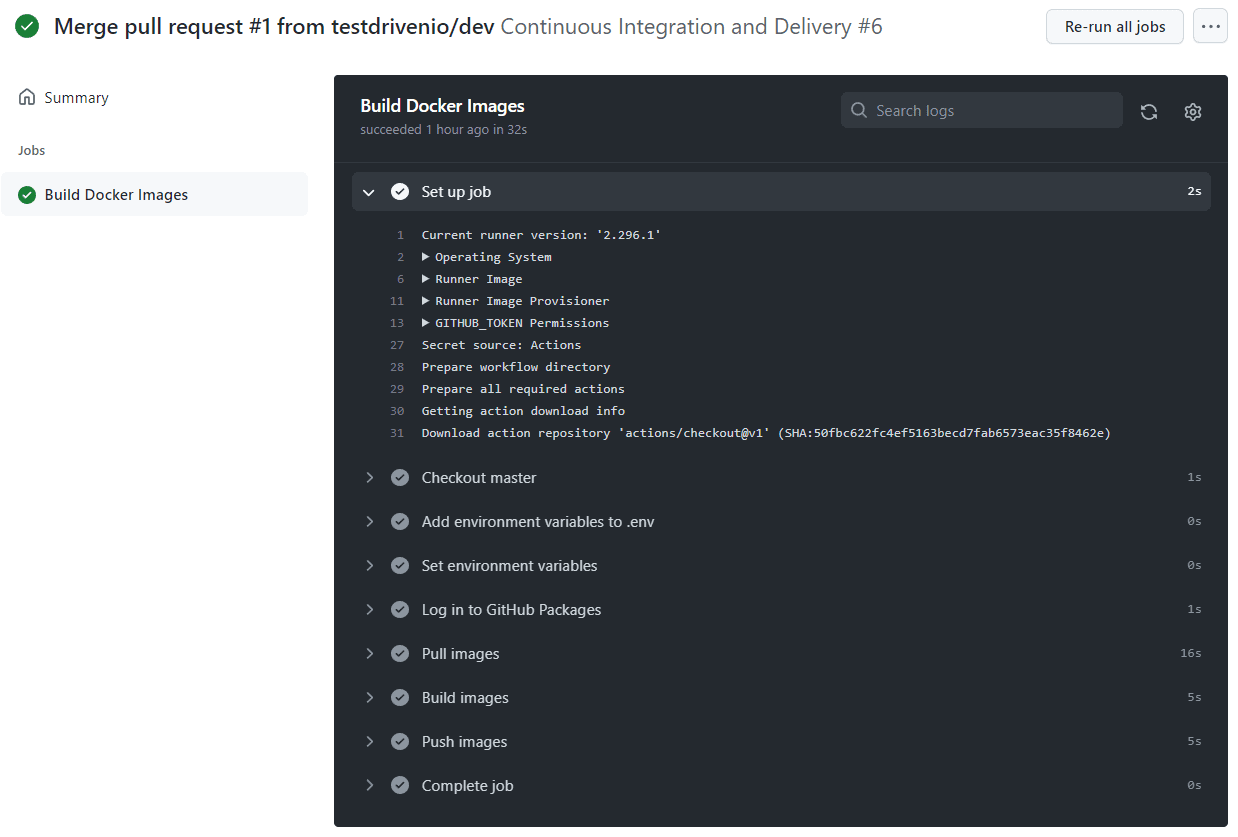
If you check your packages you'll notice that two images were created, web and nginx. NGINX is used as a reverse proxy to serve the web application and static/media files.
Deploy Job
Next, add a new job called deploy right after the build job:
deploy:
  name: Deploy to Linode
  runs-on: ubuntu-latest
  needs: build
  steps:
    - name: Checkout master
      uses: actions/checkout@v1
    - name: Add environment variables to .env
      run: |
        echo "DEBUG=0" >> .env
        echo "SQL_ENGINE=django.db.backends.postgresql" >> .env
        echo "DATABASE=postgres" >> .env
        echo "SECRET_KEY=${{ secrets.SECRET_KEY }}" >> .env
        echo "SQL_DATABASE=${{ secrets.SQL_DATABASE }}" >> .env
        echo "SQL_USER=${{ secrets.SQL_USER }}" >> .env
        echo "SQL_PASSWORD=${{ secrets.SQL_PASSWORD }}" >> .env
        echo "SQL_HOST=${{ secrets.SQL_HOST }}" >> .env
        echo "SQL_PORT=${{ secrets.SQL_PORT }}" >> .env
        echo "WEB_IMAGE=${{ env.WEB_IMAGE }}" >> .env
        echo "NGINX_IMAGE=${{ env.NGINX_IMAGE }}" >> .env
        echo "NAMESPACE=${{ secrets.NAMESPACE }}" >> .env
        echo "PERSONAL_ACCESS_TOKEN=${{ secrets.PERSONAL_ACCESS_TOKEN }}" >> .env
    - name: Add the private SSH key to the ssh-agent
      env:
        SSH_AUTH_SOCK: /tmp/ssh_agent.sock
      run: |
        mkdir -p ~/.ssh
        ssh-agent -a $SSH_AUTH_SOCK > /dev/null
        ssh-keyscan github.com >> ~/.ssh/known_hosts
        ssh-add - <<< "${{ secrets.PRIVATE_KEY }}"
    - name: Build and deploy images on Linode
      env:
        SSH_AUTH_SOCK: /tmp/ssh_agent.sock
      run: |
        scp  -o StrictHostKeyChecking=no -r ./.env ./docker-compose.prod.yml root@${{ secrets.LINODE_IP_ADDRESS }}:/app
        ssh -o StrictHostKeyChecking=no root@${{ secrets.LINODE_IP_ADDRESS }} << 'ENDSSH'
          cd /app
          source .env
          docker login ghcr.io -u $NAMESPACE -p $PERSONAL_ACCESS_TOKEN
          docker pull $WEB_IMAGE
          docker pull $NGINX_IMAGE
          sudo docker-compose -f docker-compose.prod.yml up -d
        ENDSSH
This job only runs if the build job completes successfully (via needs: build).
Job steps:
- Check out the repository.
- Add environment variables (including secrets) to a .env file.
- Initialize the SSH agent and add Linode's private SSH key.
- Copy .env and docker-compose.prod to the Linode.
- SSH to the Linode.
- Change the active directory.
- Log in to the container registry and pull the images.
- Use Docker Compose to deploy the images.
Add the following two secrets to your repo:
LINODE_IP_ADDRESS: IP address of your LinodePRIVATE_KEY: your SSH private key
To test, commit and then push your code.
Ensure that both jobs complete successfully. Then, navigate to your site. You should see:
{
  "hello": "world"
}
Test
Finally, to make sure that the deploy job only runs when changes are made to the master branch add if: github.ref == 'refs/heads/master' below needs: build.
If you're using
mainas the default branch, make sure to replacemasterwithmain.
deploy:
  name: Deploy to Linode
  runs-on: ubuntu-latest
  needs: build
  if: github.ref == 'refs/heads/master'
  steps:
    - name: Checkout master
      uses: actions/checkout@v1
    - name: Add environment variables to .env
      run: |
        echo "DEBUG=0" >> .env
        echo "SQL_ENGINE=django.db.backends.postgresql" >> .env
        echo "DATABASE=postgres" >> .env
        echo "SECRET_KEY=${{ secrets.SECRET_KEY }}" >> .env
        echo "SQL_DATABASE=${{ secrets.SQL_DATABASE }}" >> .env
        echo "SQL_USER=${{ secrets.SQL_USER }}" >> .env
        echo "SQL_PASSWORD=${{ secrets.SQL_PASSWORD }}" >> .env
        echo "SQL_HOST=${{ secrets.SQL_HOST }}" >> .env
        echo "SQL_PORT=${{ secrets.SQL_PORT }}" >> .env
        echo "WEB_IMAGE=${{ env.WEB_IMAGE }}" >> .env
        echo "NGINX_IMAGE=${{ env.NGINX_IMAGE }}" >> .env
        echo "NAMESPACE=${{ secrets.NAMESPACE }}" >> .env
        echo "PERSONAL_ACCESS_TOKEN=${{ secrets.PERSONAL_ACCESS_TOKEN }}" >> .env
    - name: Add the private SSH key to the ssh-agent
      env:
        SSH_AUTH_SOCK: /tmp/ssh_agent.sock
      run: |
        mkdir -p ~/.ssh
        ssh-agent -a $SSH_AUTH_SOCK > /dev/null
        ssh-keyscan github.com >> ~/.ssh/known_hosts
        ssh-add - <<< "${{ secrets.PRIVATE_KEY }}"
    - name: Build and deploy images on Linode
      env:
        SSH_AUTH_SOCK: /tmp/ssh_agent.sock
      run: |
        scp  -o StrictHostKeyChecking=no -r ./.env ./docker-compose.prod.yml root@${{ secrets.LINODE_IP_ADDRESS }}:/app
        ssh -o StrictHostKeyChecking=no root@${{ secrets.LINODE_IP_ADDRESS }} << 'ENDSSH'
          cd /app
          source .env
          docker login ghcr.io -u $NAMESPACE -p $PERSONAL_ACCESS_TOKEN
          docker pull $WEB_IMAGE
          docker pull $NGINX_IMAGE
          sudo docker-compose -f docker-compose.prod.yml up -d
        ENDSSH
To test if it works, create a new dev branch. Then, Change the hello world message in app/hello_django/urls.py to hello linode:
def home(request):
    return JsonResponse({"hello": "linode"})
Commit and push your changes to GitHub. Ensure only the build job runs. Once the build passes, open a PR against the master (or main) branch and merge the changes. This will trigger a new build with both stages, build and deploy. Ensure the deploy works as expected:
{
  "hello": "linode"
}
--
That's it. You can grab the final source code from django-github-linode repo.