 Michael Herman
In this tutorial, we'll look at how to configure GitHub Actions to continuously deploy a Django and Docker application to DigitalOcean.
Dependencies:
- Django v3.2.4
- Docker v20.04
- Python v3.9.5
Contents
Objectives
By the end of this tutorial, you will be able to:
- Deploy Django to DigitalOcean with Docker
- Configure GitHub actions to continuously deploy Django to DigitalOcean
- Use GitHub Packages to store Docker Images
- Set up Passwordless SSH Login
- Configure DigitalOcean's Managed Databases for data persistence
Project Setup
Along with Django and Docker, the demo project that we'll be using includes Postgres, Nginx, and Gunicorn.
Curious about how this project was developed? Check out the Dockerizing Django with Postgres, Gunicorn, and Nginx blog post.
Start by cloning down the base project:
$ git clone https://github.com/testdrivenio/django-github-digitalocean.git --branch base --single-branch
$ cd django-github-digitalocean
To test locally, build the images and spin up the containers:
$ docker-compose up -d --build
Navigate to http://localhost:8000/. You should see:
{
  "hello": "world"
}
GitHub Packages
GitHub Packages is a package management service, fully integrated with GitHub. It allows you to host your software packages, publicly or privately, for use within your projects on GitHub. We'll use it to store Docker images.
Assuming you have an account on GitHub, create a new repository for this project and update the local project's origin remote to point to the repository that you just created.
To test locally, you'll need to create a personal access token. Within your Developer Settings, click "Personal access tokens". Then, click "Generate new token". Provide a descriptive note and select the following scopes:
write:packagesread:packagesdelete:packages
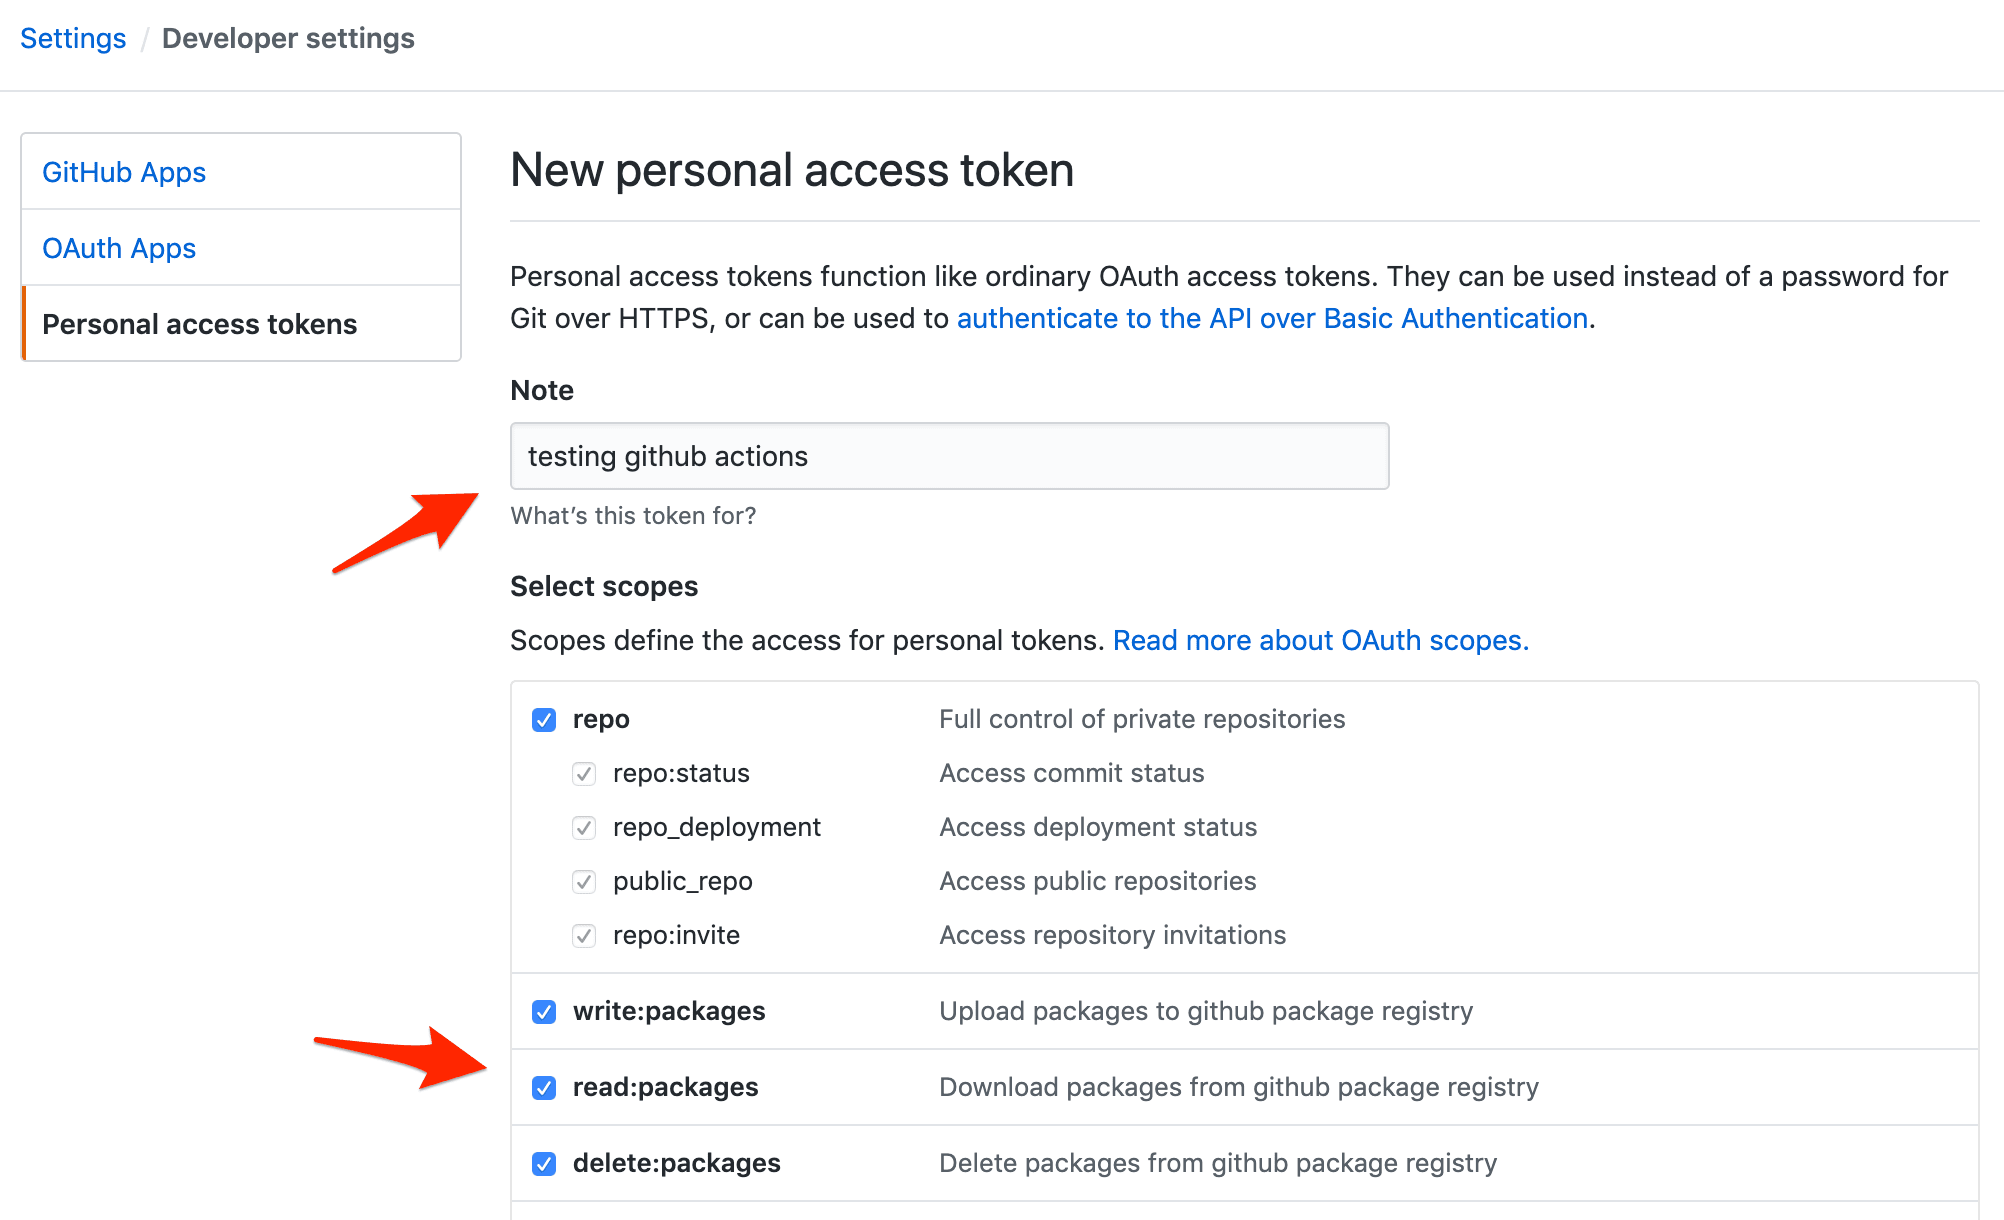
Take note of the token.
Build and tag the image:
$ docker build -f app/Dockerfile -t ghcr.io/<USERNAME>/<REPOSITORY_NAME>/web:latest ./app

# example:
# docker build -f app/Dockerfile -t ghcr.io/testdrivenio/django-github-digitalocean/web:latest ./app
Next, using your personal access token, authenticate to GitHub Packages with Docker:
$ docker login ghcr.io -u <USERNAME> -p <TOKEN>

# example:
# docker login ghcr.io -u testdrivenio -p ce70f1d4a3a906ce8ac24caa6870fd29f2273d30
Push the image to the Container registry on GitHub Packages:
$ docker push ghcr.io/<USERNAME>/<REPOSITORY_NAME>/web:latest

# example:
# docker push ghcr.io/testdrivenio/django-github-digitalocean/web:latest
You should now be able to see the package at one of the following URLs (depending on if you're using your personal account or an org):
https://github.com/orgs/<USERNAME>/packages

https://github.com/<USERNAME>?tab=packages
DigitalOcean
Let's set up DigitalOcean to work with our application.
First, you'll need to sign up for a DigitalOcean account (if you don't already have one), and then generate an access token so you can access the DigitalOcean API.
Add the token to your environment:
$ export DIGITAL_OCEAN_ACCESS_TOKEN=[your_digital_ocean_token]
Droplet
Next, create a new Droplet with Docker pre-installed:
$ curl -X POST \
    -H 'Content-Type: application/json' \
    -H 'Authorization: Bearer '$DIGITAL_OCEAN_ACCESS_TOKEN'' \
    -d '{"name":"django-docker","region":"sfo3","size":"s-2vcpu-4gb","image":"docker-20-04"}' \
    "https://api.digitalocean.com/v2/droplets"
Check the status:
$ curl \
    -H 'Content-Type: application/json' \
    -H 'Authorization: Bearer '$DIGITAL_OCEAN_ACCESS_TOKEN'' \
    "https://api.digitalocean.com/v2/droplets?name=django-docker"
If you have jq installed, then you can parse the JSON response like so:
$ curl \
    -H 'Content-Type: application/json' \
    -H 'Authorization: Bearer '$DIGITAL_OCEAN_ACCESS_TOKEN'' \
    "https://api.digitalocean.com/v2/droplets?name=django-docker" \
  | jq '.droplets[0].status'
The root password should be emailed to you. Retrieve it. Then, once the status of the droplet is active, SSH into the instance as root and update the password when prompted.
Next, generate a new SSH key:
$ ssh-keygen -t rsa
Save the key to /root/.ssh/id_rsa and don't set a password. This will generate a public and private key -- id_rsa and id_rsa.pub, respectively. To set up passwordless SSH login, copy the public key over to the authorized_keys file and set the proper permissions:
$ cat ~/.ssh/id_rsa.pub
$ vi ~/.ssh/authorized_keys
$ chmod 600 ~/.ssh/authorized_keys
$ chmod 600 ~/.ssh/id_rsa
Copy the contents of the private key:
$ cat ~/.ssh/id_rsa
Exit from the SSH session, and then set the key as an environment variable on your local machine:
export PRIVATE_KEY='-----BEGIN RSA PRIVATE KEY-----
MIIEpAIBAAKCAQEA04up8hoqzS1+APIB0RhjXyObwHQnOzhAk5Bd7mhkSbPkyhP1
...
iWlX9HNavcydATJc1f0DpzF0u4zY8PY24RVoW8vk+bJANPp1o2IAkeajCaF3w9nf
q/SyqAWVmvwYuIhDiHDaV2A==
-----END RSA PRIVATE KEY-----'
Add the key to the ssh-agent:
$ ssh-add - <<< "${PRIVATE_KEY}"
To test, run:
$ ssh -o StrictHostKeyChecking=no root@<YOUR_INSTANCE_IP> whoami

root
Then, create a new directory for the app:
$ ssh -o StrictHostKeyChecking=no root@<YOUR_INSTANCE_IP> mkdir /app
Database
Moving along, let's spin up a production Postgres database via DigitalOcean's Managed Databases:
$ curl -X POST \
    -H 'Content-Type: application/json' \
    -H 'Authorization: Bearer '$DIGITAL_OCEAN_ACCESS_TOKEN'' \
    -d '{"name":"django-docker-db","region":"sfo3","engine":"pg","version":"13","size":"db-s-2vcpu-4gb","num_nodes":1}' \
    "https://api.digitalocean.com/v2/databases"
Check the status:
$ curl \
    -H 'Content-Type: application/json' \
    -H 'Authorization: Bearer '$DIGITAL_OCEAN_ACCESS_TOKEN'' \
    "https://api.digitalocean.com/v2/databases?name=django-docker-db" \
  | jq '.databases[0].status'
It should take a few minutes to spin up. Once the status is online, grab the connection information:
$ curl \
    -H 'Content-Type: application/json' \
    -H 'Authorization: Bearer '$DIGITAL_OCEAN_ACCESS_TOKEN'' \
    "https://api.digitalocean.com/v2/databases?name=django-docker-db" \
  | jq '.databases[0].connection'
Example response:
{
  "protocol": "postgresql",
  "uri": "postgresql://doadmin:v60qcyaito1i0h66@django-docker-db-do-user-778274-0.a.db.ondigitalocean.com:25060/defaultdb?sslmode=require",
  "database": "defaultdb",
  "host": "django-docker-db-do-user-778274-0.a.db.ondigitalocean.com",
  "port": 25060,
  "user": "doadmin",
  "password": "v60qcyaito1i0h66",
  "ssl": true
}
GitHub Actions
To configure GitHub Actions, start by adding a new directory called ".github" in the root of your project. Within that directory add another directory called "workflows". Now, to configure a workflow, which is made up of one or more jobs, create a new file in the "workflows" directory called main.yml.
Build Job
name: Continuous Integration and Delivery

on: [push]

env:
  WEB_IMAGE: ghcr.io/$(echo $GITHUB_REPOSITORY | tr '[:upper:]' '[:lower:]')/web
  NGINX_IMAGE: ghcr.io/$(echo $GITHUB_REPOSITORY | tr '[:upper:]' '[:lower:]')/nginx

jobs:

  build:
    name: Build Docker Images
    runs-on: ubuntu-latest
    steps:
      - name: Checkout master
        uses: actions/checkout@v1
      - name: Add environment variables to .env
        run: |
          echo DEBUG=0 >> .env
          echo SQL_ENGINE=django.db.backends.postgresql >> .env
          echo DATABASE=postgres >> .env
          echo SECRET_KEY=${{ secrets.SECRET_KEY }} >> .env
          echo SQL_DATABASE=${{ secrets.SQL_DATABASE }} >> .env
          echo SQL_USER=${{ secrets.SQL_USER }} >> .env
          echo SQL_PASSWORD=${{ secrets.SQL_PASSWORD }} >> .env
          echo SQL_HOST=${{ secrets.SQL_HOST }} >> .env
          echo SQL_PORT=${{ secrets.SQL_PORT }} >> .env
      - name: Set environment variables
        run: |
          echo "WEB_IMAGE=$(echo ${{env.WEB_IMAGE}} )" >> $GITHUB_ENV
          echo "NGINX_IMAGE=$(echo ${{env.NGINX_IMAGE}} )" >> $GITHUB_ENV
      - name: Log in to GitHub Packages
        run: echo ${PERSONAL_ACCESS_TOKEN} | docker login ghcr.io -u ${{ secrets.NAMESPACE }} --password-stdin
        env:
          PERSONAL_ACCESS_TOKEN: ${{ secrets.PERSONAL_ACCESS_TOKEN }}
      - name: Pull images
        run: |
          docker pull ${{ env.WEB_IMAGE }} || true
          docker pull ${{ env.NGINX_IMAGE }} || true
      - name: Build images
        run: |
          docker-compose -f docker-compose.ci.yml build
      - name: Push images
        run: |
          docker push ${{ env.WEB_IMAGE }}
          docker push ${{ env.NGINX_IMAGE }}
Here, we defined a build job that will be triggered on all pushes where we:
- Set the global
WEB_IMAGEandNGINX_IMAGEenvironment variables - Check out the repository so the job has access to it
- Add environment variables to a .env file
- Set the
WEB_IMAGEandNGINX_IMAGEenvironment variables with so they can be accessed within the Docker Compose file - Log in to GitHub Packages
- Pull the images if they exist
- Build the images
- Push the images up to GitHub Packages
Did you notice the secrets?
secrets.SECRET_KEYsecrets.SQL_DATABASEsecrets.SQL_USERsecrets.SQL_PASSWORDsecrets.SQL_HOSTsecrets.SQL_PORTsecrets.NAMESPACEsecrets.PERSONAL_ACCESS_TOKEN
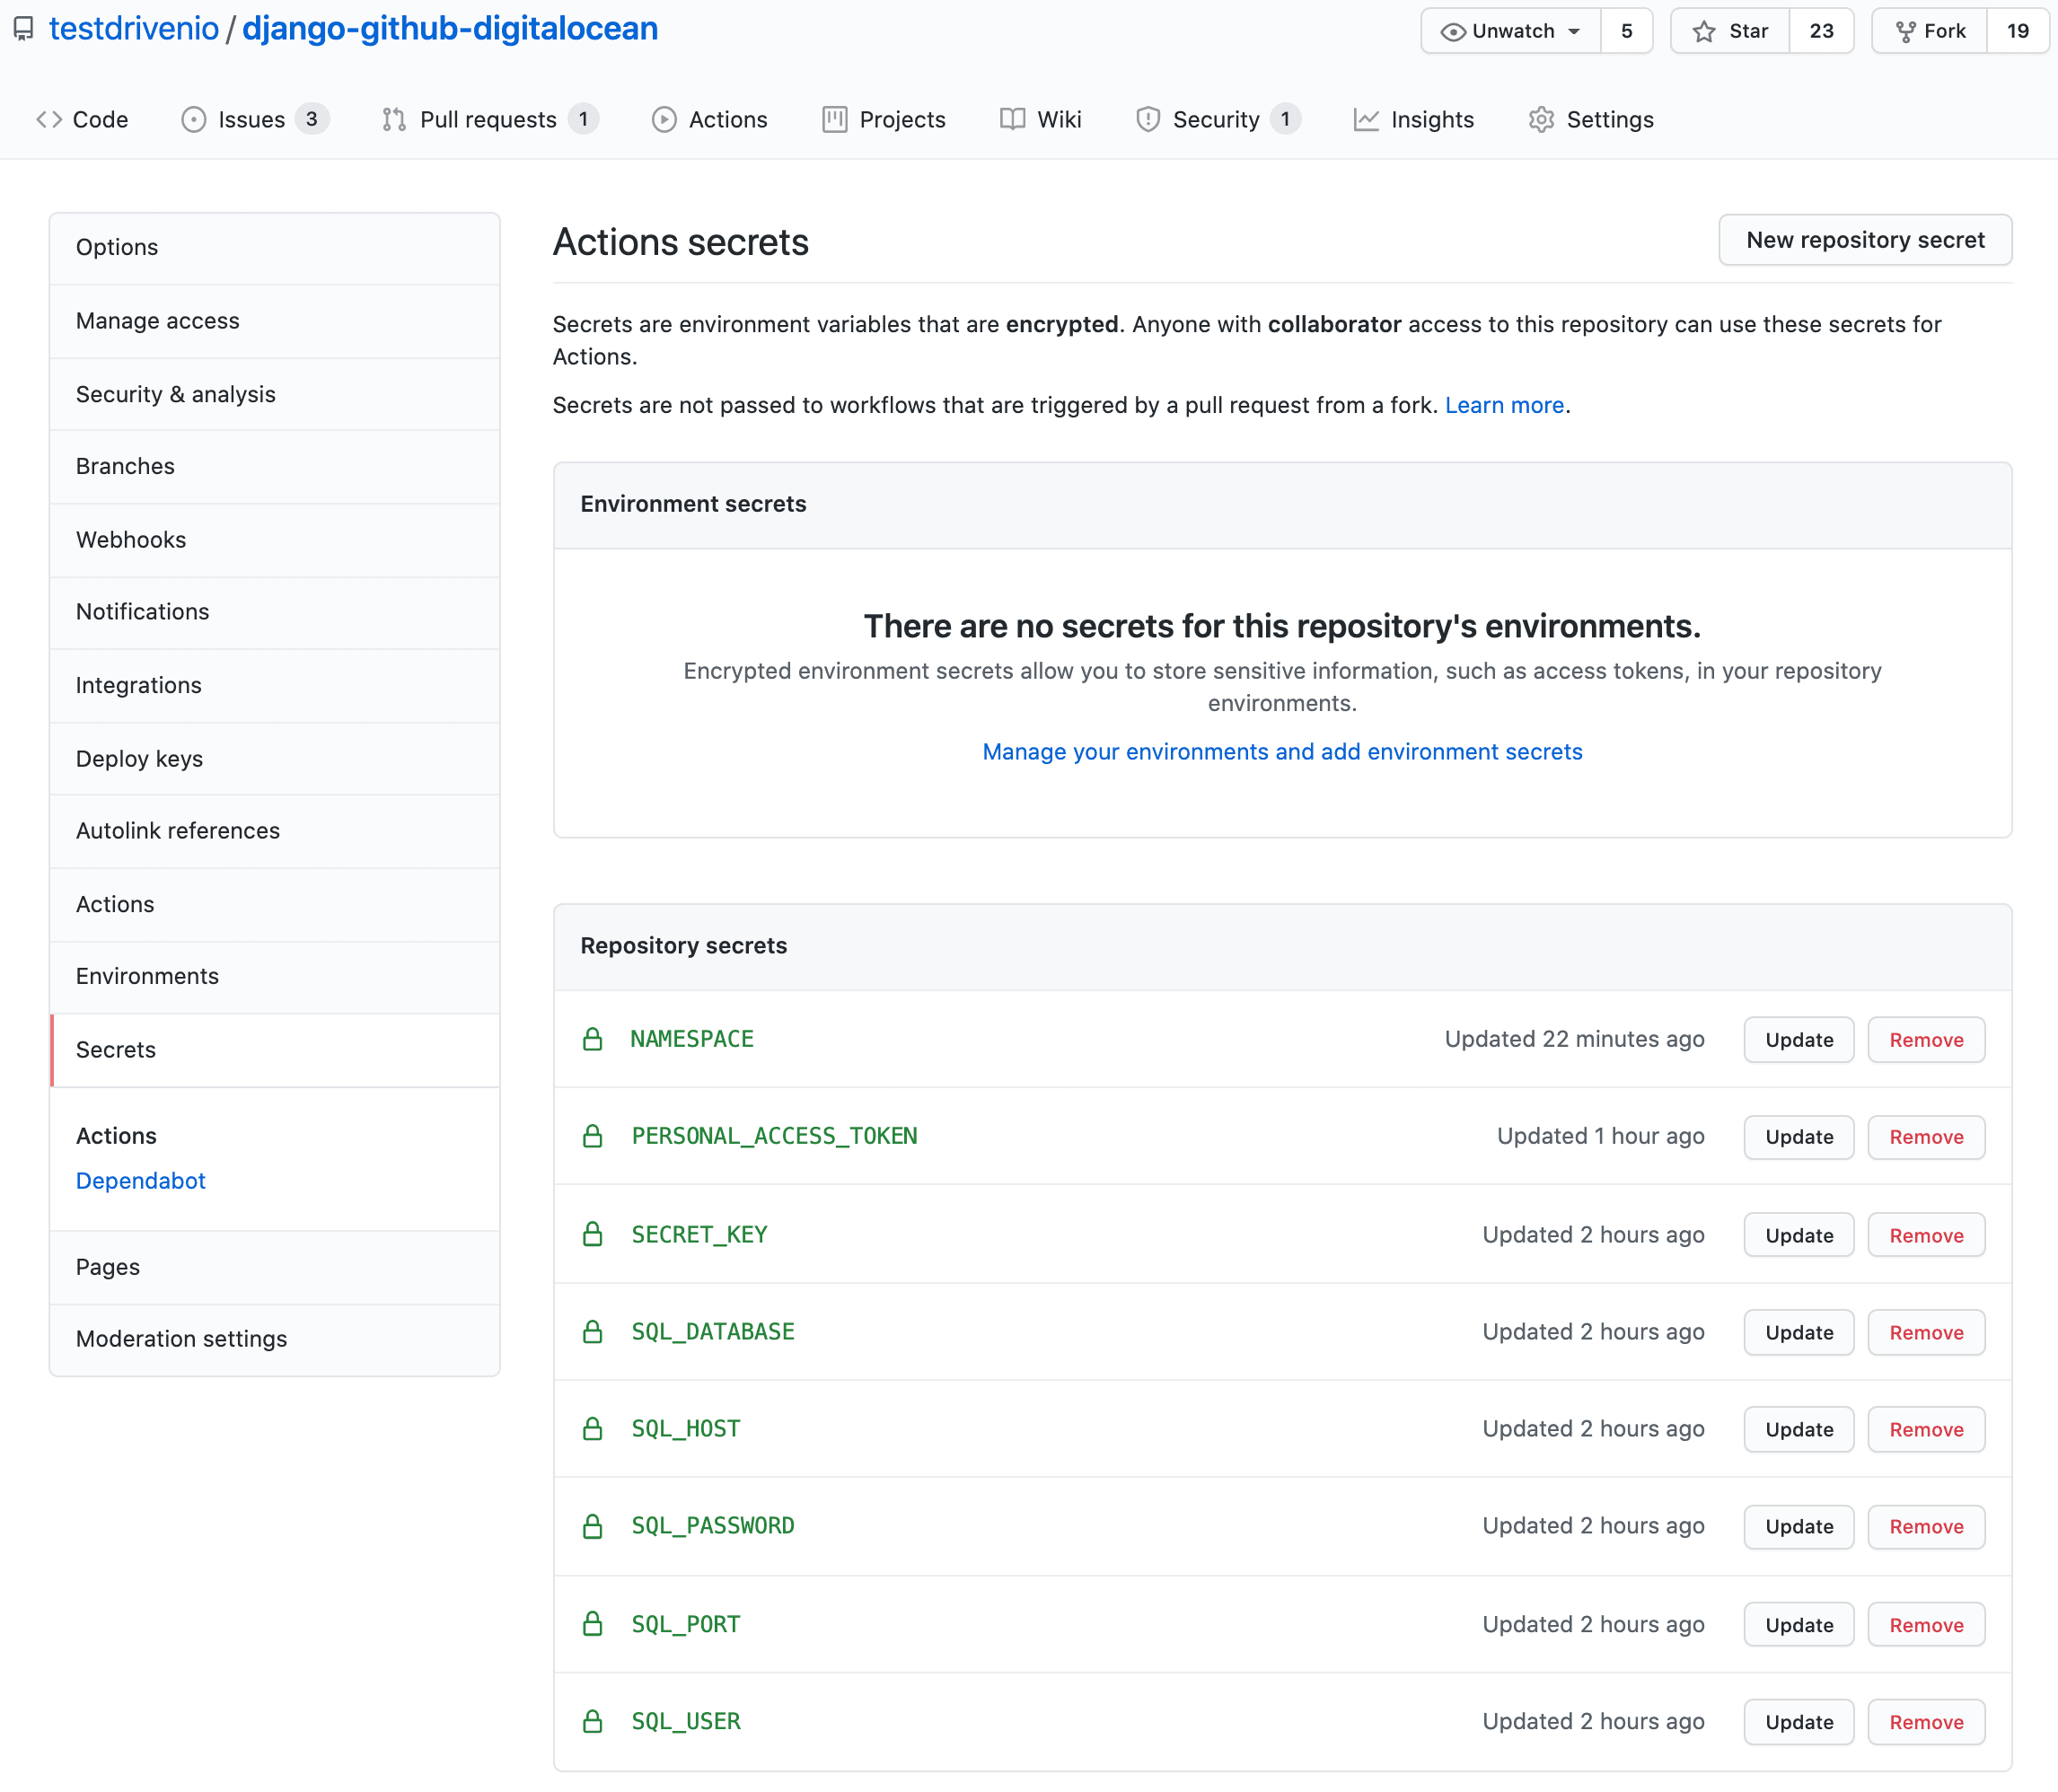
These need to be set in your repository's secrets (Settings > Secrets). Add the first six variables based on the Database connection information from above.
For example:
SECRET_KEY:9zYGEFk2mn3mWB8Bmg9SAhPy6F4s7cCuT8qaYGVEnu7huGRKW9SQL_DATABASE:defaultdbSQL_HOST:django-docker-db-do-user-778274-0.a.db.ondigitalocean.comSQL_PORT:25060SQL_USER:doadminSQL_PASSWORD:v60qcyaito1i0h66
Use your Github username or your org name for NAMESPACE and your personal access token for the PERSONAL_ACCESS_TOKEN variable.
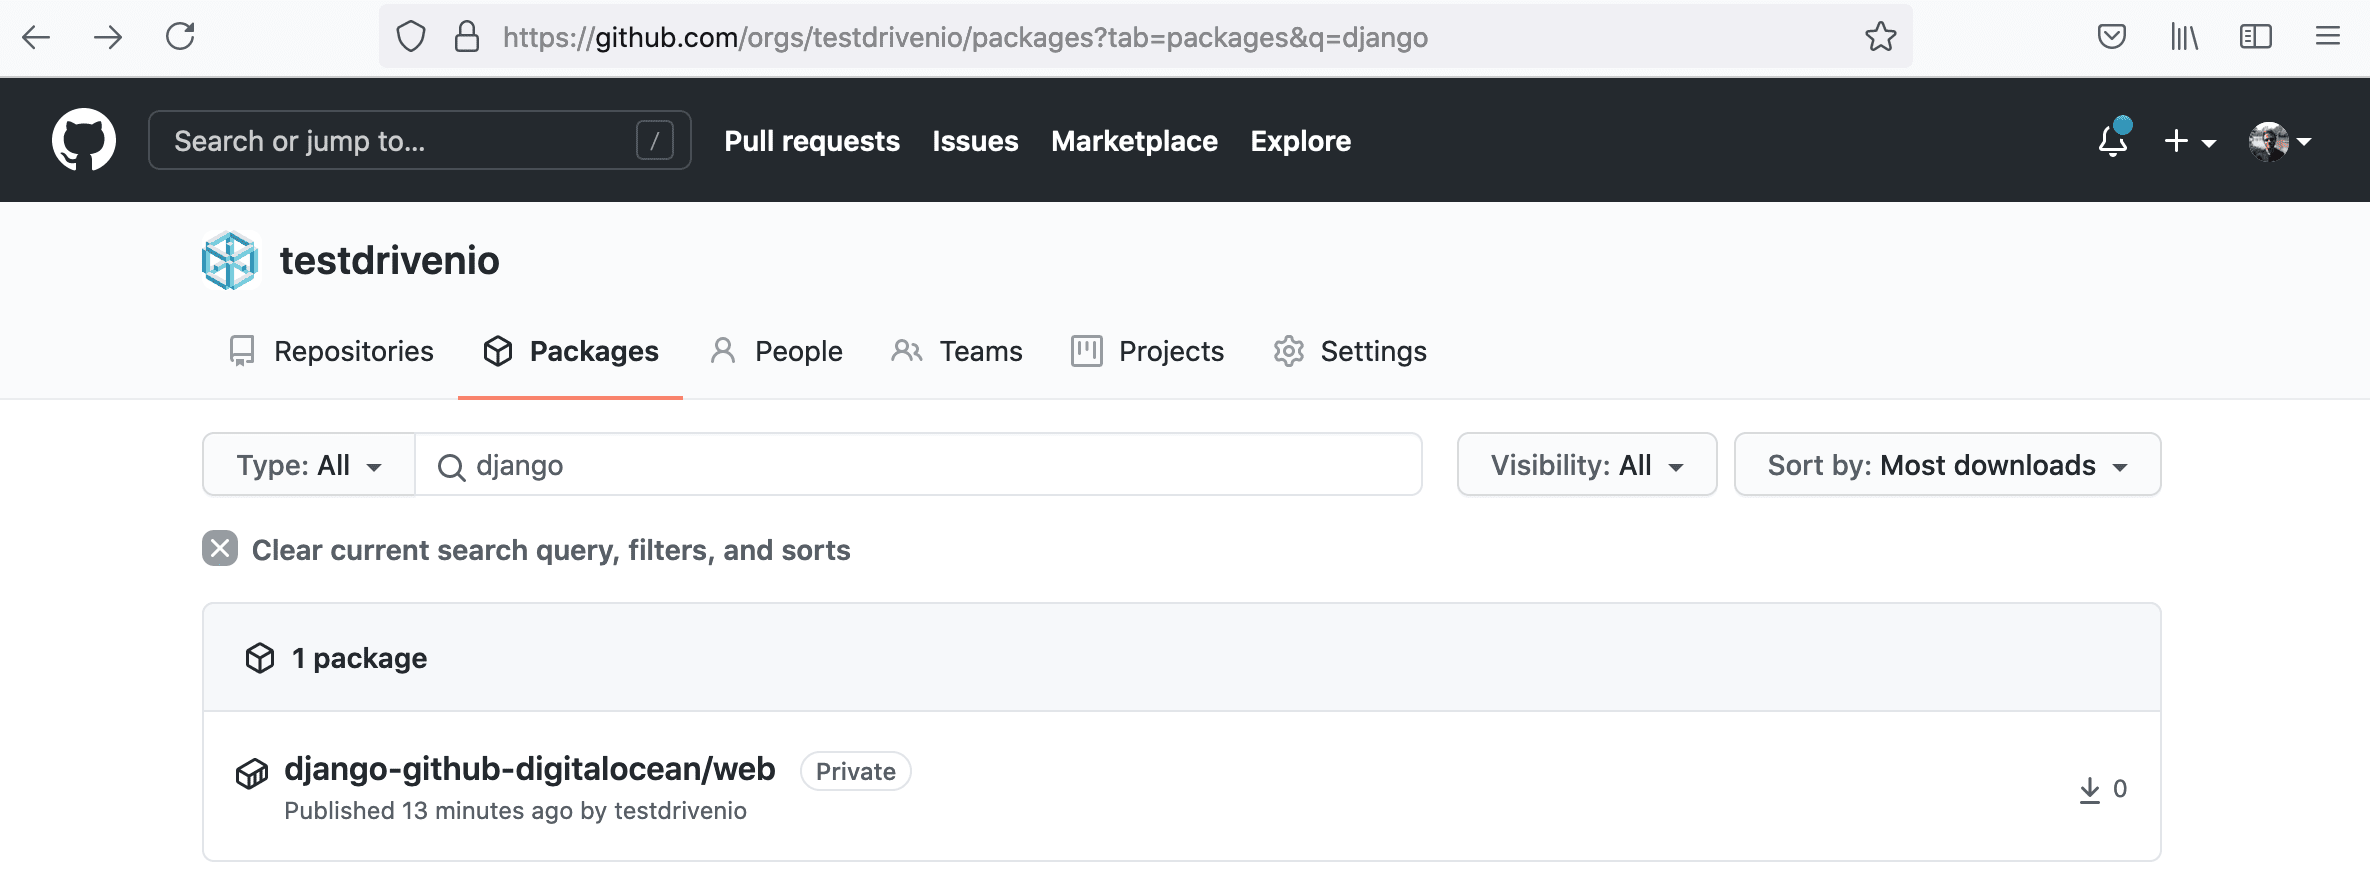
Once done, commit and push your code up to GitHub to trigger a new build. Make sure it passes. You should see the images in GitHub Packages:

Deploy Job
Next, add a deploy job:
deploy:
  name: Deploy to DigitalOcean
  runs-on: ubuntu-latest
  needs: build
  steps:
    - name: Checkout master
      uses: actions/checkout@v1
    - name: Add environment variables to .env
      run: |
        echo DEBUG=0 >> .env
        echo SQL_ENGINE=django.db.backends.postgresql >> .env
        echo DATABASE=postgres >> .env
        echo SECRET_KEY=${{ secrets.SECRET_KEY }} >> .env
        echo SQL_DATABASE=${{ secrets.SQL_DATABASE }} >> .env
        echo SQL_USER=${{ secrets.SQL_USER }} >> .env
        echo SQL_PASSWORD=${{ secrets.SQL_PASSWORD }} >> .env
        echo SQL_HOST=${{ secrets.SQL_HOST }} >> .env
        echo SQL_PORT=${{ secrets.SQL_PORT }} >> .env
        echo WEB_IMAGE=${{ env.WEB_IMAGE }} >> .env
        echo NGINX_IMAGE=${{ env.NGINX_IMAGE }} >> .env
        echo NAMESPACE=${{ secrets.NAMESPACE }} >> .env
        echo PERSONAL_ACCESS_TOKEN=${{ secrets.PERSONAL_ACCESS_TOKEN }} >> .env
    - name: Add the private SSH key to the ssh-agent
      env:
        SSH_AUTH_SOCK: /tmp/ssh_agent.sock
      run: |
        mkdir -p ~/.ssh
        ssh-agent -a $SSH_AUTH_SOCK > /dev/null
        ssh-keyscan github.com >> ~/.ssh/known_hosts
        ssh-add - <<< "${{ secrets.PRIVATE_KEY }}"
    - name: Build and deploy images on DigitalOcean
      env:
        SSH_AUTH_SOCK: /tmp/ssh_agent.sock
      run: |
        scp  -o StrictHostKeyChecking=no -r ./.env ./docker-compose.prod.yml root@${{ secrets.DIGITAL_OCEAN_IP_ADDRESS }}:/app
        ssh -o StrictHostKeyChecking=no root@${{ secrets.DIGITAL_OCEAN_IP_ADDRESS }} << 'ENDSSH'
          cd /app
          source .env
          docker login ghcr.io -u $NAMESPACE -p $PERSONAL_ACCESS_TOKEN
          docker pull $WEB_IMAGE
          docker pull $NGINX_IMAGE
          docker-compose -f docker-compose.prod.yml up -d
        ENDSSH
So, in the deploy job, which only runs if the build job completes successfully (via needs: build), we:
- Check out the repository so the job has access to it
- Add environment variables to a .env file
- Add the private SSH key to the ssh-agent and run the agent
- Copy over the .env and docker-compose.prod.yml files to the remote server
- SSH to the remove server on DigitalOcean
- Navigate to the deployment directory and set the environment variables
- Log in to GitHub Packages
- Pull the images
- Spin up the containers
- End the SSH session
Add the DIGITAL_OCEAN_IP_ADDRESS and PRIVATE_KEY secrets to GitHub. Then, add the server's IP to the ALLOWED_HOSTS list in the Django settings.
Commit and push your code to trigger a new build. Once the build passes, navigate to the IP of your instance. You should see:
{
  "hello": "world"
}
Test
Finally, update the deploy job by adding if: github.ref == 'refs/heads/master' just below needs: build so that it only runs when changes are made to the master branch:
deploy:
  name: Deploy to DigitalOcean
  runs-on: ubuntu-latest
  needs: build
  if: github.ref == 'refs/heads/master'
  steps:
    - name: Checkout master
      uses: actions/checkout@v1
    - name: Add environment variables to .env
      run: |
        echo DEBUG=0 >> .env
        echo SQL_ENGINE=django.db.backends.postgresql >> .env
        echo DATABASE=postgres >> .env
        echo SECRET_KEY=${{ secrets.SECRET_KEY }} >> .env
        echo SQL_DATABASE=${{ secrets.SQL_DATABASE }} >> .env
        echo SQL_USER=${{ secrets.SQL_USER }} >> .env
        echo SQL_PASSWORD=${{ secrets.SQL_PASSWORD }} >> .env
        echo SQL_HOST=${{ secrets.SQL_HOST }} >> .env
        echo SQL_PORT=${{ secrets.SQL_PORT }} >> .env
        echo WEB_IMAGE=${{ env.WEB_IMAGE }} >> .env
        echo NGINX_IMAGE=${{ env.NGINX_IMAGE }} >> .env
        echo NAMESPACE=${{ secrets.NAMESPACE }} >> .env
        echo PERSONAL_ACCESS_TOKEN=${{ secrets.PERSONAL_ACCESS_TOKEN }} >> .env
    - name: Add the private SSH key to the ssh-agent
      env:
        SSH_AUTH_SOCK: /tmp/ssh_agent.sock
      run: |
        mkdir -p ~/.ssh
        ssh-agent -a $SSH_AUTH_SOCK > /dev/null
        ssh-keyscan github.com >> ~/.ssh/known_hosts
        ssh-add - <<< "${{ secrets.PRIVATE_KEY }}"
    - name: Build and deploy images on DigitalOcean
      env:
        SSH_AUTH_SOCK: /tmp/ssh_agent.sock
      run: |
        scp  -o StrictHostKeyChecking=no -r ./.env ./docker-compose.prod.yml root@${{ secrets.DIGITAL_OCEAN_IP_ADDRESS }}:/app
        ssh -o StrictHostKeyChecking=no root@${{ secrets.DIGITAL_OCEAN_IP_ADDRESS }} << 'ENDSSH'
          cd /app
          source .env
          docker login ghcr.io -u $NAMESPACE -p $PERSONAL_ACCESS_TOKEN
          docker pull $WEB_IMAGE
          docker pull $NGINX_IMAGE
          docker-compose -f docker-compose.prod.yml up -d
        ENDSSH
To test, create a new develop branch. Add an exclamation point after world in urls.py:
def home(request):
    return JsonResponse({"hello": "world!"})
Commit and push your changes to GitHub. Ensure only the build job runs. Once the build passes open a PR against the master branch and merge the changes. This will trigger a new build with both stages -- build and deploy. Ensure the deploy works as expected:
{
  "hello": "world!"
}
--
That's it! You can find the final code in the django-github-digitalocean repo.