 Jace Medlin
How can I combine Vue.js with Flask?
So you've finally got Flask under your belt, and you're no stranger to JavaScript. You've even developed a few web applications, but you start to realize something -- you have excellent functionality, but your UX is kind of bland. Where's the application flow and seamless navigation you see on many popular websites and apps today? How can that be achieved?
As you become more invested in your websites and web apps, you'll probably want to add more client-side functionality and reactivity to them. Modern web development typically achieves this through the use of front-end frameworks, and one such framework that is quickly rising in popularity is Vue (also known as Vue.js or VueJS).
Depending on your project's requirements, there are a few different ways to build a web application with Flask and Vue, and they each involve various levels of back-end/front-end separation.
In this article, we'll take a look at three different methods for combining Flask and Vue:
- Jinja Template: Importing Vue into a Jinja template
- Single-Page Application: Building a Single-Page Application (SPA) to completely separate Flask and Vue
- Flask Blueprint: Serving up Vue from a Flask blueprint to partially separate the two
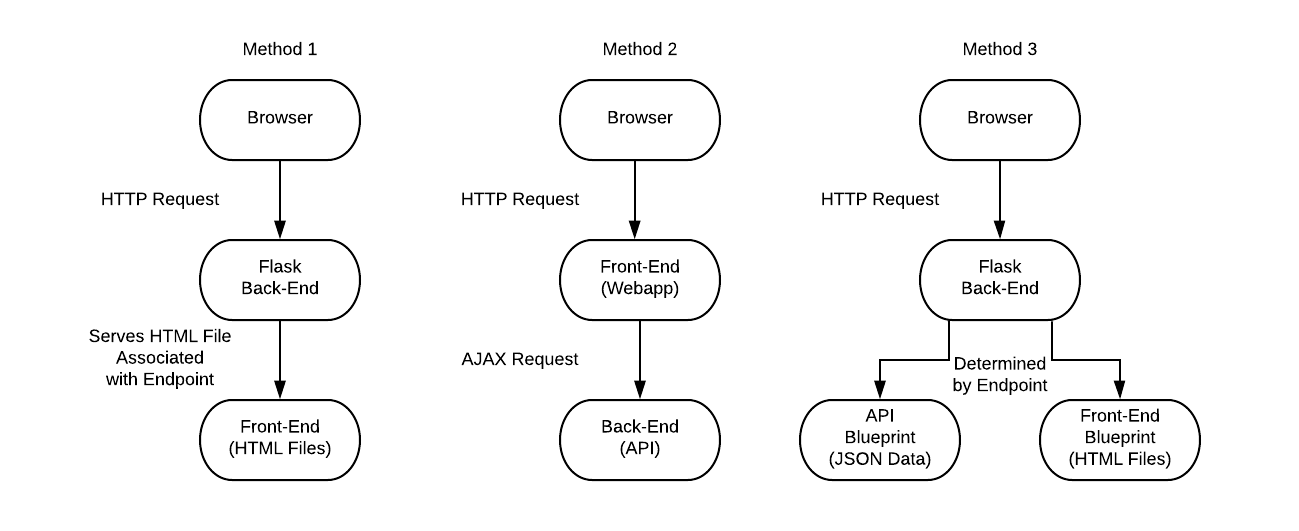
We'll analyze the pros and cons of each method, look at their best use cases, and detail how to set each of them up.
Contents
Jinja Template
Regardless of whether you're using React, Vue, or Angular, this is the easiest way to transition to using a front-end framework.
In many cases, when you're building a front-end for your web app, you design it around the front-end framework itself. With this method, however, the focus is still on your back-end Flask application. You'll still use Jinja and server-side templating along with a bit of reactive functionality with Vue if and when you need it.
You can import the Vue library either through a Content Delivery Network (CDN) or by serving it yourself along with your app, while setting up and routing Flask as you would normally.
Pros
- You can build your app your way instead of fitting it around Vue's foundation.
- Search Engine Optimization (SEO) doesn't require any additional configuring.
- You can take advantage of cookie-based authentication instead of token-based authentication. This tends to be easier, as you're not dealing with asynchronous communication between the front and back end.
Cons
- You have to import Vue on and set up each page individually, which can be difficult if you start adding Vue to more and more pages. It may require a number of workarounds as well since it's not really the intended way to use either Flask or Vue.
Best For
- Small web apps literally using a single HTML page or two (as opposed to a SPA with its own dynamic routing -- see the SPA method for more info).
- Building functionality into an already existing web app.
- Adding bits of reactivity to an app without fully committing to a front-end framework.
- Web apps that don't need to communicate as frequently to a back-end via AJAX.
Additional Dependencies
This method just requires the Vue library, which you can add via a CDN:
<script src="https://cdn.jsdelivr.net/npm/vue/dist/vue.js"></script>
Setup
Out of all the methods, this setup is the simplest.
Create a folder to hold all of your app's code. Inside of that folder, create an app.py file as you would normally:
from flask import Flask, render_template # These are all we need for our purposes

app = Flask(__name__)

@app.route("/")
def index():
    return render_template("index.html", **{"greeting": "Hello from Flask!"})
We only need to import Flask and render_template from flask.
The greeting variable will come up again in a second when we look at how to render variables with both Jinja and Vue in the same file.
Next, create a "templates" folder to hold our HTML file. Inside of that folder, create an index.html file. In the body of our HTML file, create a container div with an id of vm.
It's worth noting that
vmis just a common naming standard. It stands for ViewModel. You can name it whatever you want; it does not need to bevm.
Within the div, create two p tags to serve as placeholders for our Flask and Vue variables:
- One of the
divs should contain the word 'greeting' surrounded by braces:{{ greeting }}. - The other should contain 'greeting' surrounded by brackets:
[[ greeting ]].
If you don't use separate delimiters, with the default setup, Flask will replace both greetings with whatever variable you pass with it (i.e., "Hello from Flask!").
Here's what we have thus far:
<body>
<!-- The id 'vm' is just for consistency - it can be anything you want -->
    <div id="vm">
        <p>{{ greeting }}</p>
        <p>[[ greeting ]]</p>
    </div>
</body>
Before the end of the body tag, import Vue from the official CDN along with a script to hold our JavaScript code:
<body>
<!-- The id 'vm' is just for consistency - it can be anything you want -->
    <div id="vm">
        <p>{{ greeting }}</p>
        <p>[[ greeting ]]</p>
    </div>
    <script src="https://cdn.jsdelivr.net/npm/vue/dist/vue.js"></script>
    <script src="{{ url_for('static', filename='index.js') }}"></script>
</body>
Navigating up a directory, create a "static" folder. Add a new JavaScript file in that folder called index.js.
In this file, create the Vue context, set our instance's el as '#vm', change the default delimiters from '{{', '}}' to '[[', ']]':
const vm = new Vue({ // Again, vm is our Vue instance's name for consistency.
    el: '#vm',
    delimiters: ['[[', ']]']
})
In reality, we can use anything we want as our delimiters. In fact, if it's your preference, you can change the delimiters for your Jinja templates in Flask instead.
Finally, add a data element with the key/value of greeting: 'Hello, Vue!':
const vm = new Vue({ // Again, vm is our Vue instance's name for consistency.
    el: '#vm',
    delimiters: ['[[', ']]'],
    data: {
        greeting: 'Hello, Vue!'
    }
})
And now we're done with that file. Your final folder structure should look something like:
├───app.py
├───static
│   └───index.js
└───templates
    └───index.html
Now you can go back to you root project folder and run the app with flask run. Navigate to the site in your browser. The first and second line should have been replaced by Flask and Vue, respectively:
Hello from Flask!
Hello, Vue!
That's it! You can mix and match JSON endpoints and HTML endpoints as you please, but be aware that this can get really ugly really quickly. For a more manageable alternative, see the Flask Blueprint method.
With each additional HTML page, you'll have to either import the same JavaScript file and account for variables and elements that may not apply to it or create a new Vue object for each page. A true SPA will be difficult, but not impossible -- theoretically you could write a tiny JavaScript library that will asynchronously grab HTML pages/elements served by Flask.
I've actually created my own JavaScript library for this before. It was a big hassle and honestly not worth it, especially considering JavaScript will not run script tags imported this way, unless you build the functionality yourself. You'll also be reinventing the wheel.
If you'd like to check out my implementation of this method, you can find it on GitHub. The library takes a given chunk of HTML and replaces the specified HTML on the page with it. If the given HTML contains no
<script>elements (it checks using regex), it simply usesHTMLElement.innerHTMLto replace it. If it does contain<script>elements, it recursively adds the nodes, recreating any<script>nodes that come up, allowing your JavaScript to run.Using something like this in combination with the History API can help you build a small SPA with a very tiny file size. You can even create your own Server-Side Rendering (SSR) functionality by serving full HTML pages on page load and then serve up partial pages through AJAX requests. You can learn more about SSR in the SPA with Nuxt method.
Single-Page Application
If you want to build a fully dynamic web app with a seamless User Experience (UX), you can completely separate your Flask back-end from your Vue front-end. This may take learning a whole new way of thinking when it comes to web app design if you're not familiar with modern front-end frameworks.
Developing your app as a SPA may put a dent in your SEO. In the past, this hit would be much more dramatic, but updates to how Googlebot indexes sites have negated this at least somewhat. It may, however, still have a greater impact on non-Google search engines that don't render JavaScript or those that snapshot your page(s) too early -- the latter shouldn't happen if your website is well-optimized.
For more information on SEO in modern SPAs, this article on Medium shows how Googlebot indexes JavaScript-rendered sites. Additionally, this article talks in-depth about the same thing along with other helpful tips concerning SEO on other search engines.
With this method, you'll want to generate a completely separate Vue app using the Vue CLI tool. Flask will then be used to serve up a JSON RESTful API that your Vue SPA will communicate with via AJAX.
Pros
- Your front- and back-end will be completely independent of each other, so you can make changes to one without it impacting the other.
- This allows them to be deployed, developed, and maintained separately.
- You can even set up a number of other front-ends to interact with your Flask API if you'd like.
- Your front-end experience will be much smoother and more seamless.
Cons
- There is much more to set up and learn.
- Deployment is difficult.
- SEO might suffer without further intervention (see the SPA with Nuxt method for more details).
- Authentication is much more involved, as you'll have to keep passing your auth token (JWT or Paseto) to your back-end.
Best For
- Apps where UX is more important than SEO.
- Back-ends that need to be accessible by multiple front-ends.
Additional Dependencies
- Node/npm
- Vue CLI
- Flask-CORS
Deployment and containerization are outside of the scope of this article, but it's not terribly difficult to Dockerize this setup to simplify deployment.
Setup
Because we're completely separating Vue from Flask, this method requires a bit more setup. We'll need to enable Cross-Origin Resource Sharing (CORS) in Flask, since our front- and back-end will be served on separate ports. To accomplish this quickly and easily, we'll use the Flask-CORS Python package.
For security reasons, modern web browsers do not allow client-side JavaScript to access resources (such as JSON data) from an origin differing from the origin your script is on unless they include a specific response header letting the browser know it's okay.
If you haven't yet installed Flask-CORS, do so with pip.
Let's start with our Flask API.
First, create a folder to hold the code for your project. Inside, create a folder called "api". Create an app.py file in the folder. Open the file with your favorite text editor. This time we'll need to import Flask from flask and CORS from flask_cors. Because we're using flask_cors to enable cross-origin resource sharing, wrap the app object (without setting a new variable) with CORS: CORS(app). That's all we have to do to enable CORS on all of our routes for any origin.
Although this is fine for demonstration purposes, you probably aren't going to want just any app or website to be able to access your API. In that case, you can use the kwarg 'origins' with the CORS function to add a list of acceptable origins -- i.e.,
CORS(app, origins=["origin1", "origin2"])For more information on Cross-Origin Resource Sharing, MDN has some great documentation on it.
Lastly, create a single greeting route at /greeting to return a JSON object with a single key/value:
{"greeting": "Hello from Flask!"}
Here's what you should have ended up with:
from flask import Flask
from flask_cors import CORS

app = Flask(__name__)
CORS(app)

@app.route("/greeting")
def greeting():
    return {"greeting": "Hello from Flask!"}
That's all we need to do with Python.
Next, we'll set up our Vue webapp. From a terminal, open your project's root folder. Using the Vue CLI, create a Vue project called "webapp" (vue create webapp). You can use pretty much whatever options you like, but if you're using class-based components in TypeScript, the syntax will look a bit different.
When your project is finished being created, open App.vue.
Since our goal is just to see how Vue and Flask interact with each other, at the top of the page, delete all elements within the div with the id of app. You should just be left with:
<template>
<div id="app">
</div>
</template>
Within #app, create two p elements:
- The content of the first should be
{{ greeting }}. - The content of the second should be
{{ flaskGreeting }}.
Your final HTML should be as such:
<template>
<div id="app">
    <p>{{ greeting }}</p>
    <p>{{ flaskGreeting }}</p>
</div>
</template>
In our script, let's add logic to show a purely client-side greeting (greeting) and a greeting pulled from our API (flaskGreeting).
Within the Vue object (it begins with export default), create a data key. Make it a function that returns an object. Then, within this object, create two more keys: greeting and flaskGreeting. greeting's value should be 'Hello, Vue!' while flaskGreeting's should be an empty string.
Here's what we have thus far:
export default {
    name: 'App',
    components: {
        HelloWorld
    },
    data: function(){
        return {
            greeting: 'Hello, Vue!',
            flaskGreeting: ''
        }
    }
}
Finally, let's give our Vue object a created lifecycle hook. This hook will only be run once the DOM is loaded and our Vue object is created. This allows us to use the fetch API and interact with Vue without anything clashing:
export default {
    components: {
        Logo
    },
    data: function(){
        return {
            greeting: 'Hello, Vue!',
            flaskGreeting: ''
        }
    },
    created: async function(){
        const gResponse = await fetch("http://localhost:5000/greeting");
        const gObject = await gResponse.json();
        this.flaskGreeting = gObject.greeting;
    }
}
Looking at the code, we're awaiting a response to our API's 'greeting' endpoint (http://localhost:5000/greeting), awaiting that response's asynchronous .json() response, and setting our Vue object's flaskGreeting variable to the returned JSON object's value for its greeting key.
For those unfamiliar with JavaScript's relatively new Fetch API, it's basically a native AXIOS killer (at least as far as the client-side is concerned -- it's not supported by Node, but it will be by Deno). Additionally, if you like consistency, you can also check out the isomorphic-fetch package in order to use Fetch on the server-side.
And we're finished. Now because, again, our front- and back-end are separate, we'll need to run both of our apps separately.
Let's open our project's root folder in two separate terminal windows.
In the first, change into the "api" directory, and then run flask run. If all goes well, the Flask API should be running. In the second terminal, change into the "webapp" directory and run npm run serve.
Once the Vue app is up, you should be able to access it from localhost:8080. If everything works, you should be greeted twice -- once by Vue, and again from your Flask API:
Hello, Vue!
Hello from Flask!
Your final file tree should look like:
├───app.py
├───api
│   └───app.py
└───webapp
    ... {{ Vue project }}
Single-Page Application with Nuxt
If SEO is as important to you as UX, you might want to implement Server-Side Rendering (SSR) in some format.
SSR makes it easier for search engines to navigate and index your Vue app, as you'll be able to give them a form of your app that doesn't require JavaScript to generate. It can also make it quicker for users to interact with your app, since much of your initial content will be rendered before it's sent to them. In other words, users will not have to wait for all of your content to load asynchronously.
A Single-Page App with Server-Side Rendering is also called a Universal App.
Although it's possible to implement SSR manually, we'll use Nuxt in this article; it greatly simplifies things.
Just like with the SPA method, your front- and back-end will be completely separate; you'll just be using Nuxt instead of the Vue CLI.
Pros
- All of the pros of the SPA method with the addition of Server-Side Rendering.
Cons
- About as difficult to set up as the SPA method.
- Conceptually, there's even more to learn as Nuxt is essentially just another layer on top of Vue.
Best For
- Apps where SEO is as important as UX.
Additional Dependencies
- Node/npm
- Nuxt
- Flask-CORS
Setup
This is going to be very similar to the SPA method. In fact, the Flask portion is the exact same. Follow along with it until you have created your Flask API.
Once your API is finished, within your terminal, open your project's root folder and run the command npx create-nuxt-app webapp. This will let you interactively generate a new Nuxt project without installing any global dependencies.
Any options should be fine here.
Once your project is done being generated, dive into your new "webapp" folder. Within the "pages" folder, open index.vue in your text editor. Similarly, delete everything within the div that has the class container. Inside the div, create two p tags with the same vars: {{ greeting }} and {{ flaskGreeting }}.
It should look like this:
<template>
<div class="container">
    <p>{{ greeting }}</p>
    <p>{{ flaskGreeting }}</p>
</div>
</template>
And now for our script:
- Add a
datakey that returns an object with the variablesgreetingandflaskGreeting - Add a
createdlifecycle hook:awaitfetchto get the JSON greeting from our API (on port 5000 unless you changed it)awaitthejson()method to asynchronously get our JSON data from our API's response- Set our Vue instance's
flaskGreetingto thegreetingkey from our response's JSON object
The Vue object should look like:
export default {
    components: {
        Logo
    },
    data: function(){
        return {
            greeting: 'Hello, Vue!',
            flaskGreeting: ''
        }
    },
    created: async function(){
        const gResponse = await fetch("http://localhost:5000/greeting");
        const gObject = await gResponse.json();
        this.flaskGreeting = gObject.greeting;
    }
}
Running the Nuxt/Vue app and Flask API will look very similar to the the SPA method as well.
Open two terminal windows. Within the first, change into "api" and run the flask run command. Within the second, change into "webapp" and run npm run dev to start a development server for your Nuxt project.
Once the Nuxt app is up, you should be able to access it from localhost:3000:
Hello, Vue!
Hello from Flask!
In production you can run
npm run buildand thennpm run startto start a production server.
Our final tree:
├───app.py
├───api
│   └───app.py
└───webapp
    ... {{ Nuxt project }}
BONUS: Vue vs Nuxt SEO Comparison
I mentioned the benefits of SEO earlier in this article, but just to show you what I meant, I ran both web apps as-is and grabbed the Lighthouse SEO scores for both.
With no changes to either app, here's what we have:

Again, there are things you can do to improve your pure Vue SEO score. Lighthouse in Chrome's dev tools mentions adding a meta description, but with no additional intervention, Nuxt gave us a perfect SEO score.
Additionally, you can actually see the difference between the SSR that Nuxt does and vanilla Vue's completely asynchronous approach. If you run both apps at the same time, navigate to their respective origins, localhost:8080 and localhost:3000, the Vue app's initial greeting happens milliseconds after you get the response, whereas Nuxt's is served with its initial greeting already-rendered.
For more information on the differences between Nuxt and Vue, you can check out these articles:
Flask Blueprint
Perhaps you already have a small Flask app developed and you want to build a Vue app as more of a means to an end rather than as the main event.
Examples:
- Prototype to demonstrate functionality to your employer or client (you can always replace this or hand it off to a front-end developer later on).
- You just don't want to deal with the potential frustration that could result when deploying completely separate front- and back-end.
In that case you could sort-of meet in the middle by keeping your Flask app, but building on a Vue front-end within its own Flask blueprint.
This will look a lot like the Jinja Template method, but the code will be more organized.
Pros
- No need to build a complex front-end if it isn't necessary.
- Similar to the Jinja Template method with the added benefit of better code organization.
- You can always expand the front- and back-end as needed later on.
Cons
- Workarounds might be necessary to allow a full SPA.
- Accessing the API might be slightly more annoying from a separate front-end (such as a mobile app) as the front- and back-end are not completely separate.
Best For
- Projects where functionality is more important than UI.
- You're building a front-end onto an already-existing Flask app.
- Small web apps that are made up of only a couple of HTML pages.
Additional Dependencies
Similarly to the Jinja Template method, we will be using a CDN to pull in the Vue library:
<script src="https://cdn.jsdelivr.net/npm/vue/dist/vue.js"></script>
Setup
Like the other methods, create a new folder to house your code. Inside of it, create two folders: "api" and "client". Intuitively, these will contain the blueprints for our API and client (Vue), respectively.
Let's dive into the "api" folder.
Create a file called api.py. This will contain all of the code associated with our API. Additionally, because we will be accessing this file/folder as a module, create an __init__.py file:
from flask import Blueprint

api_bp = Blueprint('api_bp', __name__) # "API Blueprint"

@api_bp.route("/greeting") # Blueprints don't use the Flask "app" context. They use their own blueprint's
def greeting():
    return {'greeting': 'Hello from Flask!'}
The first argument to Blueprint is for Flask's routing system. The second, __name__, is equivalent to a Flask app's first argument (Flask(__name__)).
And that's it with our API blueprint.
Okay. Let's dive into the "client" folder we created earlier. This one's going to be a little more involved than our API blueprint, but no more complicated than a regular Flask app.
Again, like a regular Flask app, inside this folder, create a "static" folder and a "templates" folder. Create a file called client.py and open it in your text editor.
This time, we'll pass in a few more arguments to our Blueprint so it knows where to find the correct static files and templates:
client_bp = Blueprint('client_bp', __name__, # 'Client Blueprint'
    template_folder='templates', # Required for our purposes
    static_folder='static', # Again, this is required
    static_url_path='/client/static' # Flask will be confused if you don't do this
)
Add the route as well to serve up the index.html template:
from flask import Blueprint, render_template

client_bp = Blueprint("client_bp", __name__, # 'Client Blueprint'
    template_folder="templates", # Required for our purposes
    static_folder="static", # Again, this is required
    static_url_path="/client/static" # Flask will be confused if you don't do this
)

@client_bp.route("/")
def index():
    return render_template("index.html")
Excellent. Our client blueprint is now finished. Exit the file and turn to the blueprint's "templates" folder. Create an index.html file:
<body>
<!-- The id 'vm' is just for consistency - it can be anything you want -->
    <div id="vm" class="container">
        <p>[[ greeting ]]</p>
        <p>[[ flaskGreeting ]]</p>
    </div>
    <script src="https://cdn.jsdelivr.net/npm/[email protected]"></script>
    <script src="{{ url_for('client_bp.static', filename='index.js') }}"></script>
</body>
Did you notice that we're using brackets instead of braces? It's because we need to change the delimiters to keep Flask from catching them first.
greeting will be rendered by Vue as soon as it's ready, while flaskGreeting will be taken from a Flask response that we'll request asynchronously.
Done. Add a new file to the "static" folder called index.js. Create a variable called apiEndpoint and set it to api_v1. This just makes everything a little more DRY if we decide to change our endpoint later on:
const apiEndpoint = '/api_v1/';
We haven't created the logic for our endpoint yet. That will come in the last step.
Next, start by making the Vue context look identical to the context in the Jinja Template method:
const apiEndpoint = '/api_v1/';

const vm = new Vue({ // Again, vm is our Vue instance's name for consistency.
    el: '#vm',
    delimiters: ['[[', ']]'],
    data: {
        greeting: 'Hello, Vue!'
    }
})
Again, we created the Vue context, set our instance's el as '#vm', changed the default delimiters from '{{', '}}' to '[[', ']]', and added a data element with the key/value of greeting: 'Hello, Vue!'.
Because we're also going to pull a greeting from our API, create a data placeholder called flaskGreeting with the value of an empty string:
const apiEndpoint = '/api_v1/';

const vm = new Vue({
    el: '#vm',
    delimiters: ['[[', ']]'],
    data: {
        greeting: 'Hello, Vue!',
        flaskGreeting: ''
    }
})
Let's give our Vue object an asynchronous created lifecycle hook:
const apiEndpoint = '/api_v1/';

const vm = new Vue({
    el: '#vm',
    delimiters: ['[[', ']]'],
    data: {
        greeting: 'Hello, Vue!',
        flaskGreeting: ''
    },
    created: async function(){
        const gResponse = await fetch(apiEndpoint + 'greeting');
        const gObject = await gResponse.json();
        this.flaskGreeting = gObject.greeting;
    }
})
Looking at the code, we're awaiting a response from our API's 'greeting' endpoint (/api_v1/greeting), awaiting that response's asynchronous .json() response, and setting our Vue object's flaskGreeting variable to the returned JSON object's value for its greeting key. It's basically a mashup between the Vue objects from methods 1 and 2.
Excellent. Only one thing left to do: Let's put everything together by adding an app.py to the project root. Within the file, import flask along with the blueprints:
from flask import Flask
from api.api import api_bp
from client.client import client_bp
Create a Flask app as you would normally and register the blueprints using app.register_blueprint():
from flask import Flask
from api.api import api_bp
from client.client import client_bp

app = Flask(__name__)
app.register_blueprint(api_bp, url_prefix='/api_v1')
app.register_blueprint(client_bp)
Final file tree:
├───app.py
├───api
│   └───__init__.py
│   └───api.py
└───client
    ├───__init__.py
    ├───static
    │   └───index.js
    └───templates
        └───index.html
And that's it! If you run your new app with flask run you should be greeted twice -- once by Vue itself and again by a response from your Flask API.
Summary
There are many, many different ways in which to build a web app using Vue and Flask. It all depends on your situation at hand.
Some questions to ask:
- How important is SEO?
- What does your development team look like? If you don't have a DevOps team, do you want to take on the added complexity of having to deploy the front- and back-end separately?
- Are you just rapid prototyping?
Hopefully this article steers you in the right direction, giving you an idea about how to combine your Vue and Flask applications.
You can grab the final code from the combining-flask-with-vue repo on GitHub.