Sessions
Part 1, Chapter 7
This chapter looks at how to work with sessions in Flask.
Sessions
When you open your browser and navigate to http://127.0.0.1:5000/, an HTTP (HyperText Transfer Protocol) request is sent from the browser to our Flask app on the server:
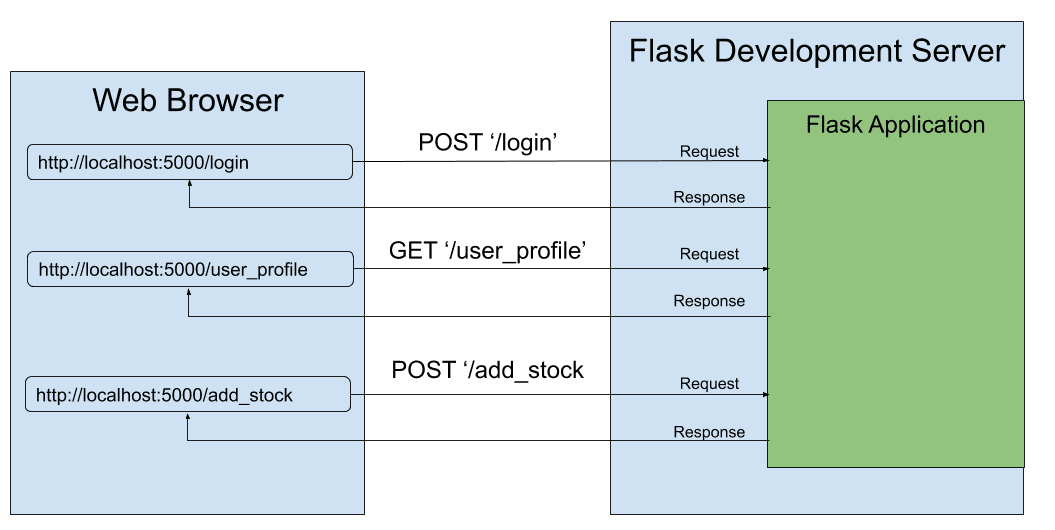
HTTP is a "stateless" protocol as each request is executed independently. This means that each request has no knowledge of any previous requests that were executed.
This greatly simplifies client/server communication. However, web apps typically need a way to store data between each request as a user interacts with the app itself.
For example, on an ecommerce website, you'd typically store items that a user has added to their shopping cart to a database so that once they're done shopping they can view their cart to purchase the items. This workflow, of storing items in the database, only works for authenticated users, though. So, you need a way to store user-specific data for non-authenticated users between requests.
That's where a session comes into play.
A session is used to store information related to a user as they interact with a web app. So, in the above example, the items would be added to a user's session.
Sessions in Flask
In Flask, you can store information specific to a user for the duration of a session. Saving data for use throughout a session allows the web app to keep data persistent over multiple requests -- i.e., as a user accesses different pages within a web app.
In this chapter, we'll store the stock data that the user entered in the session object (implemented as a dictionary).
How are sessions implemented in Flask?
In order to store data across multiple requests, Flask utilizes cryptographically-signed cookies (stored on the web browser) to store the data for a session. This cookie is sent with each request to the Flask app on the server-side where it's decoded.
Since session data is stored in cookies that are cryptographically-signed (not encrypted!), sessions should NOT be used for storing any sensitive information. You should never include passwords or personal information in session data.
This chapter stores the stock data that the user entered in the session data, but this is only being done to illustrate how sessions work. In an upcoming chapter, we'll refactor this so that the stock data is stored in a database.
While it may be an over-simplification, storing data in the session object in Flask can be considered client-side storage, since the data is stored in the web browser. Alternately, storing data in a database can be considered server-side storage, since the database is stored on a server.
The data stored for a session should be considered temporary data, as the session will eventually expire. In order to permanently store date, you need to utilize a database.
Computer storage is a nice analogy here: Temporary items on a computer are stored in RAM (Random Access Memory), much like sessions, while permanent items are stored on the hard drive, much like databases.
Examples of data to store in a session:
- Items in a user's shopping cart
- Whether the user is logged in or not
- Preferences (language, currency, dark vs. light mode)
Examples of data to store in a database:
- User credentials (email, username, hashed password, email confirmed boolean)
- Data entered by the user (stock data, recipes, blog posts)
Storing Data for a Session
Let's utilize the session object to store the stock data to help illustrate this concept.
Secret Key
Since the session data is stored in a cryptographically-signed cookie, we need to specify a parameter in app.py called the secret key:
app = Flask(__name__)

app.secret_key = 'BAD_SECRET_KEY'
As the name implies, BAD_SECRET_KEY is a (really) bad idea.
Why is the secret key important?
The goal of signing the cookie that stores the session data is to detect if the data has been tampered with. When the cookie is sent back to the Flask app, the secret key is used to deconstruct the cookie to determine if any (bad) modifications have been made.
If the secret key is known, an attacker could modify the contents of the session and Flask wouldn't be able to detect that the cookie was tampered with!
Therefore, it's important to ensure that the secret key remains a secret that cannot be easily guessed.
If you're using Python 3.6 or higher, the recommended way for generating a secret key is to use the secrets module:
(venv) $ python

>>> import secrets
>>> print(secrets.token_hex())
If you're using a version of Python prior to 3.6, utilize the os module:
(venv) $ python

>>> import os
>>> print(os.urandom(32))
Replace BAD_SECRET_KEY with that new value.
In an upcoming chapter, we'll discuss how to properly store the configuration parameters (including the secret key) for a Flask app.
Updated Route
Import the session object from flask at the top of app.py:
from flask import session
Next, update the add_stock() function to store the data from the form into the session object when the data is valid:
@app.route('/add_stock', methods=['GET', 'POST'])
def add_stock():
    if request.method == 'POST':
        # Print the form data to the console
        for key, value in request.form.items():
            print(f'{key}: {value}')

        try:
            stock_data = StockModel(
                stock_symbol=request.form['stock_symbol'],
                number_of_shares=request.form['number_of_shares'],
                purchase_price=request.form['purchase_price']
            )
            print(stock_data)

            # Save the form data to the session object
            session['stock_symbol'] = stock_data.stock_symbol          # NEW!!
            session['number_of_shares'] = stock_data.number_of_shares  # NEW!!
            session['purchase_price'] = stock_data.purchase_price      # NEW!!
        except ValidationError as e:
            print(e)

    return render_template('add_stock.html')
Loading Session Data
We're now going to implement the loading of the session data to display the stock data that was entered by the user.
In app.py, let's update the '/stocks/' route to display the stock data:
@app.route('/stocks/')
def list_stocks():
    return render_template('stocks.html')
Refer back to the 'Routing' chapter on a description of when to use the trailing
/in a URL.
This function renders a new template, which needs to be defined in templates/stocks.html:
{% extends "base.html" %}

{% block content %}
<div>
  <h1>List of Stocks</h1>

  <table>
    <!-- Table Header Row -->
    <thead>
      <tr>
        <th>Stock Symbol</th>
        <th>Number of Shares</th>
        <th>Purchase Price</th>
      </tr>
    </thead>

    <!-- Table Element (Row) -->
    <tbody>
      <td>{{ session['stock_symbol'] }}</td>
      <td>{{ session['number_of_shares'] }}</td>
      <td>${{ session['purchase_price'] }}</td>
    </tbody>
  </table>
</div>
{% endblock %}
So, the session object is conveniently available for use in templates! This template file creates a table (via the <table> element) containing a header row and a data row that contains the stock data.
Putting It Together
Let's see how the Flask app handles the stock data.
Start by navigating to the '/add_stock' URL and adding the following stock data:
- Stock Symbol: AAPL
- Number of Shares: 15
- Purchase Price ($): 302.17
Next, navigate to the '/stocks/' URL and you'll see the stock data listed:
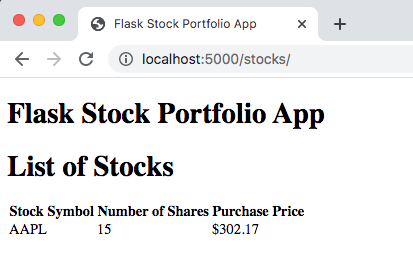
The stock data that we entered into the form is saved in the session object and is now available across multiple requests to the Flask app!
Understanding Sessions
To further demonstrate the concept of sessions, open a different web browser on your computer and navigate to the '/add_stock' URL:
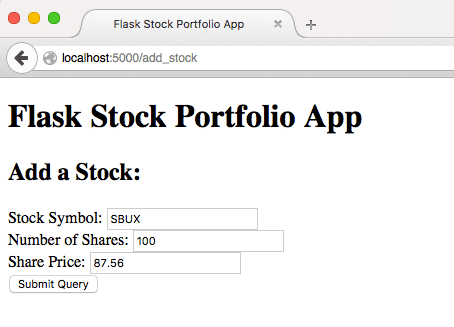
Add the following stock data:
- Stock Symbol: SBUX
- Number of Shares: 100
- Purchase Price ($): 87.56
Within this same web browser, navigate to the '/stocks/' URL and observe how the stock data displayed matches what was just entered:
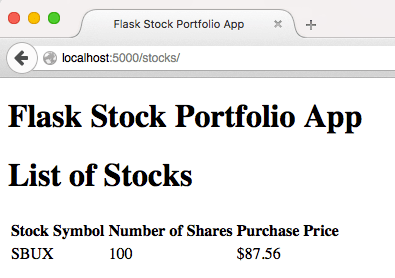
If you go back to your original web browser and re-load the '/stocks/' URL, you'll still see the original stock data that you entered in that browser:
The two web browsers are considered different users, so the session data stored for each is unique to that user.
Improvements
Doesn't it feel unnatural to have to navigate to the '/stocks/' URL after adding the stock data in the '/add_stock' URL?
Let's improve this experience by updating the add_stock() function to automatically redirect the user to the '/stocks/' URL:
from flask import redirect, url_for


@app.route('/add_stock', methods=['GET', 'POST'])
def add_stock():
    if request.method == 'POST':
        # Print the form data to the console
        for key, value in request.form.items():
            print(f'{key}: {value}')

        try:
            stock_data = StockModel(
                stock_symbol=request.form['stock_symbol'],
                number_of_shares=request.form['number_of_shares'],
                purchase_price=request.form['purchase_price']
            )
            print(stock_data)

            # Save the form data to the session object
            session['stock_symbol'] = stock_data.stock_symbol
            session['number_of_shares'] = stock_data.number_of_shares
            session['purchase_price'] = stock_data.purchase_price
            return redirect(url_for('list_stocks'))  # NEW!!
        except ValidationError as e:
            print(e)

    return render_template('add_stock.html')
What's happening here?
First, the url_for() function is used to generate a URL based on a specific view function. The first argument passed to url_for() is the name of the view function. In our example, url_for('list_stocks') returns '/stocks/'.
It's worthing noting that you can also pass in variable arguments to a URL.
For example, we created the following view function in an early chapter:
@app.route('/blog_posts/<int:post_id>')
def display_blog_post(post_id):
    return f'<h1>Blog Post #{post_id}...</h1>'
We can retrieve the URL using url_for('display_blog_post', post_id=17), which returns '/blog_posts/17'.
While it might be tempting to hard-code URLs, it's recommended to use url_for() to retrieve the associated URL for a view function as this allows greater flexibility. Without it, if you changed a URL, you'd have to refactor all instances of it throughout your app.
Next, the redirect() function is used to redirect the user to another URL. This process can greatly improve the navigation through a site by automatically redirecting users to the expected pages.
In the example that we created, after the stock data is processed from the form, the user is redirected to the page that lists the stock data. This redirect is a significant improvement over having to manually enter the '/stocks/' URL in your web browser.
To provide further illustration of what the redirect() function does, let's look at the log messages from the Flask development server when we add a stock:
127.0.0.1 - - [08/Jan/2022 17:08:52] "GET /add_stock HTTP/1.1" 200 -
stock_symbol: SBUX
number_of_shares: 150
purchase_price: 87.65
stock_symbol='SBUX' number_of_shares=150 purchase_price=87.65
127.0.0.1 - - [08/Jan/2022 17:09:07] "POST /add_stock HTTP/1.1" 302 -
127.0.0.1 - - [08/Jan/2022 17:09:07] "GET /stocks/ HTTP/1.1" 200 -
The first line is logged when we retrieve the form from the '/add_stock' URL. The second line is logged when we submit the stock data in the form. The status code returned is 302 (Found), which is used to redirect the user to a new URL that is specified in the header field of the response. This redirect is seen in the third line, which gets logged when the stock data is retrieved from the '/stocks/' URL.
Conclusion
In this chapter we looked at how to store data in the session object. You should now be able to:
- Explain what a session is in a web app
- Define the secret key for a Flask app
- Save non-sensitive data into the
sessionobject - Retrieve the data stored in the
sessionobject
You should also be able to utilize the url_for() and redirect() functions to improve the navigation in a Flask app.
✓ Mark as Completed