Manually Testing the API
Part 1, Chapter 4
In this chapter, we'll look at two different tools for manually testing our API:
- DRF's Browsable API
- Postman
Populating the Database
Before we start manually testing, let's add some data via a Django fixture.
Inside "shopping_list", create a folder called "fixtures". Then, inside "fixtures", create a JSON file called initial_shopping_items.json.
You should have the following structure:
shopping_list
└── fixtures
    └── initial_shopping_items.json
Now, add the following JSON to the file:
[
  {
    "model": "shopping_list.ShoppingItem",
    "fields": {
      "name": "Pineapple",
      "purchased": true
    }
  },
  {
    "model": "shopping_list.ShoppingItem",
    "fields": {
      "name": "Broccoli",
      "purchased": false
    }
  },
  {
    "model": "shopping_list.ShoppingItem",
    "fields": {
      "name": "Chocolate",
      "purchased": false
    }
  },
  {
    "model": "shopping_list.ShoppingItem",
    "fields": {
      "name": "Milk",
      "purchased": true
    }
  }
]
Here, we specified the app and model, shopping_list.ShoppingItem, along with the fields for each object.
Run the following command to load the fixture content into the database:
(venv)$ python manage.py loaddata initial_shopping_items.json
Fixtures are just a collection of files that contain the serialized contents of the database. The loaddata command searches for and loads the contents of the named fixture into the database.
Browsable API
While APIs are primarily designed to be machine-readable (via JSON and XML), they need to be human-readable as well since developers need to be able to understand the output from an API in order to program how the machines interact with it. Fortunately, DRF comes with a powerful tool for manually testing your API in a human-readable fashion -- the Browsable API. With it, you can view the HTML-generated output from your endpoints. It provides forms as well for adding, updating, and deleting data.
Be careful with the Browsable API. When using it during development, you can easily shift into imagining users interacting with your API's endpoints via a website. This most likely won't be the case, so keep in mind that the Browsable API is just a means to an end, not the end itself.
With that, let's take a look at the Browsable API.
API Root
First, start the Django development server:
(venv)$ python manage.py runserver
In your browser of choice, navigate to http://127.0.0.1:8000/api/. You should be able to see a list of your API's endpoints.
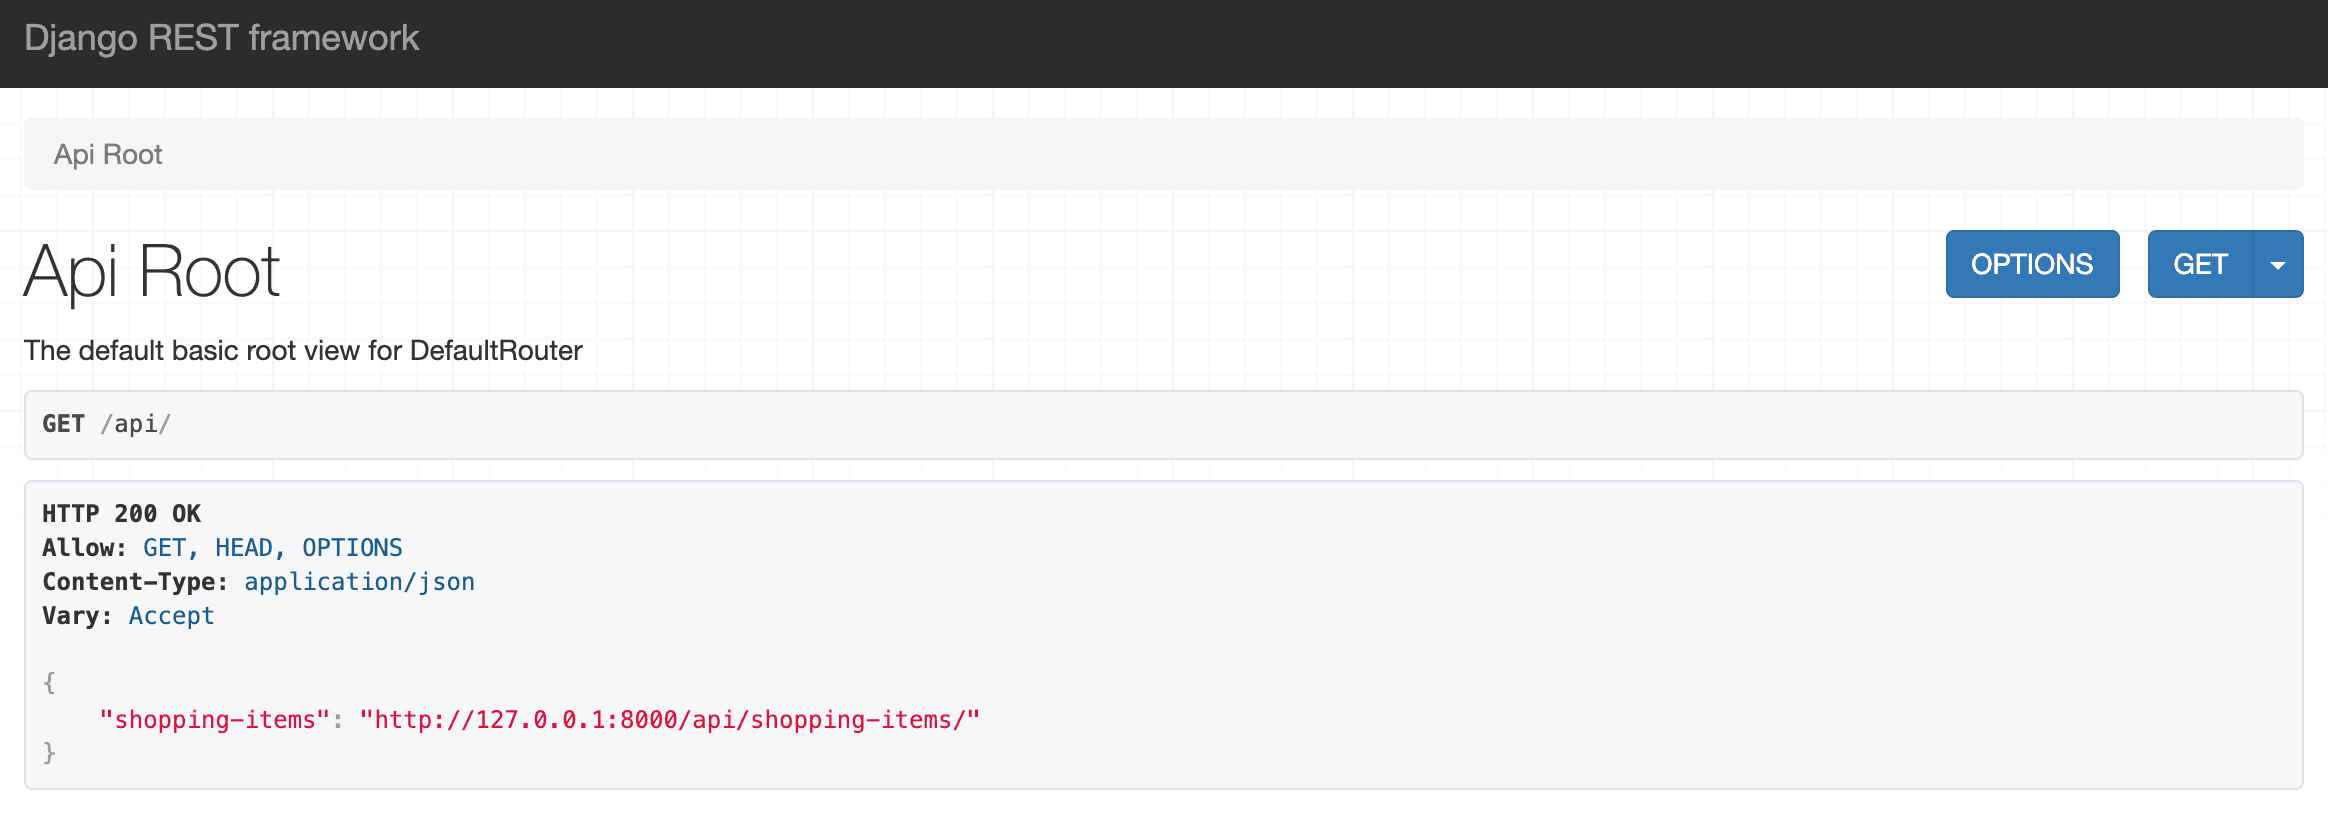
This is the default API root view that is automatically created when you use DefaultRouter.
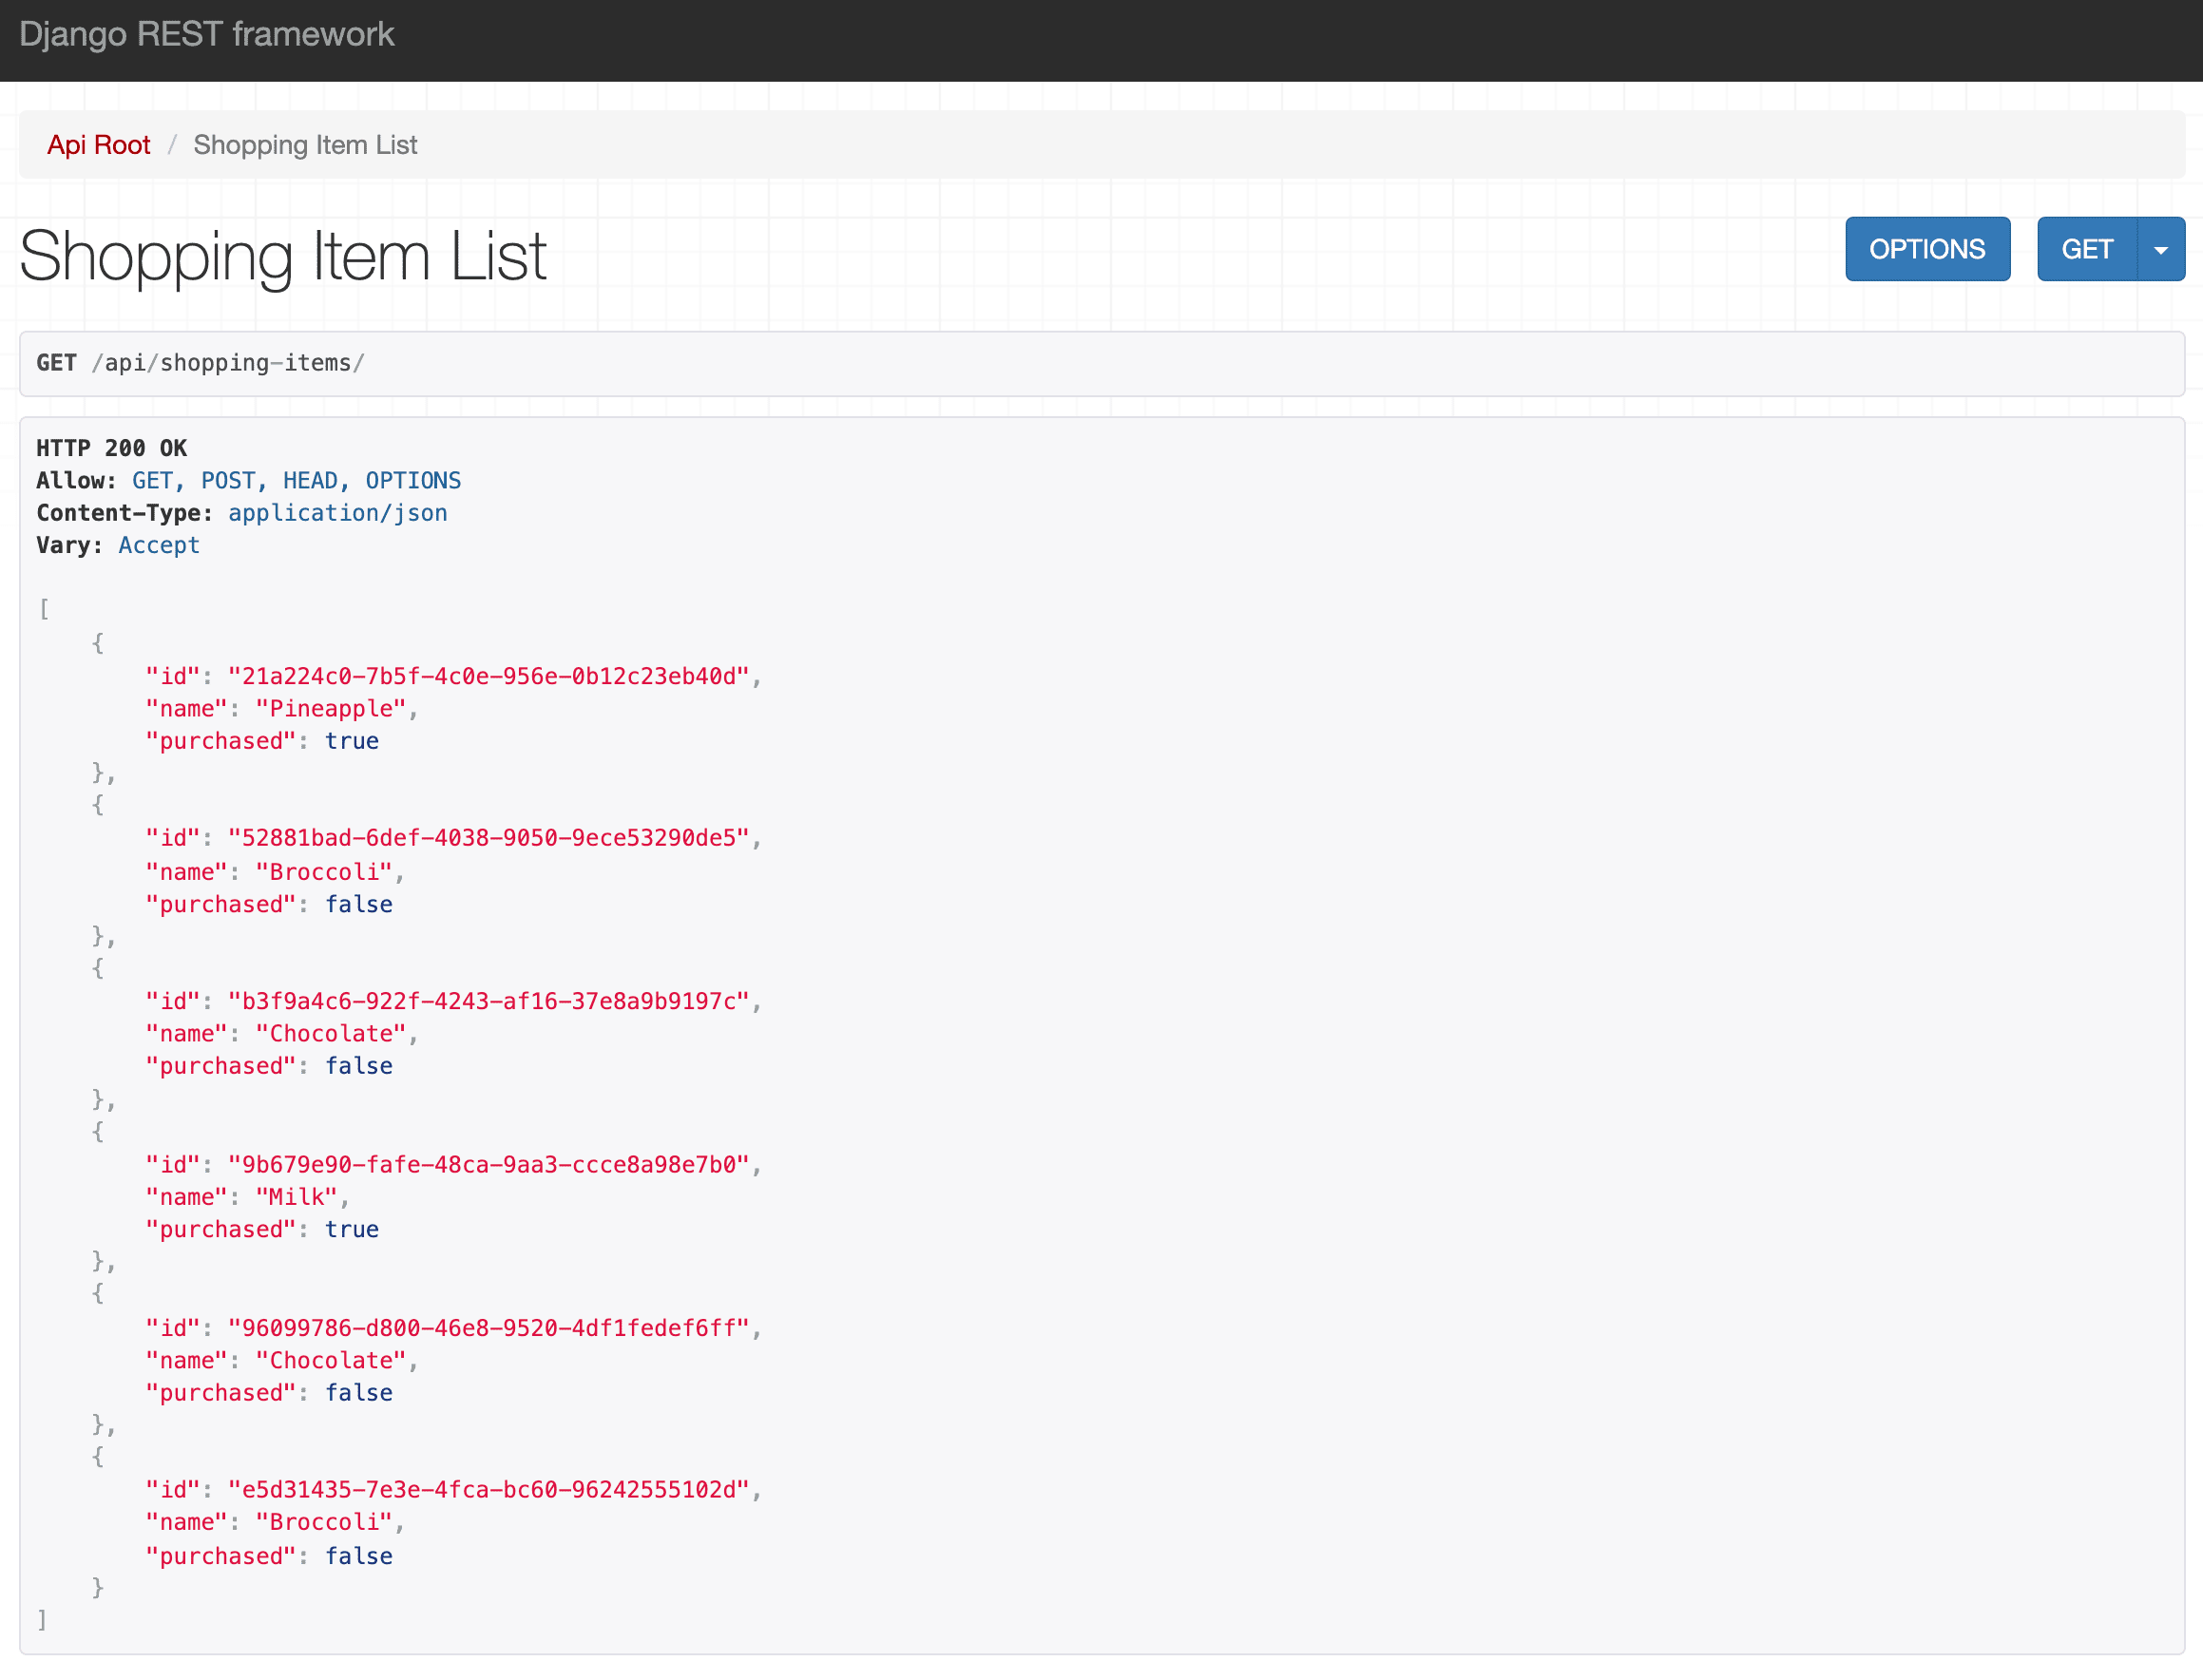
List Endpoint
Click on the "http://localhost:8000/api/shopping-items/" link to view your list endpoint for shopping items, which currently has the items from the fixtures. Go ahead and add a few new items to the list, making sure to leave the id field blank:
Read-Only Fields
Since we actually don't want the client to be able to create their own UUIDs, we can make the id field read-only.
Update ShoppingItemSerializer in shopping_list/api/serializers.py:
# shopping_list/api/serializers.py


from rest_framework import serializers

from shopping_list.models import ShoppingItem


class ShoppingItemSerializer(serializers.ModelSerializer):
    class Meta:
        model = ShoppingItem
        fields = ['id', 'name', 'purchased']
        read_only_fields = ('id',)  # NEW
Now, the client will still be able to view the field in GET requests. You won't be able to create or update the field, though.
Detail Endpoint
Besides the list view, where you can see a list of all the items or add a new item, ViewSet also provides a detail view.
Grab the UUID from one of your shopping items, and navigate to http://127.0.0.1:8000/api/shopping-items/<SHOPPING-ITEM-UUID>/:
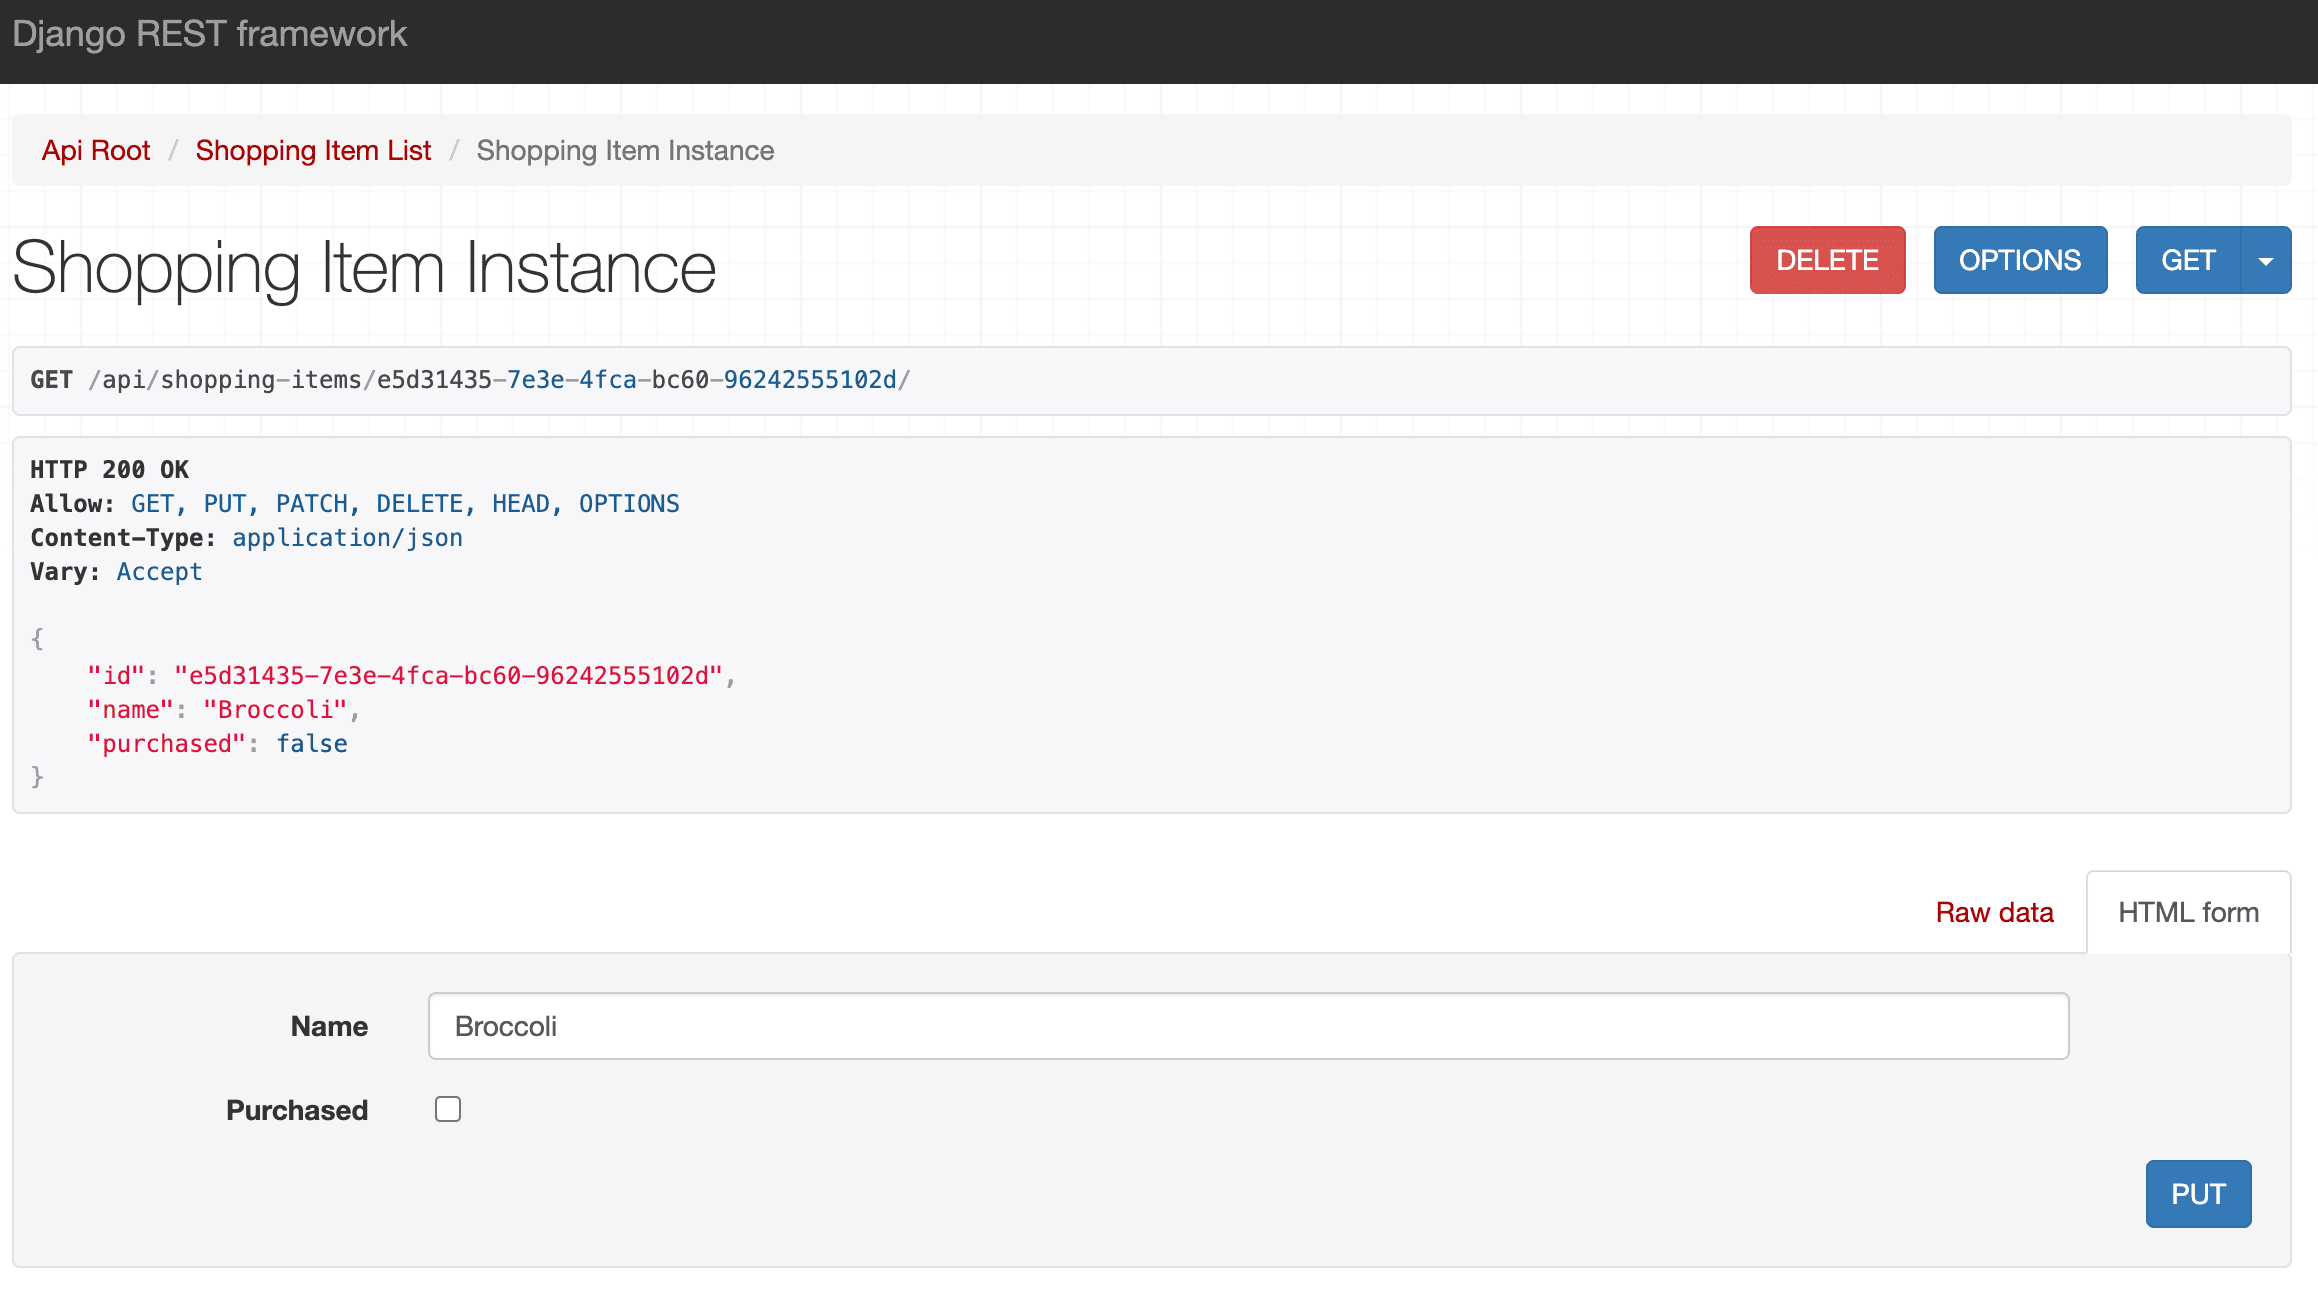
On the detail view, you can perform all the "detail actions":
- Retrieve (GET method)
- Edit (PUT and PATCH methods)
- Delete (DELETE method)
Try these out on your own.
JSON Representation
To get a better idea on how the API's response will really look, when consumed by a machine, you can view the JSON representation of your API as well from the Browsable API by changing the renderer. You can either change the renderer for the whole app (via the default renderer) or just for a single view.
Default Renderer
To render data in JSON, you need to change DEFAULT_RENDERER_CLASSES inside your settings.py file:
# core/settings.py

REST_FRAMEWORK = {
    'DEFAULT_RENDERER_CLASSES': [
        'rest_framework.renderers.JSONRenderer',
    ],
}
Refresh the page, and you'll see JSON rather than the HTML representation of your API:
[
  {
    "id": "21a224c0-7b5f-4c0e-956e-0b12c23eb40d",
    "name": "Pineapple",
    "purchased": true
  },
  {
    "id": "52881bad-6def-4038-9050-9ece53290de5",
    "name": "Broccoli",
    "purchased": false
  },
  {
    "id": "b3f9a4c6-922f-4243-af16-37e8a9b9197c",
    "name": "Chocolate",
    "purchased": false
  },
  {
    "id": "9b679e90-fafe-48ca-9aa3-ccce8a98e7b0",
    "name": "Milk",
    "purchased": true
  },
  {
    "id": "96099786-d800-46e8-9520-4df1fedef6ff",
    "name": "Chocolate",
    "purchased": false
  }
]
Make sure to remove or comment out the code before moving on.
Renderer For a View
If you, for some reason, want only one view to be rendered as JSON, you can set it in renderer_classes inside the view.
For example:
# shopping_list/api/viewsets.py


from rest_framework.renderers import JSONRenderer
from rest_framework.viewsets import ModelViewSet

from shopping_list.api.serializers import ShoppingItemSerializer
from shopping_list.models import ShoppingItem


class ShoppingItemViewSet(ModelViewSet):
    queryset = ShoppingItem.objects.all()
    serializer_class = ShoppingItemSerializer
    renderer_classes = [JSONRenderer]
Make sure to remove the JSONRenderer before moving on.
Since the Browsable API presents data in a very clear and readable manner, it allows us to get quick feedback on changes made to our API. So, we'll stick with it for now.
Postman
As mentioned, the Browsable API, albeit practical, is not ideal for manually testing the API since it produces a human-readable representation of your API. While you can change the DRF's renderer to test your API in a machine-readable representation, there are better tools out there for this. We'll take a look at one such tool -- Postman, an API platform for building and consuming APIs.
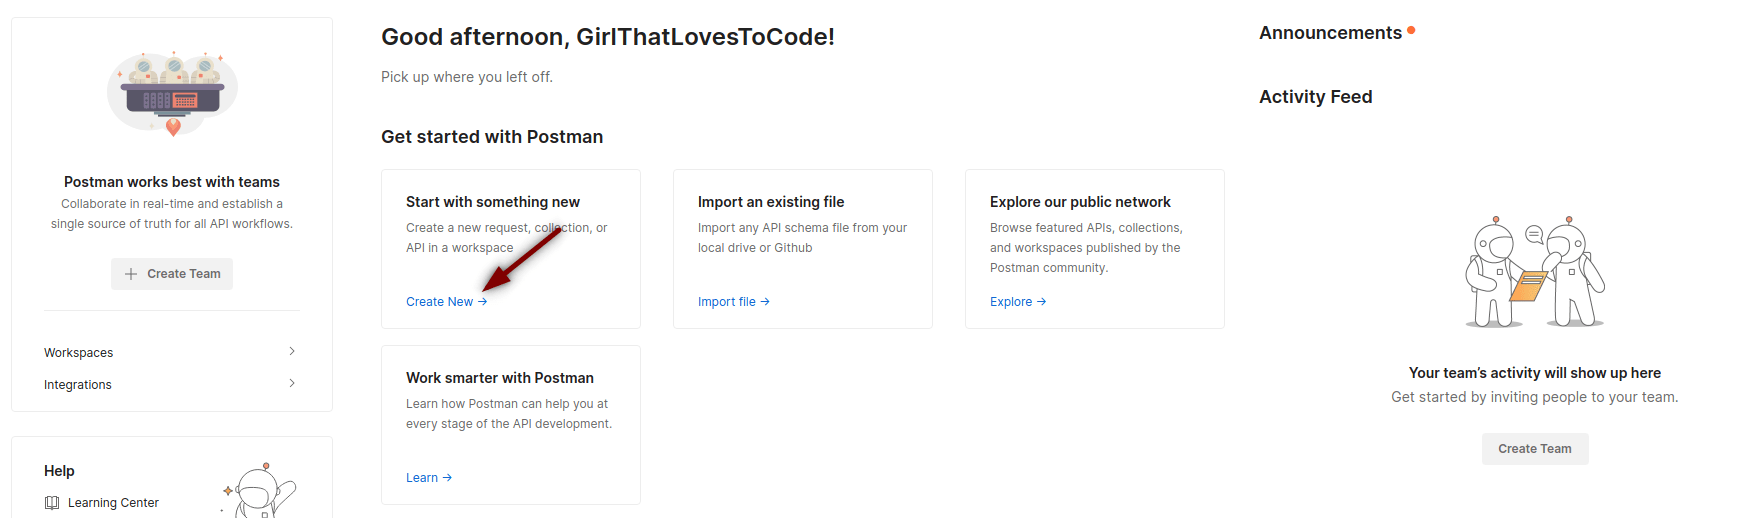
Start by downloading and installing Postman. Then, register for a free account. Once done, you should be at the main start-up screen. From there, click "Create New" under the "Start with something new" box. In the pop-up, select "HTTP Request":
You should now have an "Untitled Request" open:

Run the Django development server if it's not already running:
(venv)$ python manage.py runserver
We'll now look at how to test all of our API endpoints.
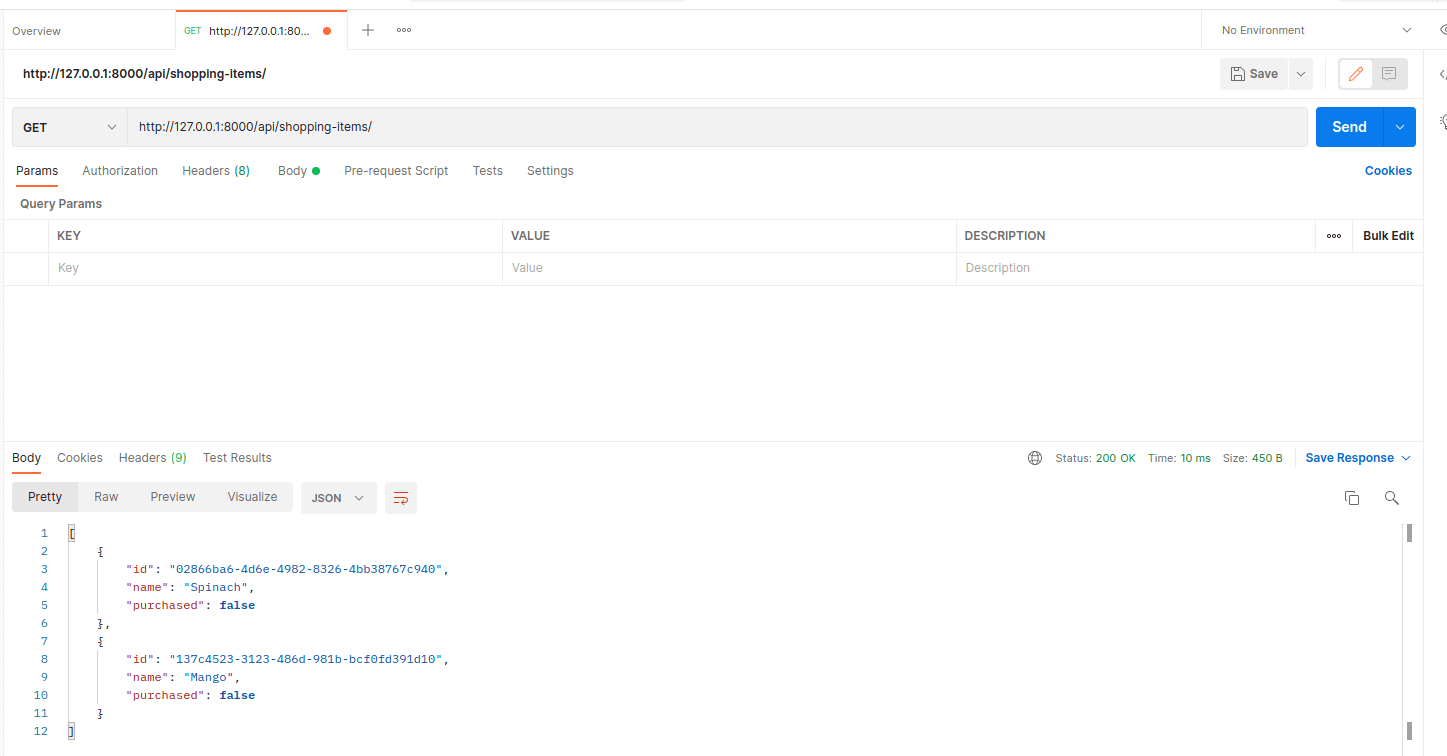
GET (list endpoint)
Sending a GET request to the list endpoint will return a list of all records.
Add the http://127.0.0.1:8000/api/shopping-items/ URL to the "Enter request url" box and click "Send":
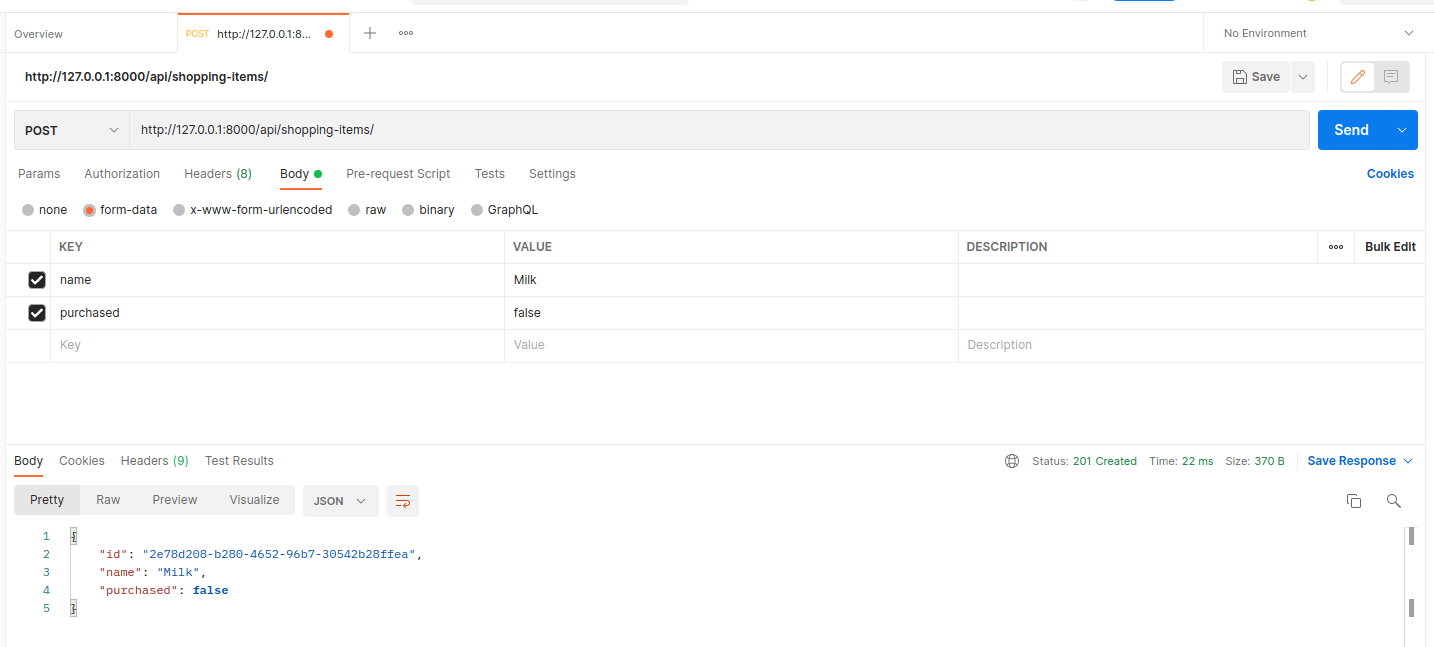
POST (list endpoint)
The POST method is used for creating a new record.
For testing the POST method, you'll need to provide some data. Click on the arrow next to "GET" and change it to "POST". In the "body" section, choose the "form-data" option and add two keys: name and purchased with appropriate values (e.g., Milk and false). Click "Send".
In the response body, you can see the data you posted. On the right side, you can see that the API endpoint returned status 201.
You've successfully tested both list methods. Turn back to the Browsable API. You should be able to see the new item you posted via Postman in the list.
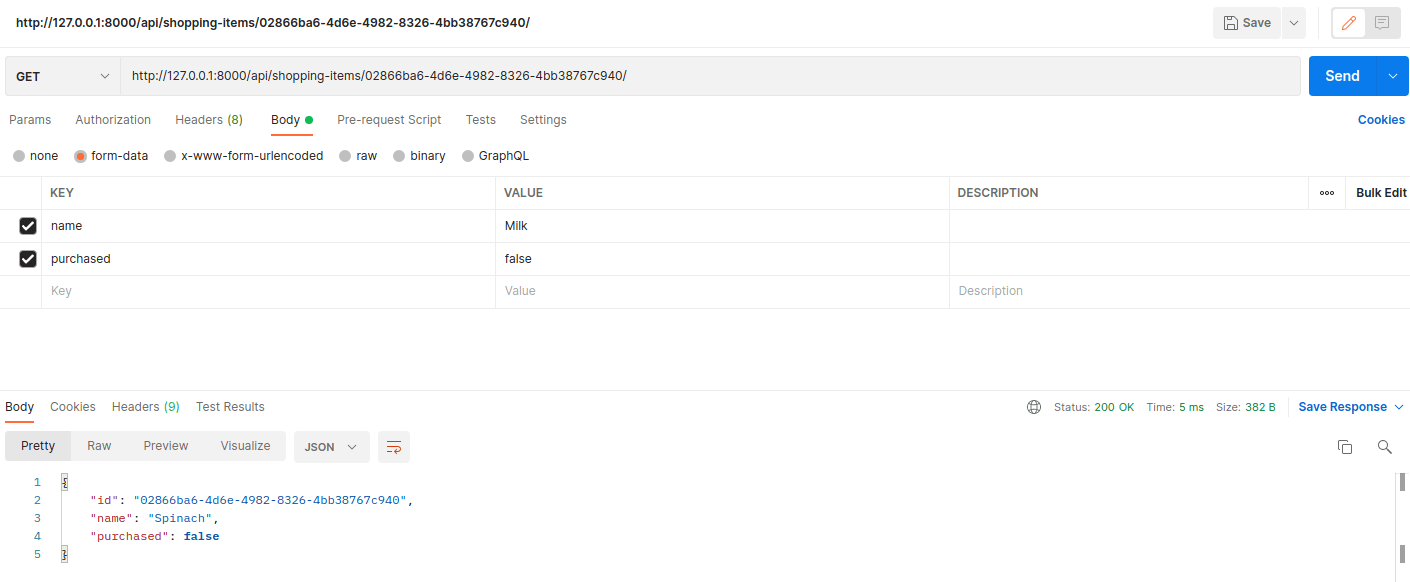
GET (detail endpoint)
You can send GET requests to the list and detail endpoints. In the latter case, it will retrieve a single record.
Test out a GET request to the list endpoint again and copy one of the UUIDs. Then, update the URL to http://127.0.0.1:8000/api/shopping-items/<SHOPPING-ITEM-UUID>/.
PUT (detail endpoint)
With many API frameworks, PUT requests generally either update the record (if it exists) or create a new one (if it doesn't). However, due to security and practical reasons, this is not the case with DRF anymore. So, a PUT request will either return a modified object or a 404.
What's the difference between PUT and PATCH?
PUT modifies the entire resource (so all fields need to be sent) while PATCH only partially updates the resource (so you can only need to send the data required to be changed).
Back in Postman, change the request method to PUT. Then, within the "form-data" option of the "body" section, add both required key-value pairs, name and purchased. Make sure the provided values differ from the values saved in your database. Click "Send". The response's body should contain the modified data.

Don't forget the trailing slash (slash at the end of the url)! Omitting it could result in some head-scratching as things won't work quite like they should for certain request methods. Try it out to see what happens. You should see an HTML response with a
RuntimeErrorerror. You can see more details in your terminal. If you see this error again in the future, try to remember that it's due to missing the trailing slash.
PATCH (detail endpoint)
As explained, you need to send all the data with PUT, but with PATCH, you need to only send the data you want to be changed:
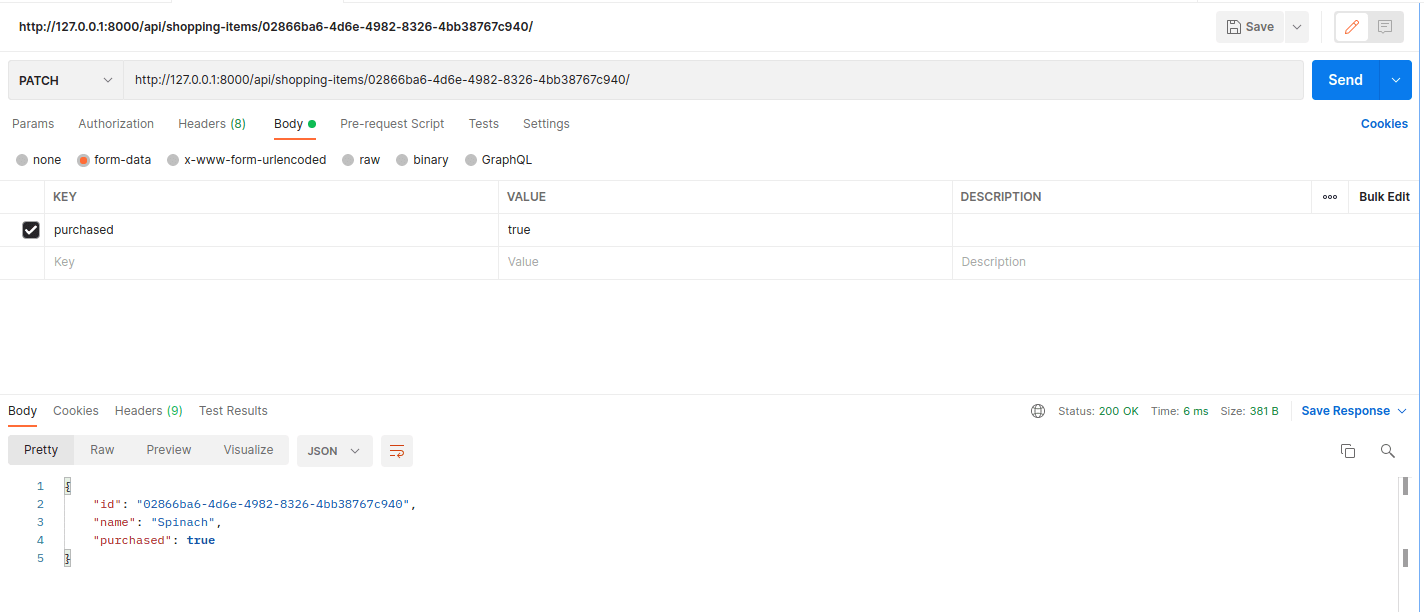
Imagine someone using your app. They'll probably cross items out as they pick them up in the store. This is the perfect use case of PATCH. The client, in that case, will just need to send a PATCH request with purchased set to true.
DELETE (detail endpoint)
As with GET, DELETE doesn't need any additional data. Just switch the method to "DELETE" in Postman and click "Send":
The DELETE method returns an empty body with a 204 status code.
Summary
In this chapter, you learned how to manually test your API using DRF's Browsable API and Postman.
The Browsable API is practical and easy to use. Since it's designed for human readability, it's not always the best way to test your API. Postman, on the other hand, can be used to test your API from a machine-readable approach, which is closer to how real clients will actually interact with your API.
There are five core HTTP methods that you can use, depending on what you want to accomplish:
- GET - for listing records or for retrieving a single record
- POST - for adding a new record
- PUT - for updating an entire record
- PATCH - for updating only part of a record
- DELETE - for deleting a record
✓ Mark as Completed