 Nik Tomazic
In this tutorial, we'll look at how to deploy a Django app to Render.
Contents
Objectives
By the end of this tutorial, you should be able to:
- Explain what Render is and how it works.
- Deploy a Django application to Render.
- Spin up a PostgreSQL instance on Render.
- Learn how to serve static and media files on Render.
- Add a custom domain and serve your web application on HTTPS.
What is Render?
Render is an easy-to-use Platform as a Service (PaaS) solution that's great for building and running all your apps and websites. It launched in 2019 and has since then been gaining popularity. Render allows you to host static sites, web services, PostgreSQL databases, and Redis instances.
Its extremely simple UI/UX and great git integration allow you to get an app up and running in minutes. It has native support for Python, Node.js, Ruby, Elixir, Go, and Rust. If none of these work for you, Render can also deploy via a Dockerfile.
Render's auto-scaling feature will make sure that your app will always have the necessary resources at the right cost. Additionally, everything that's hosted on Render can also get a free TLS certificate.
Refer to their official documentation for more information about their pricing.
Why Render?
- Great for beginners
- Effortless to set up and deploy apps
- Automatic scaling based on real-time CPU and memory usage
- Free tier (includes web service, PostgreSQL, Redis) -- great for prototyping
- Good customer support
Project Setup
In this tutorial, we'll be deploying a simple image hosting application called django-images.
Check your understanding by deploying your own Django application as you follow along with the tutorial.
First, grab the code from the repository on GitHub:
$ git clone [email protected]:duplxey/django-images.git
$ cd django-images
Create a new virtual environment and activate it:
$ python3 -m venv venv && source venv/bin/activate
Install the requirements and migrate the database:
(venv)$ pip install -r requirements.txt
(venv)$ python manage.py migrate
Run the server:
(venv)$ python manage.py runserver
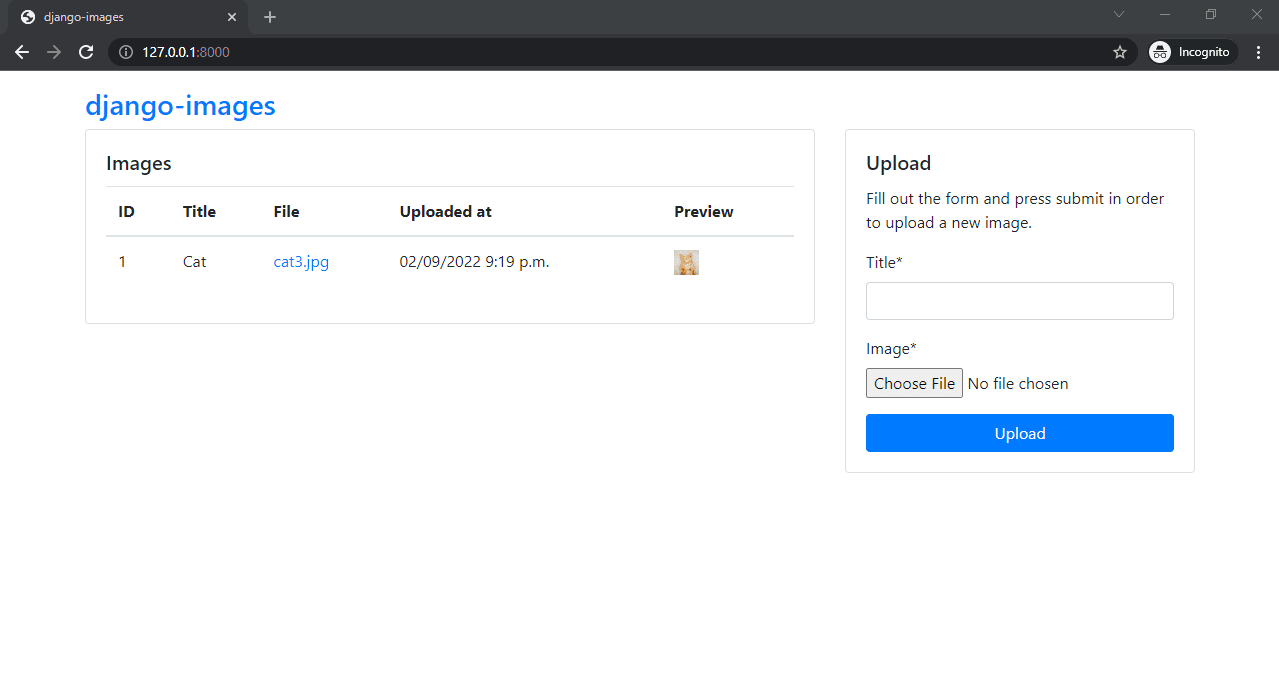
Open your favorite web browser and navigate to http://localhost:8000. Make sure everything works correctly by using the form on the right to upload an image. After you upload an image, you should see it displayed in the table:
Configure Django Project
In this section of the tutorial, we'll prepare our Django project for deployment to Render.
Environment variables
We shouldn't store secrets in source code so let's utilize environment variables. The easiest way to do this is by using a third-party package called python-dotenv. Start by adding it to requirements.txt:
python-dotenv==0.21.0
Feel free to use a different package for handling environment variables like django-environ or python-decouple.
Next, navigate to your settings.py and initialize python-dotenv at the top of the file like so:
# core/settings.py

from pathlib import Path

from dotenv import load_dotenv

# Build paths inside the project like this: BASE_DIR / 'subdir'.
BASE_DIR = Path(__file__).resolve().parent.parent

load_dotenv(BASE_DIR / '.env')
Next, load SECRET_KEY, DEBUG, and ALLOWED_HOSTS from the environment:
# core/settings.py

# SECURITY WARNING: keep the secret key used in production secret!
SECRET_KEY = os.getenv('SECRET_KEY')

# SECURITY WARNING: don't run with debug turned on in production!
DEBUG = os.getenv('DEBUG', '0').lower() in ['true', 't', '1']

ALLOWED_HOSTS = os.getenv('ALLOWED_HOSTS').split(' ')
Don't forget to import os at the top of the file:
import os
Database
Let's swap Django's default SQLite for PostgreSQL.
Install the database adapter by adding the following line to requirements.txt:
psycopg2-binary==2.9.5
Later, when we spin up a PostgreSQL database, Render will provide us with a DATABASE_URL. This is a Twelve-Factor App inspired environment variable, which includes all the parameters required to connect to a database. It will be in the following format:
postgres://USER:PASSWORD@HOST:PORT/NAME
To utilize it with Django we can use a package called dj-database-url. This package allows us to transform the database URL into Django database parameters.
Add it to requirements.txt like so:
dj-database-url==1.2.0
Next, navigate to core/settings.py and change DATABASES like so:
# core/settings.py

DATABASES = {
    'default': dj_database_url.parse(os.environ.get('DATABASE_URL'), conn_max_age=600),
}
Don't forget the import:
import dj_database_url
Gunicorn
Moving along, let's install Gunicorn, a production-grade WSGI server that's going to be used in production instead of Django's development server.
Add it to requirements.txt:
gunicorn==20.1.0
Build Script
To collect static files and migrate the database, we'll create a build script. A build script allows us to run a series of commands before the app is deployed.
Create a build.sh file in the project root with the following contents:
#!/usr/bin/env bash

set -o errexit  # exit on error

pip install -r requirements.txt

python manage.py collectstatic --no-input
python manage.py migrate
Commit all the changes to git, and push to your remote.
Deploy
In this section of the tutorial, we'll spin up a PostgreSQL instance and deploy our Django app to Render.
Go ahead and sign up for a Render account if you don't already have one.
Database
From the Render dashboard, click "New" at the top right of the screen and then "PostgreSQL". Then, create a PostgreSQL instance with the following parameters:
- Name: Custom name
- Database: Leave empty
- User: Leave empty
- Region: The region closest to you
- PostgreSQL Version: 15
- Datadog API Key: Leave empty
- Plan Type: Plan that suits your needs
Keep in mind that free Render accounts have the following limitations:
- Free PostgreSQL databases get deleted after 90 days if you don't upgrade your account.
- Render only offers 1 GB of storage for free PostgreSQL databases.
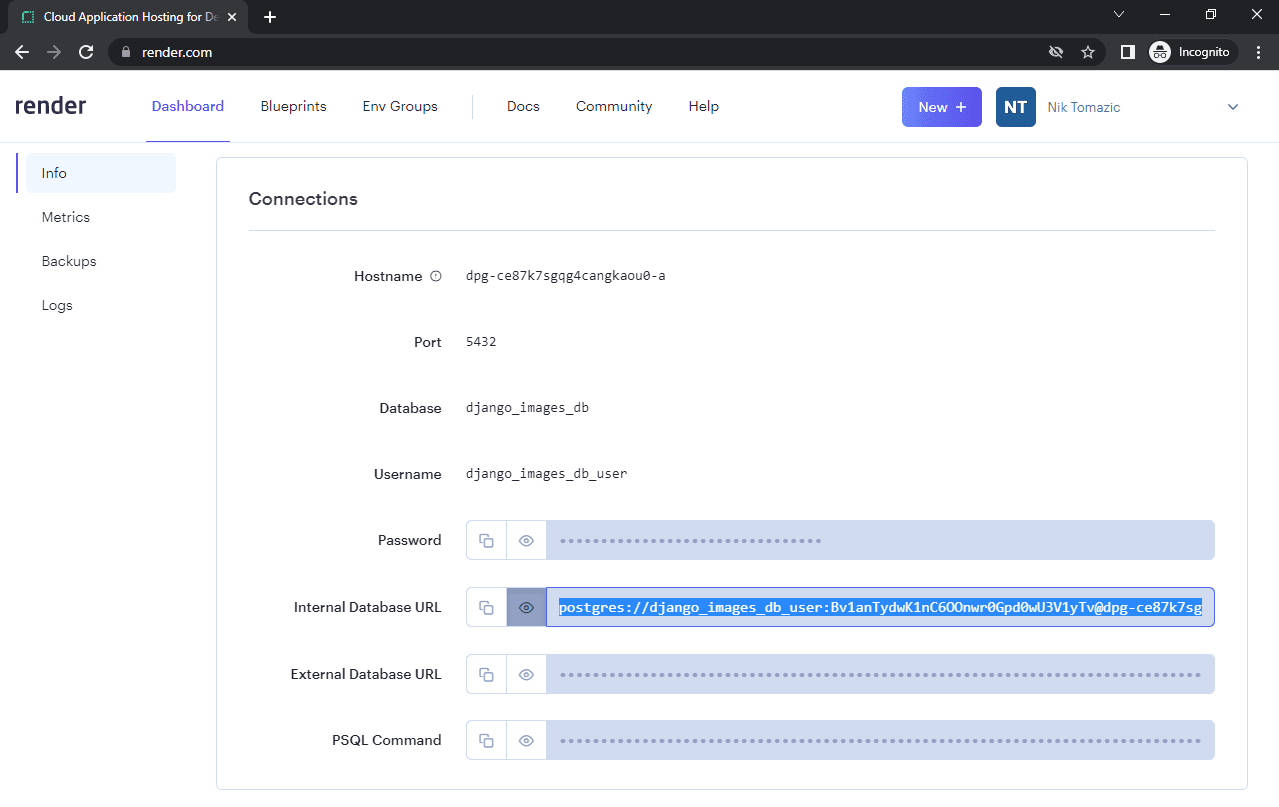
Wait for the database status to change from "Creating" to "Available", and then scroll down to the "Connections" section. Take note of the "Internal Database URL".
Great. That's it for the database part.
Web Service
Moving along, let's create a web service.
Once again click "New" at the top right of the screen, but this time select "Web Service".
Connect your Render account to either your GitHub or GitLab account. Make sure to grant Render permissions to the repositories you'd like to deploy. Once connected select your repository.
Enter the following details:
- Name: Custom name
- Region: The same region as your database
- Branch: Your main branch (e.g., master/main)
- Root directory: Leave empty
- Environment: Python 3
- Build command:
sh build.sh - Start command
gunicorn core.wsgi:application - Plan Type: Plan that suits your needs
Open the "Advanced" dropdown and add the following environment variables:
PYTHON_VERSION:3.9.9SECRET_KEY: Click "Generate"DEBUG:1ALLOWED_HOSTS:*DATABASE_URL:<your_internal_database_url>
We needed to set PYTHON_VERSION since Render's default Python version is 3.7, while Django 4 requires 3.8 or higher. We also temporarily enabled debug mode and allowed all hosts. Don't worry about this, since we'll change it later in the tutorial.
Lastly, click "Create Web Service".
Render will check out your source code, prepare the environment, run build.sh, generate a container, and deploy it.

Wait a few minutes for the deployment status to change to "Live" and then test the app by uploading an image. Your web app's URL is displayed under the web service name (top left).
Render will automatically redeploy your app every time you check code into your remote.
Static Files
To serve static files in production we can use a package called WhiteNoise. WhiteNoise allows us to make our app a self-contained unit that can be deployed anywhere without relying on Nginx, Apache, or any other external service. Additionally, it compresses our content by using gzip and Brotli formats.
Start by adding the following two packages to requirements.txt:
whitenoise==6.2.0
Brotli==1.0.9
Adding Brotli support is optional, but recommended by Whitenoise as well as Render.
Next, add WhiteNoise's middleware to the MIDDLEWARE list in settings.py. It should be placed above all other middleware apart from Django's SecurityMiddleware:
# core/settings.py

MIDDLEWARE = [
    'django.middleware.security.SecurityMiddleware',
    'whitenoise.middleware.WhiteNoiseMiddleware',
    # ...
]
Lastly, scroll down to the bottom of settings.py and add:
# core/settings.py

STATICFILES_STORAGE = 'whitenoise.storage.CompressedManifestStaticFilesStorage'
That's it. Our static files will now be served by WhiteNoise the next time Render deploys a new version of your app.
Media Files
Render (as well as many other similar services like Heroku) offers an ephemeral filesystem. This means that your data won't persistent and might vanish when your application shuts down or is redeployed. This is extremely bad if your app requires files to stick around.
To enable persistent storage you can use either:
- Render Disks: high performance SSDs with automatic daily snapshots
- Cloud Object Storage like AWS S3 or a similar service
I recommend that you set up AWS S3, since Render Disks don't allow horizontal scaling and are a bit more expensive.
To learn how to set up AWS S3 with Django take a look at Storing Django Static and Media Files on Amazon S3.
Nevertheless, let's set up Render Disks for the sake of the completeness of this tutorial.
Navigate to your Render dashboard and select your web service. Click "Disks" on the sidebar and create a new disk with the following details:
- Name: Pick a custom name
- Mount path: /opt/render/project/src/mediafiles
- Size: Lowest size that works for you
Click "Create" and you're done. Your media files will now persist.
Django Admin Access
There are two ways to create a superuser:
- SSH into the server and run the
createsuperusercommand. - Create a Django command that creates the superuser and add it to build.sh.
We'll use the second approach since it allows us to automate deployment and since Render doesn't allow free users to SSH into their web services.
First, create the following directory structure within the "images" app:
└-- images
    └-- management
        |-- __init__.py
        └-- commands
            |-- __init__.py
            └-- createsu.py
Put the following contents in createsu.py:
# images/management/commands/createsu.py

from django.contrib.auth.models import User
from django.core.management.base import BaseCommand


class Command(BaseCommand):
    help = 'Creates a superuser.'

    def handle(self, *args, **options):
        if not User.objects.filter(username='admin').exists():
            User.objects.create_superuser(
                username='admin',
                password='complexpassword123'
            )
        print('Superuser has been created.')
If you don't want your superuser credentials exposed in the source code, consider loading them from environment variables.
Add the createsu command to the end of build.sh like so:
#!/usr/bin/env bash

set -o errexit  # exit on error

pip install -r requirements.txt

python manage.py collectstatic --no-input
python manage.py migrate
python manage.py createsu  # new
Lastly, commit and push the code.
Render will automatically redeploy your app. Once it's done, navigate to your web app's admin dashboard and try to login.
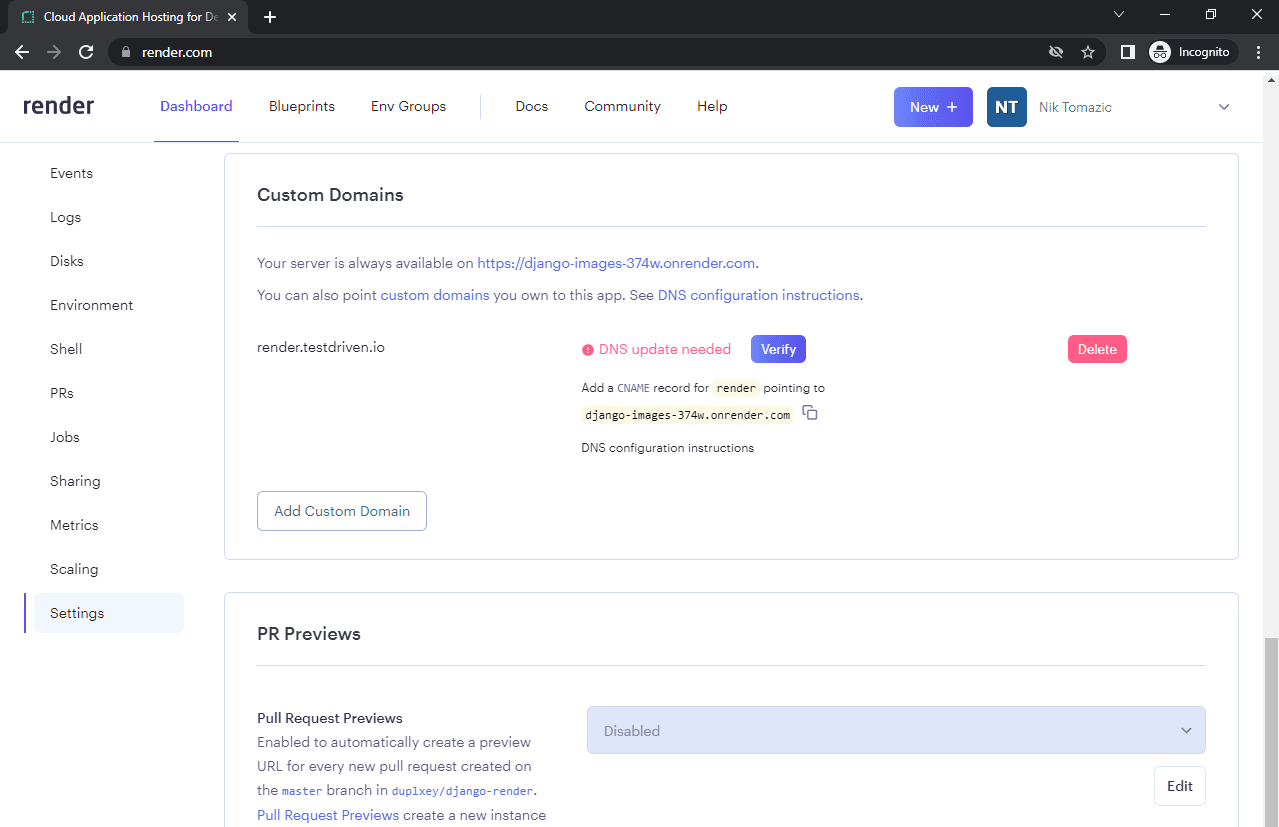
Custom Domain
Navigate to your Render dashboard and select your web service. Select "Settings" on the sidebar and then scroll down to the "Custom Domains" section. Click "Add", enter your domain name and click "Save".
Next, go to your domain's registrar DNS settings and add a new "CNAME Record" pointing to your app's hostname like so:
+----------+--------------+-----------------------------------+-----------+
| Type     | Host         | Value                             | TTL       |
+----------+--------------+-----------------------------------+-----------+
| CNAME    | <some host>  | <your_app_hostname>               | Automatic |
+----------+--------------+-----------------------------------+-----------+
Example:
+----------+--------------+-----------------------------------+-----------+
| Type     | Host         | Value                             | TTL       |
+----------+--------------+-----------------------------------+-----------+
| CNAME    | render       | django-images-374w.onrender.com   | Automatic |
+----------+--------------+-----------------------------------+-----------+
Wait a few minutes for the DNS changes to propagate and then click "Verify". Render will issue a TLS certificate for your domain and your app is now going to be accessible at your custom domain on HTTPS.
To make sure it works, try visiting your web app at:
https://<your_custom_domain>

Example:
https://render.testdriven.io
Change the ALLOWED_HOSTS environment variable to <your_custom_domain> (e.g., render.testdriven.io). Then, trigger a manual deployment of the latest commit.
Wait for your app to redeploy and you're done!
Conclusion
In this tutorial, we've successfully deployed a Django app to Render. We've taken care of the PostgreSQL database, static and media files, and added a custom domain name and enabled HTTPS. You should now have a fair understanding of how Render works and be able to deploy your own apps.
What's Next?
- Consider AWS S3 or a similar service to serve media files better and in a more secure way.
- Set
DEBUG=0to disable the debug mode. Keep in mind that the app only serves media files when debug mode is enabled. For more info on how to deal with static and media files in production, refer to Working with Static and Media files in Django. - Take a look at Render's Scaling features.