 Amal Shaji
In this tutorial, we'll look at how to set up Django with Postgres and Docker. For production environments, we'll add on Gunicorn, Traefik, and Let's Encrypt.
Contents
Project Setup
Start by creating a project directory:
$ mkdir django-docker-traefik && cd django-docker-traefik
$ mkdir app && cd app
$ python3.11 -m venv venv
$ source venv/bin/activate
Feel free to swap out virtualenv and Pip for Poetry or Pipenv. For more, review Modern Python Environments.
Next, let's install Django and create a simple Django application:
(venv)$ pip install django==4.1.6
(venv)$ django-admin startproject config .
(venv)$ python manage.py migrate
Run the application:
(venv)$ python manage.py runserver
Navigate to http://localhost:8000/ to view the Django welcome screen. Kill the server and exit from the virtual environment once done. Delete the virtual environment as well. We now have a simple Django project to work with.
Create a requirements.txt file in the "app" directory and add Django as a dependency:
Django==4.1.6
Since we'll be moving to Postgres, go ahead and remove the db.sqlite3 file from the "app" directory.
Your project directory should look like:
└── app
    ├── config
    │   ├── __init__.py
    │   ├── asgi.py
    │   ├── settings.py
    │   ├── urls.py
    │   └── wsgi.py
    ├── manage.py
    └── requirements.txt
Docker
Install Docker, if you don't already have it, then add a Dockerfile to the "app" directory:
# app/Dockerfile

# pull the official docker image
FROM python:3.11.2-slim

# set work directory
WORKDIR /app

# set env variables
ENV PYTHONDONTWRITEBYTECODE 1
ENV PYTHONUNBUFFERED 1

# install dependencies
COPY requirements.txt .
RUN pip install -r requirements.txt

# copy project
COPY . .
So, we started with a slim Docker image for Python 3.11.2. We then set up a working directory along with two environment variables:
PYTHONDONTWRITEBYTECODE: Prevents Python from writing pyc files to disc (equivalent topython -Boption)PYTHONUNBUFFERED: Prevents Python from buffering stdout and stderr (equivalent topython -uoption)
Finally, we copied over the requirements.txt file, installed the dependencies, and copied over the project.
Review Docker Best Practices for Python Developers for more on structuring Dockerfiles as well as some best practices for configuring Docker for Python-based development.
Next, add a docker-compose.yml file to the project root:
# docker-compose.yml

version: '3.8'

services:
  web:
    build: ./app
    command: python manage.py runserver 0.0.0.0:8000
    volumes:
      - ./app:/app
    ports:
      - 8008:8000
    environment:
      - DEBUG=1
Review the Compose file reference for info on how this file works.
Build the image:
$ docker-compose build
Once the image is built, run the container:
$ docker-compose up -d
Navigate to http://localhost:8008 to again view the welcome page.
Check for errors in the logs if this doesn't work via
docker-compose logs -f.
Postgres
To configure Postgres, we'll need to add a new service to the docker-compose.yml file, update the Django settings, and install Psycopg2.
First, add a new service called db to docker-compose.yml:
# docker-compose.yml

version: '3.8'

services:
  web:
    build: ./app
    command: bash -c 'while !</dev/tcp/db/5432; do sleep 1; done; python manage.py runserver 0.0.0.0:8000'
    volumes:
      - ./app:/app
    ports:
      - 8008:8000
    environment:
      - DEBUG=1
      - DATABASE_URL=postgresql://django_traefik:django_traefik@db:5432/django_traefik
    depends_on:
      - db
  db:
    image: postgres:15-alpine
    volumes:
      - postgres_data:/var/lib/postgresql/data/
    expose:
      - 5432
    environment:
      - POSTGRES_USER=django_traefik
      - POSTGRES_PASSWORD=django_traefik
      - POSTGRES_DB=django_traefik

volumes:
  postgres_data:
To persist the data beyond the life of the container we configured a volume. This config will bind postgres_data to the "/var/lib/postgresql/data/" directory in the container.
We also added an environment key to define a name for the default database and set a username and password.
Review the "Environment Variables" section of the Postgres Docker Hub page for more info.
Take note of the new command in the web service:
bash -c 'while !</dev/tcp/db/5432; do sleep 1; done; python manage.py runserver 0.0.0.0:8000'
while !</dev/tcp/db/5432; do sleep 1 will continue until Postgres is up. Once up, python manage.py runserver 0.0.0.0:8000 runs.
To configure Postgres, add django-environ, to load/read environment variables, and Psycopg2 to requirements.txt:
Django==4.1.6
django-environ==0.9.0
psycopg2-binary==2.9.5
Initialize environ at the top of config/settings.py:
# config/settings.py

import environ

env = environ.Env()
Then, update the DATABASES dict:
# config/settings.py

DATABASES = {
    'default': env.db(),
}
django-environ will automatically parse the database connection URL string that we added to docker-compose.yml:
DATABASE_URL=postgresql://django_traefik:django_traefik@db:5432/django_traefik
Update the DEBUG variable as well:
# config/settings.py

DEBUG = env('DEBUG')
Build the new image and spin up the two containers:
$ docker-compose up -d --build
Run the initial migration:
$ docker-compose exec web python manage.py migrate --noinput
Ensure the default Django tables were created:
$ docker-compose exec db psql --username=django_traefik --dbname=django_traefik

psql (15.2)
Type "help" for help.

django_traefik=# \l
                                            List of databases
      Name      |     Owner      | Encoding |  Collate   |   Ctype    |         Access privileges
----------------+----------------+----------+------------+------------+-----------------------------------
 django_traefik | django_traefik | UTF8     | en_US.utf8 | en_US.utf8 |
 postgres       | django_traefik | UTF8     | en_US.utf8 | en_US.utf8 |
 template0      | django_traefik | UTF8     | en_US.utf8 | en_US.utf8 | =c/django_traefik                +
                |                |          |            |            | django_traefik=CTc/django_traefik
 template1      | django_traefik | UTF8     | en_US.utf8 | en_US.utf8 | =c/django_traefik                +
                |                |          |            |            | django_traefik=CTc/django_traefik
(4 rows)

django_traefik=# \c django_traefik
You are now connected to database "django_traefik" as user "django_traefik".

django_traefik=# \dt
                      List of relations
 Schema |            Name            | Type  |     Owner
--------+----------------------------+-------+----------------
 public | auth_group                 | table | django_traefik
 public | auth_group_permissions     | table | django_traefik
 public | auth_permission            | table | django_traefik
 public | auth_user                  | table | django_traefik
 public | auth_user_groups           | table | django_traefik
 public | auth_user_user_permissions | table | django_traefik
 public | django_admin_log           | table | django_traefik
 public | django_content_type        | table | django_traefik
 public | django_migrations          | table | django_traefik
 public | django_session             | table | django_traefik
(10 rows)

django_traefik=# \q
You can check that the volume was created as well by running:
$ docker volume inspect django-docker-traefik_postgres_data
You should see something similar to:
[
    {
        "CreatedAt": "2023-02-11T18:01:42Z",
        "Driver": "local",
        "Labels": {
            "com.docker.compose.project": "django-docker-traefik",
            "com.docker.compose.version": "2.12.2",
            "com.docker.compose.volume": "postgres_data"
        },
        "Mountpoint": "/var/lib/docker/volumes/django-docker-traefik_postgres_data/_data",
        "Name": "django-docker-traefik_postgres_data",
        "Options": null,
        "Scope": "local"
    }
]
Gunicorn
Moving along, for production environments, let's add Gunicorn, a production-grade WSGI server, to the requirements file:
Django==4.1.6
django-environ==0.9.0
psycopg2-binary==2.9.5
gunicorn==20.1.0
Since we still want to use Django's built-in server in development, create a new compose file called docker-compose.prod.yml for production:
# docker-compose.prod.yml

version: '3.8'

services:
  web:
    build: ./app
    command: bash -c 'while !</dev/tcp/db/5432; do sleep 1; done; gunicorn --bind 0.0.0.0:8000 config.wsgi'
    ports:
      - 8008:8000
    environment:
      - DEBUG=0
      - DATABASE_URL=postgresql://django_traefik:django_traefik@db:5432/django_traefik
    depends_on:
      - db
  db:
    image: postgres:15-alpine
    volumes:
      - postgres_data_prod:/var/lib/postgresql/data/
    expose:
      - 5432
    environment:
      - POSTGRES_USER=django_traefik
      - POSTGRES_PASSWORD=django_traefik
      - POSTGRES_DB=django_traefik

volumes:
  postgres_data_prod:
If you have multiple environments, you may want to look at using a docker-compose.override.yml configuration file. With this approach, you'd add your base config to a docker-compose.yml file and then use a docker-compose.override.yml file to override those config settings based on the environment.
Take note of the default command. We're running Gunicorn rather than the Django development server. We also removed the volume from the web service since we don't need it in production.
Bring down the development containers (and the associated volumes with the -v flag):
$ docker-compose down -v
Then, build the production images and spin up the containers:
$ docker-compose -f docker-compose.prod.yml up -d --build
Run the migrations:
$ docker-compose -f docker-compose.prod.yml exec web python manage.py migrate --noinput
Verify that the django_traefik database was created along with the default Django tables. Test out the admin page at http://localhost:8008/admin. The static files are not being loaded correctly. This is expected. We'll fix this shortly.
Again, if the container fails to start, check for errors in the logs via
docker-compose -f docker-compose.prod.yml logs -f.
Production Dockerfile
Create a new Dockerfile called Dockerfile.prod for use with production builds:
# app/Dockerfile.prod

###########
# BUILDER #
###########

# pull official base image
FROM python:3.11-slim as builder

# set work directory
WORKDIR /app

# set environment variables
ENV PYTHONDONTWRITEBYTECODE 1
ENV PYTHONUNBUFFERED 1

# install system dependencies
RUN apt-get update && \
    apt-get install -y --no-install-recommends gcc

# lint
RUN pip install --upgrade pip
RUN pip install flake8==6.0.0
COPY . .
RUN flake8 --ignore=E501,F401 .

# install python dependencies
COPY requirements.txt .
RUN pip wheel --no-cache-dir --no-deps --wheel-dir /usr/src/app/wheels -r requirements.txt


#########
# FINAL #
#########

# pull official base image
FROM python:3.11-slim

# create directory for the app user
RUN mkdir -p /home/app

# create the app user
RUN addgroup --system app && adduser --system --group app

# create the appropriate directories
ENV HOME=/home/app
ENV APP_HOME=/home/app/web
RUN mkdir $APP_HOME
WORKDIR $APP_HOME

# install dependencies
COPY --from=builder /usr/src/app/wheels /wheels
COPY --from=builder /app/requirements.txt .
RUN pip install --upgrade pip
RUN pip install --no-cache /wheels/*

# copy project
COPY . $APP_HOME

# chown all the files to the app user
RUN chown -R app:app $APP_HOME

# change to the app user
USER app
Here, we used a Docker multi-stage build to reduce the final image size. Essentially, builder is a temporary image that's used for building the Python wheels. The wheels are then copied over to the final production image and the builder image is discarded.
You could take the multi-stage build approach a step further and use a single Dockerfile instead of creating two Dockerfiles. Think of the pros and cons of using this approach over two different files.
Did you notice that we created a non-root user? By default, Docker runs container processes as root inside of a container. This is a bad practice since attackers can gain root access to the Docker host if they manage to break out of the container. If you're root in the container, you'll be root on the host.
Update the web service within the docker-compose.prod.yml file to build with Dockerfile.prod:
web:
  build:
    context: ./app
    dockerfile: Dockerfile.prod
  command: bash -c 'while !</dev/tcp/db/5432; do sleep 1; done; gunicorn --bind 0.0.0.0:8000 config.wsgi'
  ports:
    - 8008:8000
  environment:
    - DEBUG=0
    - DATABASE_URL=postgresql://django_traefik:django_traefik@db:5432/django_traefik
  depends_on:
    - db
Now, let's rebuild the production images and spin up the containers:
$ docker-compose -f docker-compose.prod.yml down -v
$ docker-compose -f docker-compose.prod.yml up -d --build
$ docker-compose -f docker-compose.prod.yml exec web python manage.py migrate --noinput
Traefik
Next, let's add Traefik, a reverse proxy, into the mix.
New to Traefik? Check out the offical Getting Started guide.
Traefik vs Nginx: Traefik is a modern, HTTP reverse proxy and load balancer. It's often compared to Nginx, a web server and reverse proxy. Since Nginx is primarily a webserver, it can be used to serve up a webpage as well as serve as a reverse proxy and load balancer. In general, Traefik is simpler to get up and running while Nginx is more versatile.
Traefik:
- Reverse proxy and load balancer
- Automatically issues and renews SSL certificates, via Let's Encrypt, out-of-the-box
- Use Traefik for simple, Docker-based microservices
Nginx:
- Web server, reverse proxy, and load balancer
- Slightly faster than Traefik
- Use Nginx for complex services
Add a new file called traefik.dev.toml:
# traefik.dev.toml

# listen on port 80
[entryPoints]
  [entryPoints.web]
    address = ":80"

# Traefik dashboard over http
[api]
insecure = true

[log]
level = "DEBUG"

[accessLog]

# containers are not discovered automatically
[providers]
  [providers.docker]
    exposedByDefault = false
Here, since we don't want to expose the db service, we set exposedByDefault to false. To manually expose a service we can add the "traefik.enable=true" label to the Docker Compose file.
Next, update the docker-compose.yml file so that our web service is discovered by Traefik and add a new traefik service:
# docker-compose.yml

version: '3.8'

services:
  web:
    build: ./app
    command: bash -c 'while !</dev/tcp/db/5432; do sleep 1; done; python manage.py runserver 0.0.0.0:8000'
    volumes:
      - ./app:/app
    expose:  # new
      - 8000
    environment:
      - DEBUG=1
      - DATABASE_URL=postgresql://django_traefik:django_traefik@db:5432/django_traefik
    depends_on:
      - db
    labels: # new
      - "traefik.enable=true"
      - "traefik.http.routers.django.rule=Host(`django.localhost`)"
  db:
    image: postgres:15-alpine
    volumes:
      - postgres_data:/var/lib/postgresql/data/
    expose:
      - 5432
    environment:
      - POSTGRES_USER=django_traefik
      - POSTGRES_PASSWORD=django_traefik
      - POSTGRES_DB=django_traefik
  traefik: # new
    image: traefik:v2.9.6
    ports:
      - 8008:80
      - 8081:8080
    volumes:
      - "$PWD/traefik.dev.toml:/etc/traefik/traefik.toml"
      - "/var/run/docker.sock:/var/run/docker.sock:ro"

volumes:
  postgres_data:
First, the web service is only exposed to other containers on port 8000. We also added the following labels to the web service:
traefik.enable=trueenables Traefik to discover the servicetraefik.http.routers.django.rule=Host(`django.localhost`)when the request hasHost=django.localhost, the request is redirected to this service
Take note of the volumes within the traefik service:
"$PWD/traefik.dev.toml:/etc/traefik/traefik.toml"maps the local config file to the config file in the container so that the settings are kept in sync"/var/run/docker.sock:/var/run/docker.sock:ro"enables Traefik to discover other containers
To test, first bring down any existing containers:
$ docker-compose down -v
$ docker-compose -f docker-compose.prod.yml down -v
Build the new development images and spin up the containers:
$ docker-compose up -d --build
Navigate to http://django.localhost:8008/. You should see the Django welcome page.
Next, check out the dashboard at django.localhost:8081:
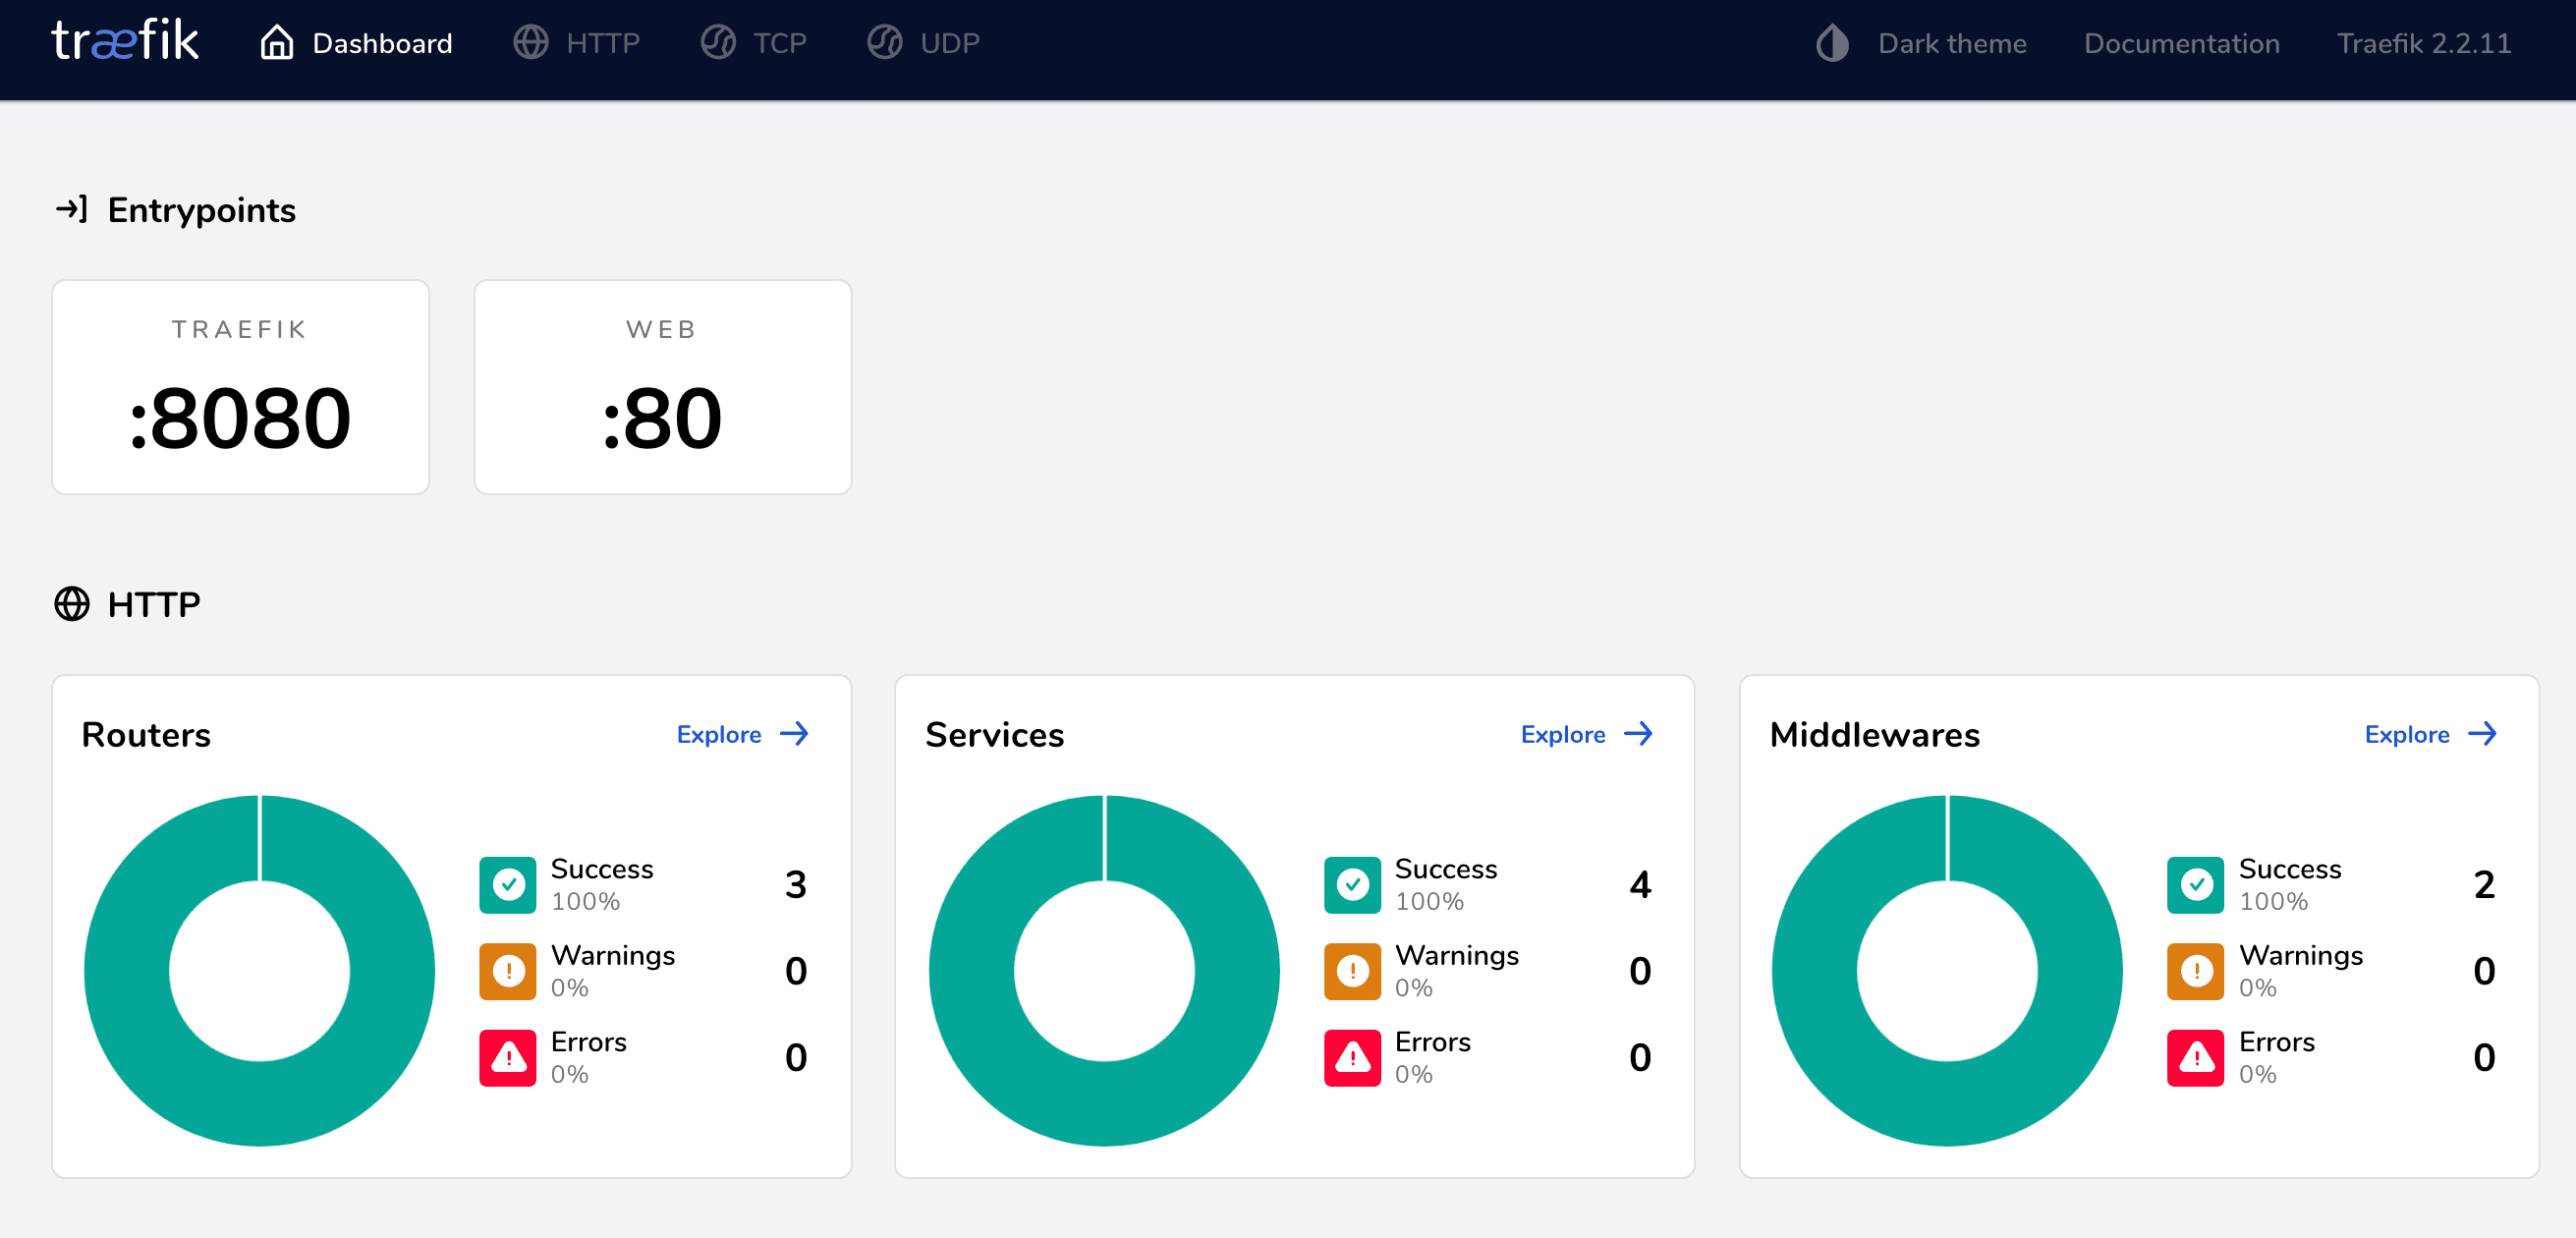
Bring the containers and volumes down once done:
$ docker-compose down -v
Let's Encrypt
We've successfully created a working example of Django, Docker, and Traefik in development mode. For production, you'll want to configure Traefik to manage TLS certificates via Let's Encrypt. In short, Traefik will automatically contact the certificate authority to issue and renew certificates.
Since Let's Encrypt won't issue certificates for localhost, you'll need to spin up your production containers on a cloud compute instance (like a DigitalOcean droplet or an AWS EC2 instance). You'll also need a valid domain name. If you don't have one, you can create a free domain at Freenom.
We used a DigitalOcean droplet to provision a compute instance with Docker and deployed the production containers to test out the Traefik config.
Assuming you configured a compute instance and set up a free domain, you're now ready to set up Traefik in production mode.
Start by adding a production version of the Traefik config to a file called traefik.prod.toml:
# traefik.prod.toml

[entryPoints]
  [entryPoints.web]
    address = ":80"
  [entryPoints.web.http]
    [entryPoints.web.http.redirections]
      [entryPoints.web.http.redirections.entryPoint]
        to = "websecure"
        scheme = "https"

  [entryPoints.websecure]
    address = ":443"

[accessLog]

[api]
dashboard = true

[providers]
  [providers.docker]
    exposedByDefault = false

[certificatesResolvers.letsencrypt.acme]
  email = "[email protected]"
  storage = "/certificates/acme.json"
  [certificatesResolvers.letsencrypt.acme.httpChallenge]
    entryPoint = "web"
Make sure to replace
[email protected]with your actual email address.
What's happening here:
entryPoints.websets the entry point for our insecure HTTP application to port 80entryPoints.websecuresets the entry point for our secure HTTPS application to port 443entryPoints.web.http.redirections.entryPointredirects all insecure requests to the secure portexposedByDefault = falseunexposes all servicesdashboard = trueenables the monitoring dashboard
Finally, take note of:
[certificatesResolvers.letsencrypt.acme]
  email = "[email protected]"
  storage = "/certificates/acme.json"
  [certificatesResolvers.letsencrypt.acme.httpChallenge]
    entryPoint = "web"
This is where the Let's Encrypt config lives. We defined where the certificates will be stored along with the verification type, which is an HTTP Challenge.
Next, assuming you updated your domain name's DNS records, create two new A records that both point at your compute instance's public IP:
django-traefik.your-domain.com- for the web servicedashboard-django-traefik.your-domain.com- for the Traefik dashboard
Make sure to replace
your-domain.comwith your actual domain.
Next, update docker-compose.prod.yml like so:
# docker-compose.prod.yml

version: '3.8'

services:
  web:
    build:
      context: ./app
      dockerfile: Dockerfile.prod
    command: bash -c 'while !</dev/tcp/db/5432; do sleep 1; done; gunicorn --bind 0.0.0.0:8000 config.wsgi'
    expose:  # new
      - 8000
    environment:
      - DEBUG=0
      - DATABASE_URL=postgresql://django_traefik:django_traefik@db:5432/django_traefik
      - DJANGO_ALLOWED_HOSTS=.your-domain.com
    depends_on:
      - db
    labels:  # new
      - "traefik.enable=true"
      - "traefik.http.routers.django.rule=Host(`django-traefik.your-domain.com`)"
      - "traefik.http.routers.django.tls=true"
      - "traefik.http.routers.django.tls.certresolver=letsencrypt"
  db:
    image: postgres:15-alpine
    volumes:
      - postgres_data_prod:/var/lib/postgresql/data/
    expose:
      - 5432
    environment:
      - POSTGRES_USER=django_traefik
      - POSTGRES_PASSWORD=django_traefik
      - POSTGRES_DB=django_traefik
  traefik:  # new
    build:
      context: .
      dockerfile: Dockerfile.traefik
    ports:
      - 80:80
      - 443:443
    volumes:
      - "/var/run/docker.sock:/var/run/docker.sock:ro"
      - "./traefik-public-certificates:/certificates"
    labels:
      - "traefik.enable=true"
      - "traefik.http.routers.dashboard.rule=Host(`dashboard-django-traefik.your-domain.com`)"
      - "traefik.http.routers.dashboard.tls=true"
      - "traefik.http.routers.dashboard.tls.certresolver=letsencrypt"
      - "traefik.http.routers.dashboard.service=api@internal"
      - "traefik.http.routers.dashboard.middlewares=auth"
      - "traefik.http.middlewares.auth.basicauth.users=testuser:$$apr1$$jIKW.bdS$$eKXe4Lxjgy/rH65wP1iQe1"

volumes:
  postgres_data_prod:
  traefik-public-certificates:
Again, make sure to replace
your-domain.comwith your actual domain.
What's new here?
In the web service, we added the following labels:
traefik.http.routers.django.rule=Host(`django-traefik.your-domain.com`)changes the host to the actual domaintraefik.http.routers.django.tls=trueenables HTTPStraefik.http.routers.django.tls.certresolver=letsencryptsets the certificate issuer as Let's Encrypt
Next, for the traefik service, we added the appropriate ports and a volume for the certificates directory. The volume ensures that the certificates persist even if the container is brought down.
As for the labels:
traefik.http.routers.dashboard.rule=Host(`dashboard-django-traefik.your-domain.com`)defines the dashboard host, so it can can be accessed at$Host/dashboard/traefik.http.routers.dashboard.tls=trueenables HTTPStraefik.http.routers.dashboard.tls.certresolver=letsencryptsets the certificate resolver to Let's Encrypttraefik.http.routers.dashboard.middlewares=authenablesHTTP BasicAuthmiddlewaretraefik.http.middlewares.auth.basicauth.usersdefines the username and hashed password for logging in
You can create a new password hash using the htpasswd utility:
# username: testuser
# password: password

$ echo $(htpasswd -nb testuser password) | sed -e s/\\$/\\$\\$/g
testuser:$$apr1$$jIKW.bdS$$eKXe4Lxjgy/rH65wP1iQe1
Feel free to use an env_file to store the username and password as environment variables
USERNAME=testuser
HASHED_PASSWORD=$$apr1$$jIKW.bdS$$eKXe4Lxjgy/rH65wP1iQe1
Next, update the ALLOWED_HOSTS environment variable in config/settings.py like so:
# config/settings.py

ALLOWED_HOSTS = env('DJANGO_ALLOWED_HOSTS', default=[])
Finally, add a new Dockerfile called Dockerfile.traefik:
# Dockerfile.traefik

FROM traefik:v2.9.6

COPY ./traefik.prod.toml ./etc/traefik/traefik.toml
Next, spin up the new containers:
$ docker-compose -f docker-compose.prod.yml up -d --build
Ensure the two URLs work:
Also, make sure that when you access the HTTP versions of the above URLs, you're redirected to the HTTPS versions.
Finally, Let's Encrypt certificates have a validity of 90 days. Treafik will automatically handle renewing the certificates for you behind the scenes, so that's one less thing you'll have to worry about!
Static Files
Since Traefik doesn't serve static files, we'll use WhiteNoise to manage the static assets.
First, add the package to the requirements.txt file:
Django==4.1.6
django-environ==0.9.0
psycopg2-binary==2.9.5
gunicorn==20.1.0
whitenoise==6.3.0
Update the middleware in config/settings.py like so:
# config/settings.py

MIDDLEWARE = [
    'django.middleware.security.SecurityMiddleware',
    'whitenoise.middleware.WhiteNoiseMiddleware',  # new
    'django.contrib.sessions.middleware.SessionMiddleware',
    'django.middleware.common.CommonMiddleware',
    'django.middleware.csrf.CsrfViewMiddleware',
    'django.contrib.auth.middleware.AuthenticationMiddleware',
    'django.contrib.messages.middleware.MessageMiddleware',
    'django.middleware.clickjacking.XFrameOptionsMiddleware',
]
Then configure the handling of your staticfiles with STATIC_ROOT:
# config/settings.py

STATIC_ROOT = BASE_DIR / 'staticfiles'
FInally, add compression and caching support:
# config/settings.py

STATICFILES_STORAGE = 'whitenoise.storage.CompressedManifestStaticFilesStorage'
To test, update the images and containers:
$ docker-compose -f docker-compose.prod.yml up -d --build
Collect the static files:
$ docker-compose -f docker-compose.prod.yml exec web python manage.py collectstatic
Ensure the static files are being served correctly at https://django-traefik.your-domain.com/admin.
Conclusion
In this tutorial, we walked through how to containerize a Django application with Postgres for development. We also created a production-ready Docker Compose file, set up Traefik and Let's Encrypt to serve the application via HTTPS, and enabled a secure dashboard to monitor our services.
In terms of actual deployment to a production environment, you'll probably want to use a:
- Fully-managed database service -- like RDS or Cloud SQL -- rather than managing your own Postgres instance within a container.
- Non-root user for the services.
You can find the code in the django-docker-traefik repo.