 Amir Tadrisi
If you talk to a man in a language he understands, that goes to his head. If you talk to him in his own language, that goes to his heart.
— Nelson Mandela
WebAssembly (WASM) opened the door for many languages to be used in different environments -- like the browser, cloud, serverless, and blockchain, to name a few -- that they couldn't have been used in before. For example, with Pyodide, which leverages WASM, you can run Python in the browser. You can also use runtimes like Wasmer to compile Python to WebAssembly, containerize it, and then run the container in different destinations like edge, IoT, and operating systems.
In this tutorial, you'll build a Single Page Application using Python and Pyodide to manipulate the DOM and manage state.
--
Python Single Page Application Series:
- Part 1 (this tutorial!): Learn the basics of Pyodide and create the base application
- Part 2: Analyze and manipulate the data with Pandas and use a web worker to speed up the application
- Part 3: Create a Python package, add additional features, and add a persistent data layer
Contents
Objectives
By the end of this tutorial, you should be able to:
- Use Pyodide alongside JavaScript to share and access objects between the two
- Manipulate the DOM directly from Python code
- Run Python's powerful data science libraries in the browser
- Create a Single Page Application (SPA) application that fetches data from a remote file, manipulates the data with Pandas, and renders it in the browser
Python in the Browser
What does it mean?
Running Python in the browser means that we can execute Python code directly on the client-side without needing to host and execute code on a server. This is made possible by WebAssembly, which allows us to build true "serverless" applications.
Why is it important? Why not just use JavaScript?
The main goal behind running Python in the browser is not to replace JavaScript but to bring both languages together and let each community use each other's powerful tools and libraries. For example, in this tutorial, we'll be using Python's Pandas library alongside JavaScript.
What We're Building
In this tutorial series, we'll be building a serverless Single Page Application (SPA) that fetches a Netflix Movies and Shows Dataset and uses Pandas to read, sanitize, manipulate and analyze the data. The results are then displayed on the DOM for the end user to see.
Our final project is a SPA that displays a list of movies and television shows, recommended movies and shows, and interesting facts. The end user will be able to delete and filter movies and shows. Data persists in PouchDB.
In this part, we'll focus on:
- Learning the basics of Pyodide and Pandas
- Sharing objects and methods between Python and JavaScript
- Manipulating the DOM from Python code
- Building the basic application structure
You can find a live demo of the application that you'll create in this first part here.
DOM Manipulation with Python
Before we dive into building the application, let's quickly look at how we can use Python to interact with the DOM API to manipulate it directly.
To begin with, create a new HTML file called index.html:
<!DOCTYPE html>
<html>
  <head>
    <script src="https://cdn.jsdelivr.net/pyodide/v0.20.0/full/pyodide.js"></script>
  </head>

  <body>
    <p id="title">My first Pyodide app</p>

    <script>
      async function main() {
        let pyodide = await loadPyodide();

        pyodide.runPython(`print('Hello world, from the browser!')`);
      };

      main();
    </script>
  </body>
</html>
Here, we loaded the main Pyodide runtime along with Pyodide's built-in packages from a CDN and ran a simple Python script using the runPython method.
Open the file in your browser. Then, within the console in your browser's developer tools, you should see:
Loading distutils
Loaded distutils
Python initialization complete
Hello world, from the browser!
The last line shows that our Python code got executed in the browser. Now let's see how we can access the DOM. To do so, we can import the js library to access the JavaScript scope.
Update the HTML file like so:
<!DOCTYPE html>
<html>
  <head>
    <script src="https://cdn.jsdelivr.net/pyodide/v0.20.0/full/pyodide.js"></script>
  </head>

  <body>
    <p id="title">My first Pyodide app</p>

    <script>
      async function main() {
        let pyodide = await loadPyodide();

        pyodide.runPython(`
          print('Hello world, from the browser!')

          import js
          js.document.title = "Hello from Python"
        `);
      };

      main();
    </script>
  </body>
</html>
So, js represents the global object window that can then be used to directly manipulate the DOM and access global variables and functions. We used it to change the browser / document title to "Hello from Python".
Refresh the browser to ensure it works.
Next, let's update the paragraph's inner text from "My first Pyodide app" to "Replaced by Python":
<!DOCTYPE html>
<html>
  <head>
    <script src="https://cdn.jsdelivr.net/pyodide/v0.20.0/full/pyodide.js"></script>
  </head>

  <body>
    <p id="title">My first Pyodide app</p>

    <script>
      async function main() {
        let pyodide = await loadPyodide();

        pyodide.runPython(`
          print('Hello world, from the browser!')

          import js
          js.document.title = "Hello from Python"

          js.document.getElementById("title").innerText = "Replaced by Python"
        `);
      };

      main();
    </script>
  </body>
</html>
Save the file, and refresh the page again.
Type Translation
One great feature of Pyodide is that you can pass objects between Python and JavaScript. There are two translation methods:
- Implicit conversion converts basic data types that exist in both languages -- e.g., converting a Python
strto JavaScriptString. - Proxy objects convert objects/types that are not shared between the language.
Implicit Conversion
As mentioned, basic data types will be converted directly between Python and JavaScript without a need to create special objects.
| Python | JavaScript |
|---|---|
int |
Number or BigInt |
float |
Number |
str |
String |
bool |
Boolean |
None |
undefined |
| JavaScript | Python |
|---|---|
Number |
int or float |
BigInt |
int |
String |
str |
Boolean |
bool |
undefined |
None |
null |
None |
Let's look at an example.
Start by adding a new variable called name to the script tag:
<script>
  var name = "John Doe";  // NEW!

  async function main() {
    let pyodide = await loadPyodide();

    pyodide.runPython(`
      print('Hello world, from the browser!')

      import js
      js.document.title = "Hello from Python"

      js.document.getElementById("title").innerText = "Replaced by Python"
    `);
  };

  main();
</script>
Next, let's take a look at the type and value using js:
<script>
  var name = "John Doe";

  async function main() {
    let pyodide = await loadPyodide();

    pyodide.runPython(`
      print('Hello world, from the browser!')

      import js
      js.document.title = "Hello from Python"

      js.document.getElementById("title").innerText = "Replaced by Python"
    `);

    // NEW !!
    pyodide.runPython(`
      import js
      name = js.name
      print(name, type(name))
    `);
  };

  main();
</script>
Refresh the browser. Within the console, you should see the following output:
John Doe <class 'str'>
As you can see, we have direct access to this variable's value, and it got converted from a JavaScript String to Python str.
Proxying
As you've seen, basic types can be converted directly to their equivalent in the target language. On the other hand, "non-basic" types need to be converted to a proxy object. There are two types of proxy objects:
- JSProxy is a proxy for making JavaScript objects behave like Python objects. In other words, it allows you to reference JavaScript objects in memory from Python code. You can use the to_py() method to convert the proxy to a native Python object.
- PyProxy is a proxy for making Python objects behave like JavaScript objects, allowing you to reference Python objects in memory from JavaScript code. You can use the toJs() method to convert the object to a native JavaScript object.
To convert a Python dictionary to JavaScript object, use the
dict_converterargument with a value ofObject.fromEntries:dictionary_name.toJs({ dict_converter: Object.fromEntries })Without this argument,
toJs()will convert the dictionary to a JavaScript Map object.
JSProxy Example
Create a new variable called products:
var products = [{
    id: 1,
    name: "product 1",
    price: 100,
}, {
    id: 2,
    name: "Product 2",
    price: 300,
}];
Import it into runPython and check the type:
pyodide.runPython(`
  import js
  print(type(js.products))
`);
Full script tag:
<script>
  var name = "John Doe";

  // NEW !!
  var products = [{
    id: 1,
    name: "product 1",
    price: 100,
  }, {
    id: 2,
    name: "Product 2",
    price: 300,
  }];

  async function main() {
    let pyodide = await loadPyodide();

    pyodide.runPython(`
      print('Hello world, from the browser!')

      import js
      js.document.title = "Hello from Python"

      js.document.getElementById("title").innerText = "Replaced by Python"
    `);
    pyodide.runPython(`
      import js
      name = js.name
      print(name, type(name))
    `);

    // NEW !!
    pyodide.runPython(`
      import js
      print(type(js.products))
    `);
  };

  main();
</script>
After refreshing the page, you should see in the console that the result is <class 'pyodide.JsProxy'>. With this proxy, we have access to the JavaScript object in memory from our Python code.
Update the newly added pyodide.runPython block like so:
pyodide.runPython(`
  import js
  products = js.products
  products.append({
      "id": 3,
      "name": "Product 3",
      "price": 400,
  })
  for p in products:
      print(p)
`);
You should see an AttributeError: append error in the browser since the JSProxy object doesn't have an append method.
What happens if you change
.appendto.push?
To manipulate this object, you can convert it to a Python object using the to_py() method:
pyodide.runPython(`
  import js
  products = js.products.to_py()
  products.append({
    "id": 3,
    "name": "Product 3",
    "price": 400,
  })
  for p in products:
      print(p)
`);
You should now see:
{'id': 1, 'name': 'product 1', 'price': 100}
{'id': 2, 'name': 'Product 2', 'price': 300}
{'id': 3, 'name': 'Product 3', 'price': 400}
PyProxy Example
Update the script tag like so:
<script>
  async function main() {
    let pyodide = await loadPyodide();

    pyodide.runPython(`
      import js
      products = [
        {
          "id": 1,
          "name": "new name",
          "price": 100,
          "votes": 2
        },
        {
          "id": 2,
          "name": "new name",
          "price": 300,
          "votes": 2
        }
      ]
    `);

    let products = pyodide.globals.get("products");
    console.log(products.toJs({ dict_converter: Object.fromEntries }));
  };

  main();
</script>
Here, we accessed the Python variable and then converted it from a Python dict to a JavaScript object via .toJs({ dict_converter: Object.fromEntries }).
After refreshing the page, you should see the following output in the console:
{id: 1, name: 'new name', price: 100, votes: 2}
{id: 2, name: 'new name', price: 300, votes: 2}
With that, let's put your newfound Pyodide knowledge to use and build an application!
Netflix Dataset
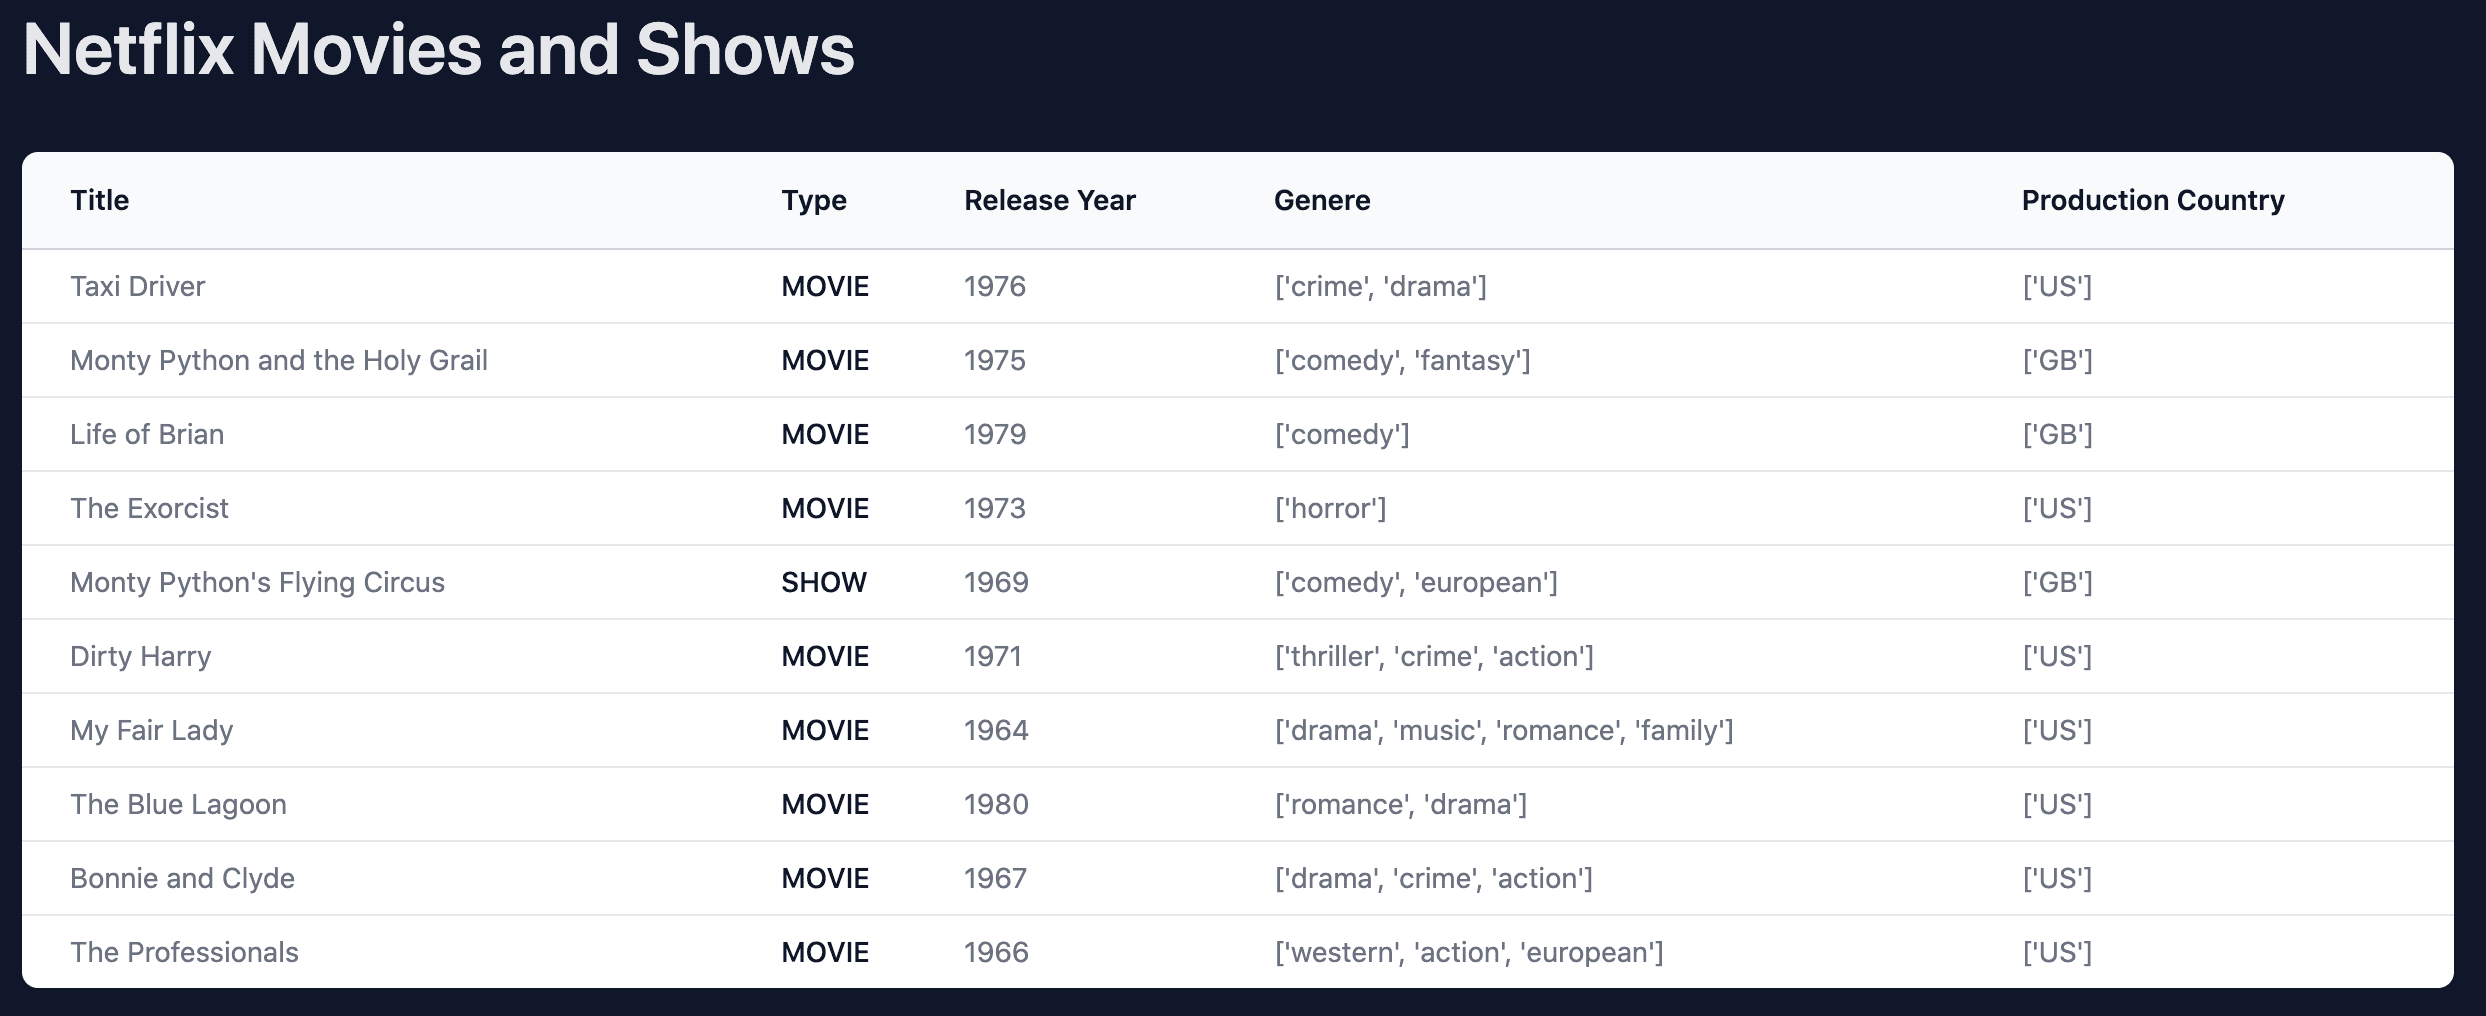
We'll be developing a serverless SPA application that fetches a Netflix dataset. We'll then use Pandas to read, sanitize, manipulate, and analyze the data. Finally, we'll pass the results to the DOM to display the analyzed data to the end user.
The dataset is a CSV, which includes the following columns:
| Name | Description |
|---|---|
| ID | The title ID on JustWatch. |
| title | The name of the title. |
| show type | TV show or movie. |
| description | A brief description. |
| release year | The release year. |
| age certification | The age certification. |
| runtime | The length of the episode (show) or movie. |
| genres | A list of genres. |
| production countries | A list of countries that produced the title. |
| seasons | Number of seasons if it's a show. |
| IMDB ID | The title ID on IMDB. |
| IMDB Score | Score on IMDB. |
| IMDB Votes | Votes on IMDB. |
| TMDB Popularity | Popularity on TMDB. |
| TMDB Score | Score on TMDB. |
Install Pyodide and TailwindCSS
Update the content of your index.html file like so:
<!DOCTYPE html>
<html>
  <head>
    <script src="https://cdn.jsdelivr.net/pyodide/v0.20.0/full/pyodide.js"></script>
    <script src="https://cdn.tailwindcss.com"></script>
  </head>

  <body class="bg-slate-900">
    <div id="app" class="relative h-full max-w-7xl mx-auto my-16"></div>
    <script>

    </script>
  </body>
</html>
As you can see, we loaded Pyodide from a CDN along with Tailwind CSS for styling. We also defined a <div> element with an id of app to hold the App component we'll be building out next.
Create the App Component
Add the following JavaScript code to the script tag:
class App {
  state = {
    titles:[],
  }

  view() {
    return `<p class="text-slate-100">Hello, World!</p>`
  }

  render() {
    app.innerHTML = this.view();
  }
}
Here, we defined an object called App. We'll refer to this as a component since it's an independent, reusable piece of code.
The App component has a state object for holding data along with two nested functions called view() and render(). render() simply appends the outputted HTML code from view() to the DOM, to the div with an id of app.
Let's create a new instance of App called appComponent and call render() on it. Add the following code after the class declaration of App:
var appComponent = new App();
appComponent.render();
Open the file in your browser. You should see "Hello, World!".
Add Sample Data
Next, let's add sample movies to the state. In the script tag, right before calling appComponent.render();, update the state with the following:
appComponent.state.titles = [
  {
    "id": 1,
    "title": "The Shawshank Redemption",
    "release_year": 1994,
    "type": "MOVIE",
    "genres": [
      "Crime",
      "Drama"
    ],
    "production_countries": [
      "USA"
    ],
    "imdb_score": 9.3,
    "imdb_votes": 93650,
    "tmdb_score": 9.3,
  },
  {
    "id": 2,
    "title": "The Godfather",
    "release_year": 1972,
    "type": "MOVIE",
    "genres": [
      "Crime",
      "Drama"
    ],
    "production_countries": [
      "USA"
    ],
    "imdb_score": 9.2,
    "imdb_votes": 93650,
    "tmdb_score": 9.3,
  }
];
Now, we can construct a table to display the data by updating view() in our App class like so:
view() {
  return (`
    <div class="px-4 sm:px-6 lg:px-8">
      <div class="sm:flex sm:items-center">
        <div class="sm:flex-auto">
          <h1 class="text-4xl font-semibold text-gray-200">Netflix Movies and Shows</h1>
        </div>
      </div>
      <!-- Start of Titles --!>
      <div class="mt-8 flex flex-col">
        <div class="-my-2 -mx-4 overflow-x-auto sm:-mx-6 lg:-mx-8">
          <div class="inline-block min-w-full py-2 align-middle md:px-6 lg:px-8">
            <div class="overflow-hidden shadow ring-1 ring-black ring-opacity-5 md:rounded-lg">
              <table class="min-w-full divide-y divide-gray-300">
                <thead class="bg-gray-50">
                  <tr>
                    <th scope="col" class="whitespace-nowrap py-3.5 pl-4 pr-3 text-left text-sm font-semibold text-gray-900 sm:pl-6">Title</th>
                    <th scope="col" class="whitespace-nowrap px-2 py-3.5 text-left text-sm font-semibold text-gray-900">Type</th>
                    <th scope="col" class="whitespace-nowrap px-2 py-3.5 text-left text-sm font-semibold text-gray-900">Release Year</th>
                    <th scope="col" class="whitespace-nowrap px-2 py-3.5 text-left text-sm font-semibold text-gray-900">Genre</th>
                    <th scope="col" class="whitespace-nowrap px-2 py-3.5 text-left text-sm font-semibold text-gray-900">Production Country</th>
                  </tr>
                </thead>
                <tbody class="divide-y divide-gray-200 bg-white">
                  ${this.state.titles.length > 0 ? this.state.titles.map(function (title) {
                    return (`
                      <tr id=${title.id}>
                        <td class="whitespace-nowrap py-2 pl-4 pr-3 text-sm text-gray-500 sm:pl-6">${title.title}</td>
                        <td class="whitespace-nowrap px-2 py-2 text-sm font-medium text-gray-900">${title.type}</td>
                        <td class="whitespace-nowrap px-2 py-2 text-sm text-gray-500">${title.release_year}</td>
                        <td class="whitespace-nowrap px-2 py-2 text-sm text-gray-500">${title.genres}</td>
                        <td class="whitespace-nowrap px-2 py-2 text-sm text-gray-500">${title.production_countries}</td>
                      </tr>
                    `)
                  }).join('') : (`
                    <tr>
                      <td class="whitespace-nowrap py-2 pl-4 pr-3 text-sm text-gray-500 sm:pl-6">Titles are loading...</td>
                      <td class="whitespace-nowrap px-2 py-2 text-sm font-medium text-gray-900">Titles are loading...</td>
                      <td class="whitespace-nowrap px-2 py-2 text-sm text-gray-500">Titles are loading...</td>
                      <td class="whitespace-nowrap px-2 py-2 text-sm text-gray-500">Titles are loading...</td>
                      <td class="whitespace-nowrap px-2 py-2 text-sm text-gray-500">Titles are loading...</td>
                    </tr>
                  `)
                  }
                </tbody>
              </table>
            <div>
          </div>
        </div>
      </div>
      <!-- End of Titles --!>
    </div>
  `)
}
So, we-
- added a table element with columns for title, type, release year, genre(s), and production country.
- Checked the
state.titlesarray length to see if it contains any titles. If there are titles, we looped through them and created a table row for each. If not, we created a table row with a loading message.
Refresh the page in the browser.
Pandas Data Manipulation
Installing Pandas
To load Python packages in Pyodide, you can use the loadPackage function right after initializing Pyodide.
For example:
let pyodide = await loadPyodide();
await pyodide.loadPackage("requests");
You can load multiple packages using a list:
await pyodide.loadPackage(["requests", "pandas", "numpy"]);
Back in your HTML file, add a main function after appComponent.render();:
async function main() {
  let pyodide = await loadPyodide();
  await pyodide.loadPackage("pandas");
}
Don't forget to call it:
main();
Refresh the page in your browser. You should see the following in the console:
Loading pandas, numpy, python-dateutil, six, pytz, setuptools, pyparsing
Loaded python-dateutil, six, pytz, pyparsing, setuptools, numpy, pandas
So, Pandas and the relevant sub-dependencies were loaded into the browser!
Reading and Manipulating Data
In this section, we'll fetch a CSV file from the internet, read it into a Pandas DataFrame, sanitize and manipulate it, and finally pass it to the state.
Python code:
import js
import pandas as pd
from pyodide.http import pyfetch

# 1. fetching CSV from and write it to memory
response = await pyfetch("https://raw.githubusercontent.com/amirtds/kaggle-netflix-tv-shows-and-movies/main/titles.csv")
if response.status == 200:
    with open("titles.csv", "wb") as f:
        f.write(await response.bytes())

# 2. load the csv file
all_titles = pd.read_csv("titles.csv")

# 3. sanitize the data
# drop unnecessary columns
all_titles = all_titles.drop(
    columns=[
        "age_certification",
        "seasons",
        "imdb_id",
    ]
)
# drop rows with null values for important columns
sanitized_titles = all_titles.dropna(
    subset=[
        "id",
        "title",
        "release_year",
        "genres",
        "production_countries",
        "imdb_score",
        "imdb_votes",
        "tmdb_score",
        "tmdb_popularity",
    ]
)
# Convert the DataFrame to a JSON object. ('orient="records"' returns a list of objects)
titles_list = sanitized_titles.head(10).to_json(orient="records")

# 4. set titles to first 10 titles to the state
js.window.appComponent.state.titles = titles_list
js.window.appComponent.render()
Take note of the code comments.
Add this code to a runPythonAsync method within main:
async function main() {
  let pyodide = await loadPyodide();
  await pyodide.loadPackage("pandas");
  await pyodide.runPythonAsync(`
    // add the code here
  `);
}
Next, remove appComponent.state.titles. Also, we need to change this line in the view method:
${this.state.titles.length > 0 ? this.state.titles.map(function (title) {
To:
${this.state.titles.length > 0 ? JSON.parse(this.state.titles).map(function (title) {
Why?
titles_list (titles_list = sanitized_titles.head(10).to_json(orient="records")) is a JSON string, so in order to iterate over it, we need to deserialize it.
Refresh the page in your browser. You should first see a loading message in the table. After Pyodide loads, Pandas imports, and, after the script finishes executing, you should see the full movies list.
Conclusion
We covered a lot in this tutorial! We looked at how Pyodide can let you run Python code in the browser, giving you the power to:
- Load and use Python packages directly in the browser. (We used Pandas to read and analyze a CSV file.)
- Access and manipulate the DOM from Python code. (Importing js in our Python code gave us access to the DOM.)
- Share and access objects and namespaces between Python and JavaScript. (In our Javascript code, we created a component that we were able to access in our Python code in order to manage its state and call its methods.)
You can find the source code for this tutorial here.
--
We're still missing a few things and we need to address a few issues, though:
- First, We haven't done much with the CSV file we imported. Pandas gives us a lot of power to easily analyze and manipulate data.
- Second, Pyodide can take some time to initialize and run the Python script. Since it's currently running in the main thread, it paralyzes the application until it's done running. We should move Pyodide and the Python script to a web worker to prevent this.
- Third, We haven't seen full SPA-like behavior yet. We still need to update the component to add event listeners to respond to user actions.
- Finally, the Python script section is not syntax highlighted in code editors. Plus, it's starting to get hard to read. We should move this code to a Python package and import it into Pyodide. This will make it easier to maintain and scale.
We'll cover these four things in the next tutorials!
--
Python Single Page Application Series: