This tutorial looks at how to leverage the JAMstack with Python and Flask. You'll learn how to generate a static site with Flask, via Frozen-Flask, and deploy it to Netlify. We'll also look at how to test the static site with pytest.
This tutorial assumes that you have prior experience with Flask. If you're interested in learning more about Flask, check out my course on how to build, test, and deploy a Flask application: Developing Web Applications with Python and Flask.
The website created in this tutorial can be found at: https://www.kennedyrecipes.com
Contents
Static vs Dynamic Websites
Static websites are intended to provide information by displaying the same content for every user. Dynamic websites, meanwhile, provide different content and are intended to be functional by enabling user interaction.
Here's a summary of the differences:
| Description | Static Site | Dynamic Site |
|---|---|---|
| Display content to users? | ✅ | ✅ |
| Allow user interaction (forms)? | ❌ | ✅ |
| Client-side files (HTML, CSS)? | ✅ | ✅ |
| Server-side code (Python, etc.)? | ❌ | ✅ |
| Serverless hosting (Netlify, etc.)? | ✅ | ❌ |
| Require web server resources? | ❌ | ✅ |
The 'Serverless hosting' category is intended to show that static sites can easily be deployed using serverless solutions (e.g., Netlify, Cloudflare, GitHub Pages, etc.). Dynamic sites can also be hosted using serverless solutions (e.g., AWS Lambda), but it's a much more complex process.
Static websites display the same fixed content for every user that accesses the website. Typically, static websites are written with HTML, CSS, and JavaScript.
Dynamic websites, on the other hand, can display different content to each user and they provide user interaction (login/logout, create and modify items in the database, etc.). Dynamic websites are much more complex than static websites as they require server-side resources and application code to handle requests. The application code needs to be maintained (crash fixes, security updates, language upgrades, etc.) as well.
Why develop a static website?
If you're creating a website that is intended to provide information, a static site is a great option. Static websites are a lot easier to create and maintain than dynamic websites, as long as you understand their limitations.
JAMstack
JAMstack is a web architecture that focuses on two key concepts: pre-rendering content and decoupling services.
- JAM - JavaScript, APIs, and Markup
- stack - layers of technology
Pre-rendering content means that the front-end content (HTML, CSS, JavaScript, and other static files) is built into static sites. The advantage of this process is that the static content can be served quickly to web browsers from a CDN (Content Delivery Network).
We'll be using Netlify to deploy the static site in this tutorial. Netlify can serve sites lightning quick thanks to an extensive CDN.
Decoupling services means leveraging the incredible set of APIs that provide services and products. APIs are available for:
- Authentication and authorization (Okta)
- Payments (Stripe)
- Forms (Formspree)
- Search (Algolia)
- Comments (Disqus)
For more API services, check out the Awesome Static Website Services.
When compared to traditional web apps, JAMstack apps have a reduced set of layers:
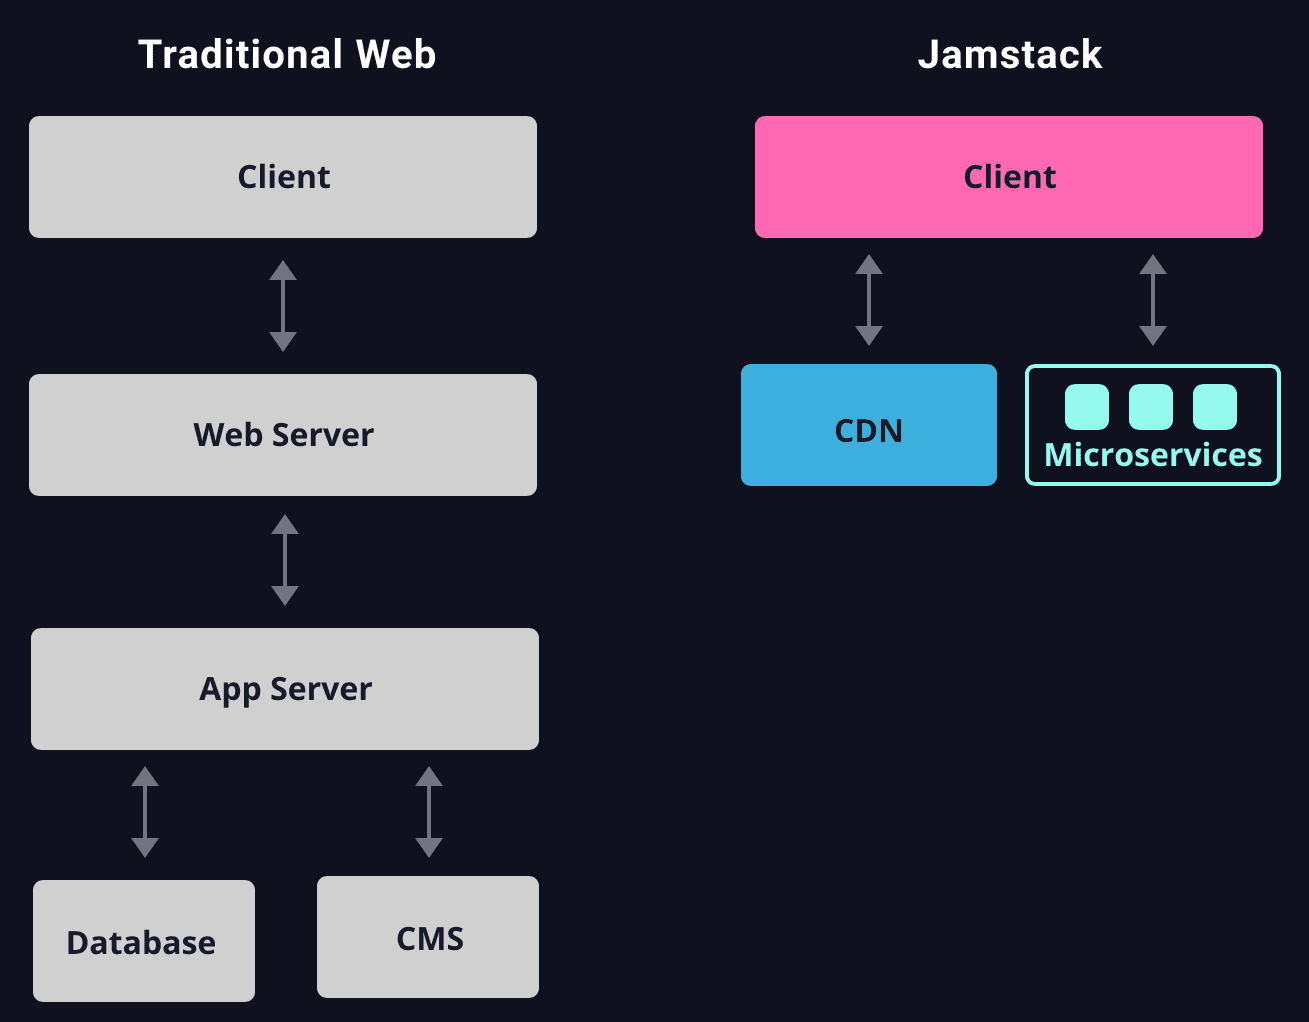
Source: JAMstack.org
A key reason for using JAMstack (as opposed to the traditional approach) is to go as "serverless" as possible, by relying on hosting solutions (Netlify) and external services (APIs).
JAMstack is a great architecture choice for building:
- client-side apps that rely on external services (APIs)
- static sites for providing information to users
Traditional web apps are a great approach when building database-driven apps that focus on server-side apps.
Alternatives
Content Management System (CMS) Solutions
CMS solutions are used to manage and deploy websites. WordPress is the most popular CMS tool, with a lot of products being developed using WordPress.
There are lots of sophisticated options for building a website these days, including:
Most of these options allow websites to be created without writing any code. These options are a great choice for quickly developing a website for displaying content, such as a blog.
I'm currently using WordPress to generate my personal blog site: https://www.patricksoftwareblog.com.
Lektor is a popular CMS solution written in Python, though it has a lot of features of a static site generator as well.
Lektor was created by Armin Ronacher, who is also the creator of Flask!
Static Site Generators
Static site generators create static files (HTML, CSS, and JavaScript) for publishing a website by parsing content created in a markdown language (typically Markdown or reStructuredText).
Jekyll, Eleventy, Gatsby, and Hugo are the most popular static site generators.
There are several Python-based options as well.
Pelican is one of the most popular static site generators written in Python. It has some powerful features:
- Content is written in Markdown or reStructuredText
- CLI (command-line interface) tools for generating static content
- Themes for quickly developing webpages
- Publication in multiple languages
Flask with Frozen-Flask (which we'll be using in this tutorial) can also be considered a static site generator. The advantage of this approach is being able to leverage an existing development process with Flask to develop a static site. Additionally, the ability to test your static site when using Flask with Frozen-Flask is a big advantage, as testing is frequently ignored when developing static sites.
The approach in this tutorial is not a "pure" static site generator, as the content is created in HTML files. To make this approach a "pure" static site generator, you can utilize Flask-FlatPages to be able to create the content in Markdown.
If you're more familiar with Django, Django-Distill is a static site generator for Django apps.
Why Use Flask for Static Sites?
If you're already comfortable with developing apps using Python and Flask, then you can continue to use the same tools and workflow for developing a static site. There's no need to learn any new tools or languages, in other words.
With Flask, you can continue to use the following tools and processes:
- Jinja templates (including template inheritance) for generating HTML code
- Blueprints for organizing the project
- Development server with hot reloading when changes are made (no need for any complicated compilation step)
- Testing using pytest
What's more, if you decide in the future to expand your site into a full web app that requires a backend database, since you started with Flask, you won't need to re-write your app. You'll just need to:
- Remove Frozen-Flask
- Interface with a database
- Deploy to Render (or a similar hosting solution)
Workflow
The following diagram illustrates the typical workflow for developing a static site with Flask and deploying it to Netlify:
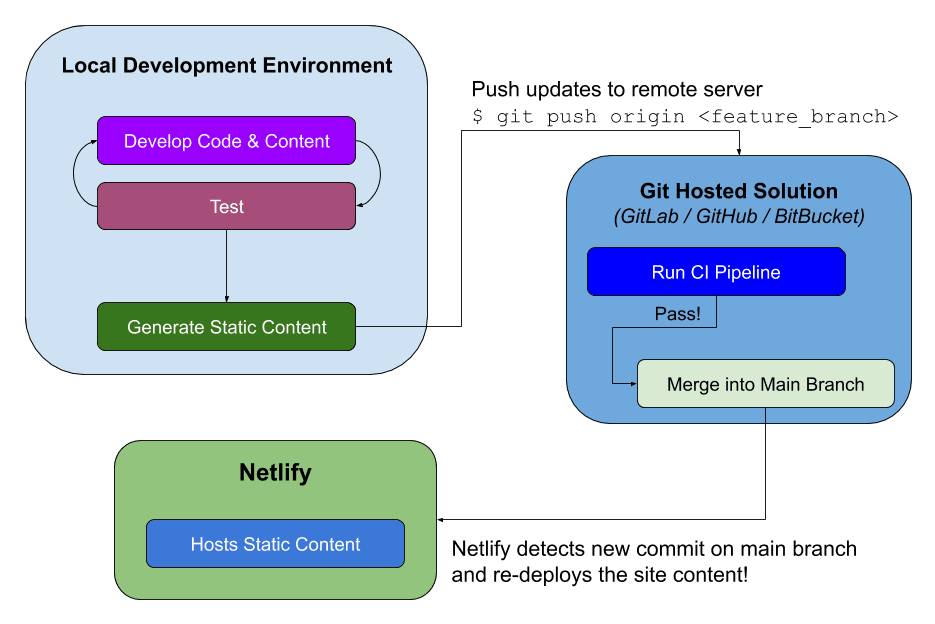
Let's dive into the details of this workflow...
Flask Project
While this Flask project will generate static files, it still uses the best practices for a Flask app:
Additionally, the Frozen-Flask package is used for generating the static content.
The source code for the project created in this tutorial can be found on GitLab at: Flask Recipe App.
Project Structure
The folder structure for the project is typical for a Flask project:
├── project
│   ├── build           # Static files are created here by Frozen-Flask!
│   ├── blog            # Blueprint for blog posts
│   │   └── templates   # Templates specific to the blog blueprint
│   ├── recipes         # Blueprint for recipes
│   │   └── templates   # Templates specific to the recipes blueprint
│   ├── static
│   │   ├── css         # CSS files for styling the pages
│   │   └── img         # Images displayed in recipes and blog posts
│   └── templates       # Base templates
├── tests
│   └── functional      # Test files
└── venv
The key folder to highlight is the "project/build" folder, which will be generated by the Frozen-Flask package with the static files.
To get started, pull down the source code from this GitLab repository:
$ git clone https://gitlab.com/patkennedy79/flask-recipe-app.git
Create a new virtual environment:
$ cd flask-recipe-app
$ python3 -m venv venv
Activate the virtual environment:
$ source venv/bin/activate
Install the Python packages specified in requirements.txt:
(venv)$ pip install -r requirements.txt
Feel free to swap out virtualenv and pip for Poetry or Pipenv. For more, review Modern Python Environments.
Recipe Routes
The routes to the recipes displayed on the site are defined in the recipes blueprint.
Blueprints allow you to cleanly organize the source code of your Flask project into distinct components. Each blueprint should encapsulate a significant piece of functionality in your application.
For example, the breakfast recipes are defined using the following variables and view functions in project/recipes/routes.py:
from . import recipes_blueprint
from flask import render_template, abort


breakfast_recipes_names = ['pancakes', 'acai_bowl', 'honey_bran_muffins', 'breakfast_scramble',
                           'pumpkin_donuts', 'waffles', 'omelette']


@recipes_blueprint.route('/breakfast/')
def breakfast_recipes():
   return render_template('recipes/breakfast.html')


@recipes_blueprint.route('/breakfast/<recipe_name>/')
def breakfast_recipe(recipe_name):
   if recipe_name not in breakfast_recipes_names:
       abort(404)

   return render_template(f'recipes/{recipe_name}.html')
The breakfast_recipes() view function renders the template for displaying all of the breakfast recipes.
The breakfast_recipe(recipe_name) view function renders a specified breakfast recipe. If an invalid recipe title is specified, then a 404 (Not Found) error is returned.
This same set of view functions is used for each of the recipe types:
- Breakfast
- Dinner
- Side Dishes
- Dessert
- Smoothies
- Baked Goods
Jinja Templates
Flask comes packaged with the Jinja templating engine out-of-the-box, which we'll use to generate our HTML files.
A template file contains variables and/or expressions, which get replaced with values when a template is rendered:
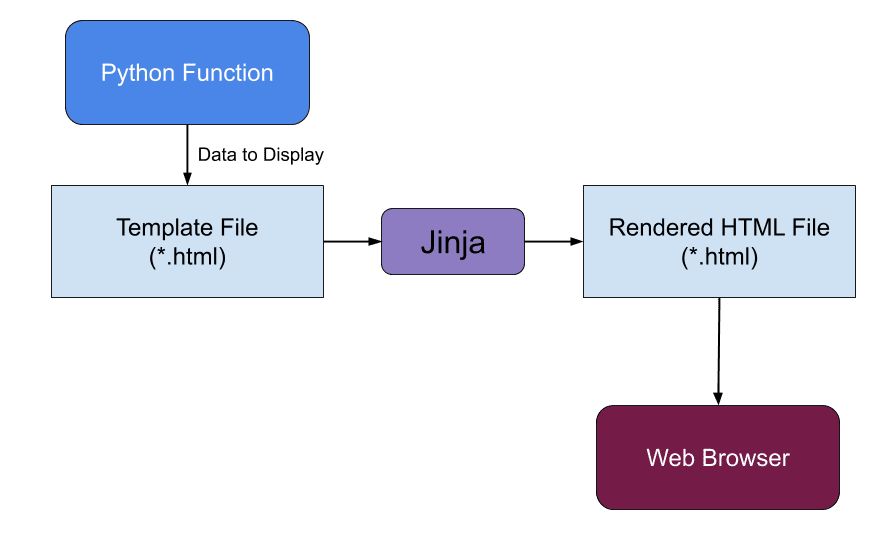
Template inheritance allows template files to inherit other templates. You can create a base template that defines the layout of the website. Since child templates will use this layout, they can just focus on the content.
The base template is defined in project/templates/base.html:
<!DOCTYPE html>
<html lang="en">
    <head>
        <!-- Required meta tags -->
        <meta charset="utf-8">
        <meta name="viewport" content="width=device-width, initial-scale=1, shrink-to-fit=no">
        <title>Flask Recipe App</title>

        <!-- Local CSS file for styling the application-->
        <link rel="stylesheet" href="{{ url_for('static', filename='css/base_style.css') }}">
        <link rel="shortcut icon" href="{{ url_for('static', filename='img/favicon.ico') }}" type="image/x-icon">

        <!-- Additional Styling -->
        {% block styling %}
        {% endblock %}
    </head>

    <body>
        <header>
            <h1>Kennedy Family Recipes</h1>
            <nav>
                <ul>
                    <li class="nav__item"><a href="{{ url_for('recipes.recipes') }}" class="nav__link">Recipes</a></li>
                    <li class="nav__item"><a href="{{ url_for('blog.blog') }}" class="nav__link">Blog</a></li>
                    <li class="nav__item"><a href="{{ url_for('blog.about') }}" class="nav__link">About</a></li>
                </ul>
            </nav>
        </header>

        <main class="content">
            <!-- child template -->
            {% block content %}
            {% endblock %}
        </main>

        <footer>
            <p>Created by <a href="https://www.patricksoftwareblog.com/">Patrick Kennedy</a> (2023)</p>
        </footer>
    </body>
</html>
The base template defines the navigation bar (<header> tag) and the footer (<footer> tag). The content to be displayed is specified in the <main> tag, but this content is expected to be filled in by the child template.
For example, the template for displaying the list of breakfast recipes (defined in project/recipes/templates/recipes/breakfast.html) expands on the base template to display all the breakfast recipes:
{% extends "base.html" %}

{% block content %}
<div class="recipe-container">

    <div class="card">
        <a href="{{ url_for('recipes.breakfast_recipe', recipe_name='pancakes') }}">
            <img
              src="{{ url_for('static', filename='img/pancakes.jpg') }}"
              alt="Pancakes"
              class="card__image" />
            <div class="card__body">
                <h2>Pancakes</h2>
                <p class="recipe-badge dairy-free-badge">Dairy-Free</p>
                <p class="recipe-badge soy-free-badge">Soy-Free</p>
            </div>
        </a>
    </div>

    <div class="card">
        <a href="{{ url_for('recipes.breakfast_recipe', recipe_name='honey_bran_muffins') }}">
            <img
              src="{{ url_for('static', filename='img/honey_bran_muffins.jpg') }}"
              alt="Honey Bran Muffins"
              class="card__image" />
            <div class="card__body">
                <h2>Honey Bran Muffins</h2>
                <p class="recipe-badge dairy-free-badge">Dairy-Free</p>
                <p class="recipe-badge soy-free-badge">Soy-Free</p>
            </div>
        </a>
    </div>

    ...
</div>
{% endblock %}
Testing
pytest is a test framework for Python used to write, organize, and run test cases. After setting up your basic test structure, pytest makes it easy to write tests and provides a lot of flexibility for running the tests.
The test files are specified in the tests/functional/ directory. For example, the tests for the breakfast recipes are specified in tests/functional/test_recipes.py:
"""
This file (test_recipes.py) contains the functional tests for the `recipes` blueprint.
"""
from project.recipes.routes import breakfast_recipes_names


def test_get_breakfast_recipes(test_client):
    """
    GIVEN a Flask application configured for testing
    WHEN the '/breakfast/' page is requested (GET)
    THEN check the response is valid
    """
    recipes = [b'Pancakes', b'Honey Bran Muffins', b'Acai Bowl',
               b'Breakfast Scramble', b'Pumpkin Donuts', b'Waffles',
               b'Omelette']
    response = test_client.get('/breakfast/')
    assert response.status_code == 200
    for recipe in recipes:
        assert recipe in response.data


def test_get_individual_breakfast_recipes(test_client):
    """
    GIVEN a Flask application configured for testing
    WHEN the '/breakfast/<recipe_name>' page is requested (GET)
    THEN check the response is valid
    """
    for recipe_name in breakfast_recipes_names:
        response = test_client.get(f'/breakfast/{recipe_name}/')
        assert response.status_code == 200
        assert str.encode(recipe_name) in response.data
These are high-level checks to make sure the expected pages render properly.
Each of these test functions is using the test_client fixture defined in tests/conftest.py:
import pytest
from project import create_app


@pytest.fixture(scope='module')
def test_client():
    flask_app = create_app()

    # Create a test client using the Flask application configured for testing
    with flask_app.test_client() as testing_client:
        yield testing_client  # this is where the testing happens!
The tests should be run from the top-level directory:
(venv)$ python -m pytest
They should pass:
================================ test session starts =================================
platform darwin -- Python 3.11.0, pytest-7.2.1, pluggy-1.0.0
plugins: cov-4.0.0
collected 18 items

tests/functional/test_blog.py ....                                               [22%]
tests/functional/test_recipes.py ..............                                 [100%]
================================ 18 passed in 0.33s ==================================
Frozen-Flask
Up to this point, the Flask app looks like a typical web app. This is where Frozen-Flask comes into play. We can generate static files and URLs automatically.
Think back to the project thus far. What do we need to create URLs for?
- Static files found in project/static
- Routes found in project/recipes/routes.py
Frozen-Flask will automatically generate all URLs for static files. For example:
static/css/base_style.cssstatic/img/acai_bowl.jpg
Take note of project/recipes/routes.py:
@recipes_blueprint.route('/')
def recipes():
    return render_template('recipes/recipes.html')


@recipes_blueprint.route('/breakfast/')
def breakfast_recipes():
    return render_template('recipes/breakfast.html')


@recipes_blueprint.route('/breakfast/<recipe_name>/')
def breakfast_recipe(recipe_name):
    if recipe_name not in breakfast_recipe_names:
        abort(404)

    return render_template(f'recipes/{recipe_name}.html')
Frozen-Flask will automatically generate URLs for GET routes without variable parts in the URL. In our case, it will generate URLs for / and /breakfast/.
How about '/breakfast/<recipe_name>/? Any links from url_for() will also be found, which should cover everything.
For example, the breakfast.html template contains
url_for()calls for each of the breakfast recipes.
Development
During the development process, we want to be able to test out the routes on our local computer, just like with any Flask app.
The app.py file is used for running the Flask development server:
from flask_frozen import Freezer
from project import create_app

# Call the application factory function to construct a Flask application
# instance using the development configuration
app = create_app()

# Create an instance of Freezer for generating the static files from
# the Flask application routes ('/', '/breakfast', etc.)
freezer = Freezer(app)


if __name__ == '__main__':
    # Run the development server that generates the static files
    # using Frozen-Flask
    freezer.run(debug=True)
This file starts by calling the application factory function, which creates the Flask app. Next, an instance of Freezer (from Frozen-Flask) is created. Finally, the development server from Frozen-Flask is run:
Starting the development server is just like any other Flask app:
(venv)$ flask --app app --debug run
Now you can navigate to http://127.0.0.1:5000/:
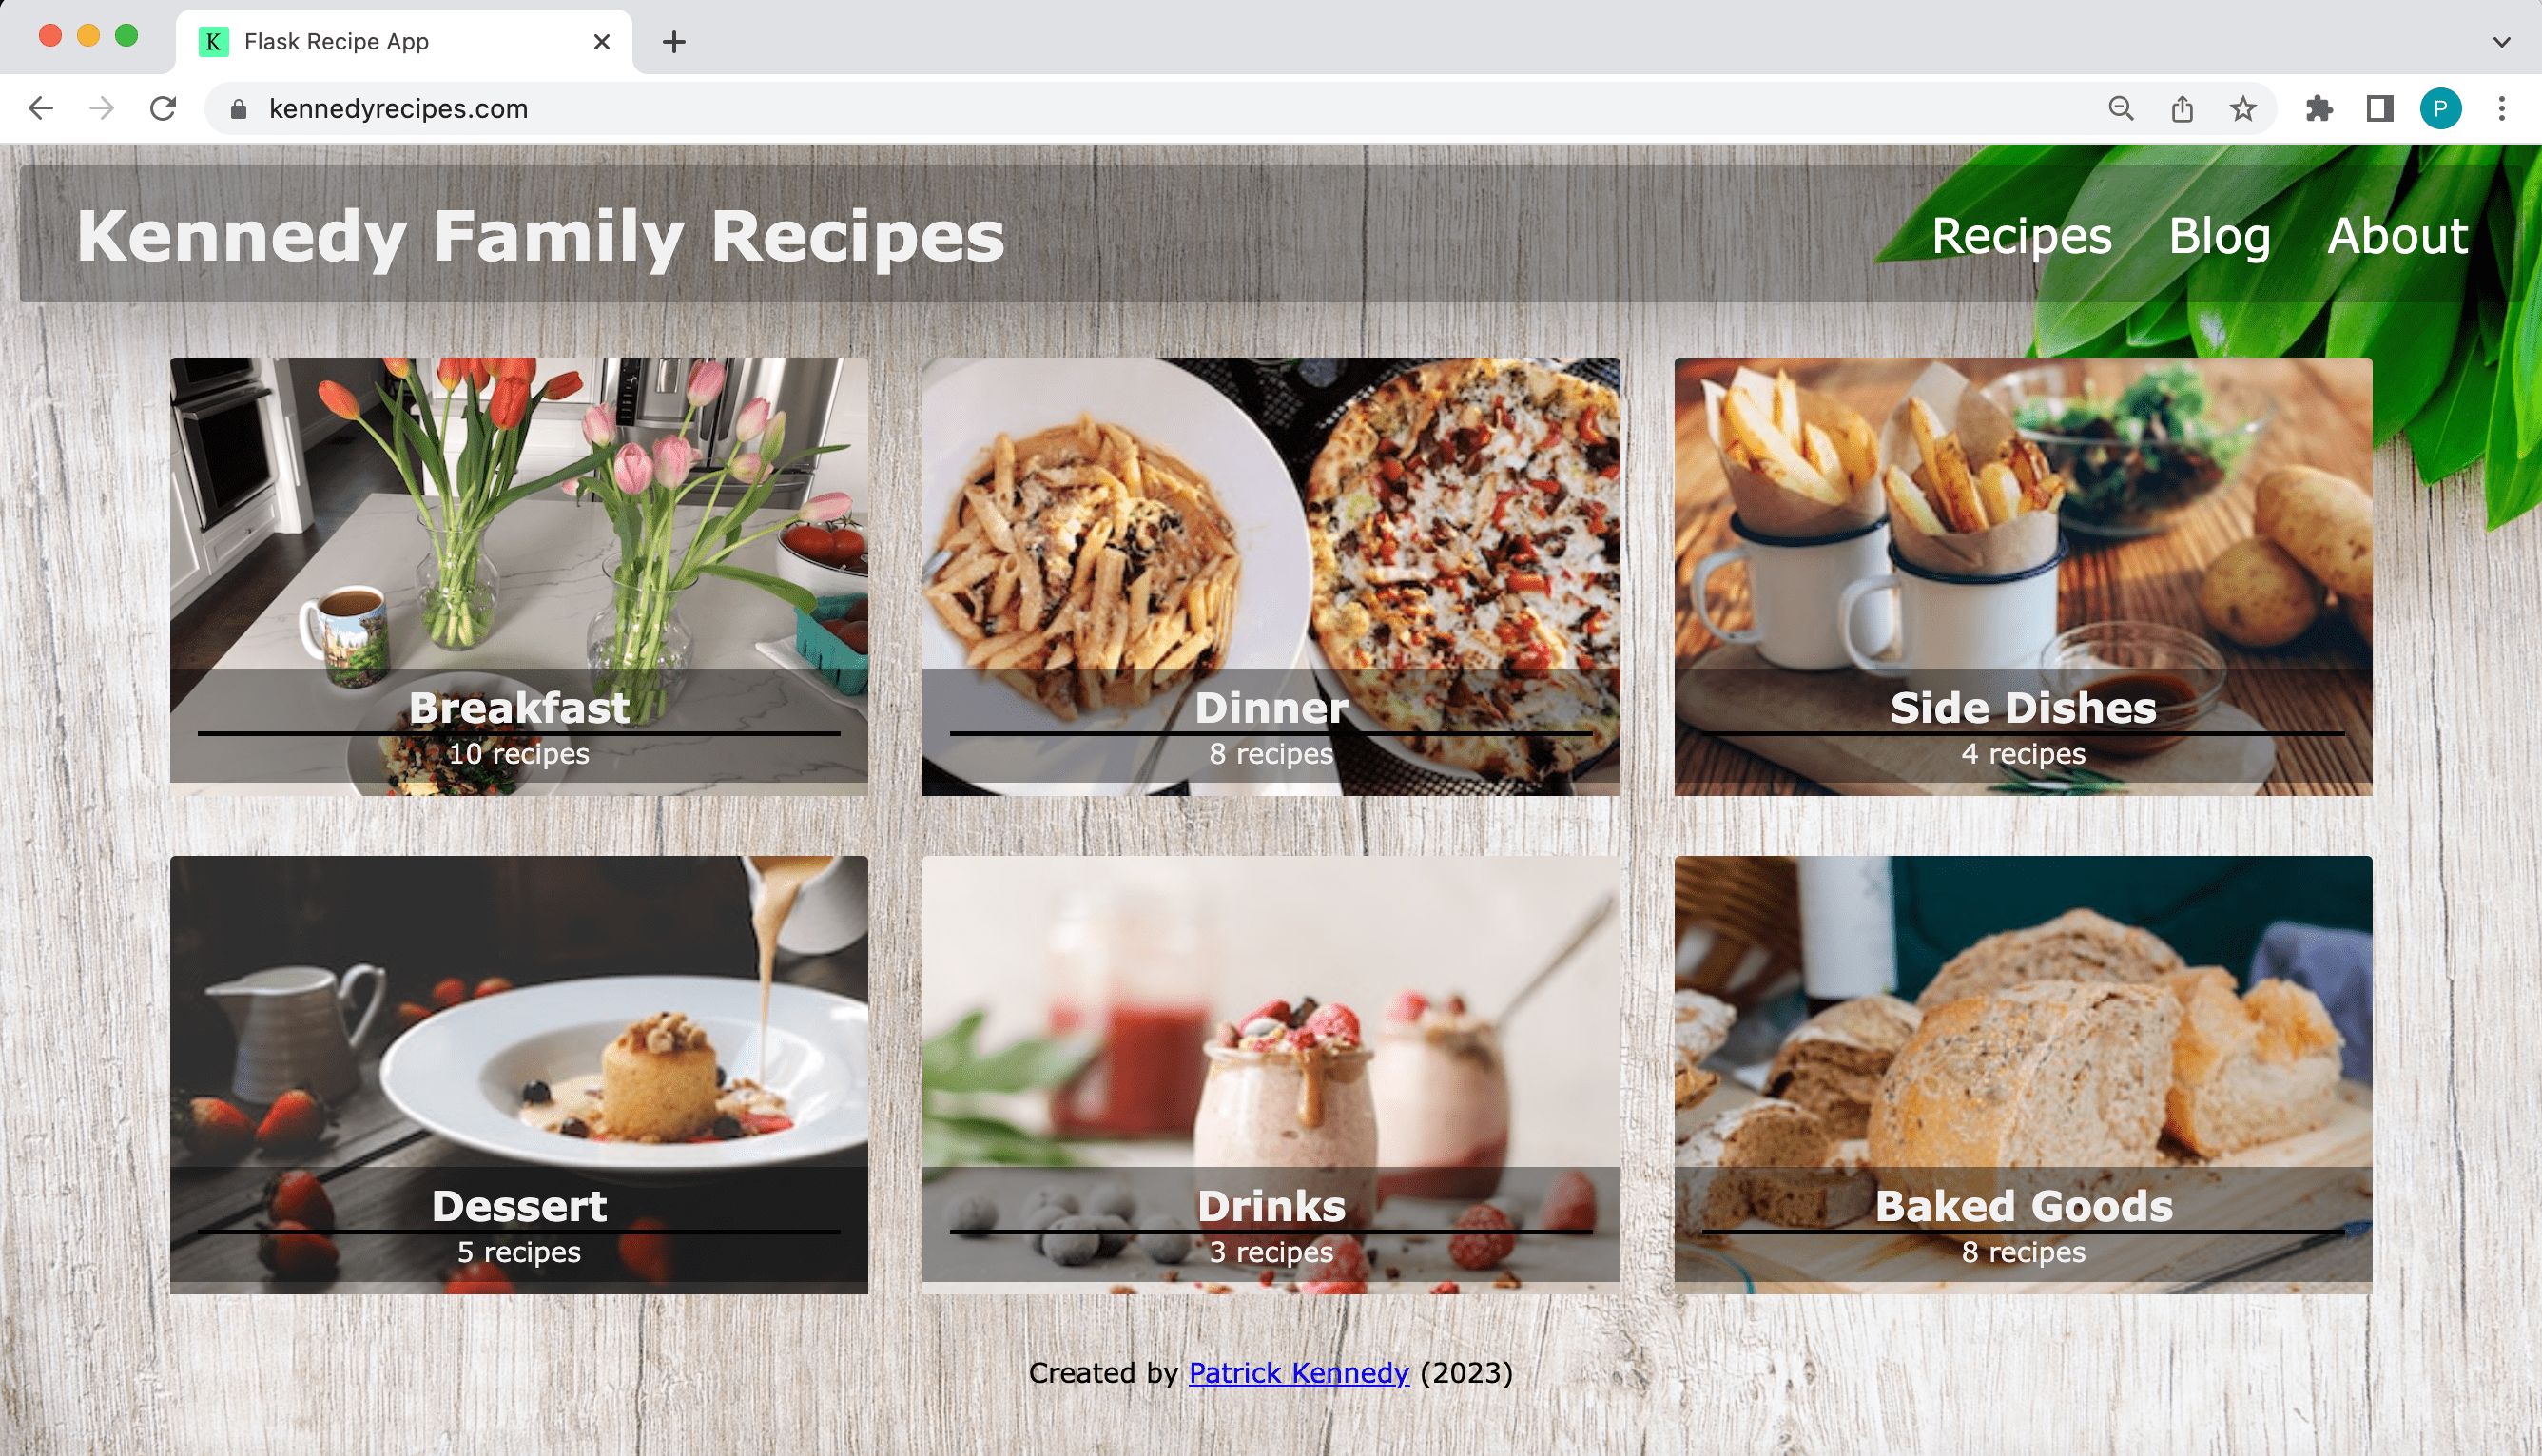
Build Script
Once you're ready to deploy the static files, you need to build the files to generate the static files with your application's content. The build.py script in the top-level folder runs Freezer-Flask to generate the static files:
from flask_frozen import Freezer
from project import create_app

# Call the application factory function to construct a Flask application
# instance using the development configuration
app = create_app()

# Create an instance of Freezer for generating the static files from
# the Flask application routes ('/', '/breakfast', etc.)
freezer = Freezer(app)


if __name__ == '__main__':
    # Generate the static files using Frozen-Flask
    freezer.freeze()
Run the script:
(venv)$ python build.py
This script generates all the static files based on the routes in the Flask app and writes them to the "project/build" folder:
(venv)$ tree -L 3 project/build
project/build
├── breakfast
│   ├── acai_bowl
│   │   └── index.html
│   ├── breakfast_scramble
│   │   └── index.html
│   ├── index.html
│   └── waffles
│       └── index.html
├── index.html
└── static
    ├── css
    │   ├── base_style.css
    │   └── recipe_style.css
    └── img
This folder is what we'll deploy to Netlify!
Deploy to Netlify
What is Netlify?
Netlify is a service that simplifies hosting front-end web applications.
Netlify offers free hosting of front-end web applications and they also provide the ability to purchase a custom domain name for your application. What I especially like about their service is that they provide HTTPS with all their hosting solutions.
Before we jump into these steps, you need to make sure to create an account on Netlify. Go to https://www.netlify.com and click on 'Sign up' to create a new account (it's free and no credit card is required).
Some alternative to Netlify are: Cloudflare, GitHub Pages, are GitLab Pages.
Configure
After you've logged in to Netlify, go to your account page and click on 'Add new site' and then 'Import an existing project':

You now can select the git hosting solution (GitLab, GitHub, BitBucket, Azure DevOps) that you're using to store your git repository on:
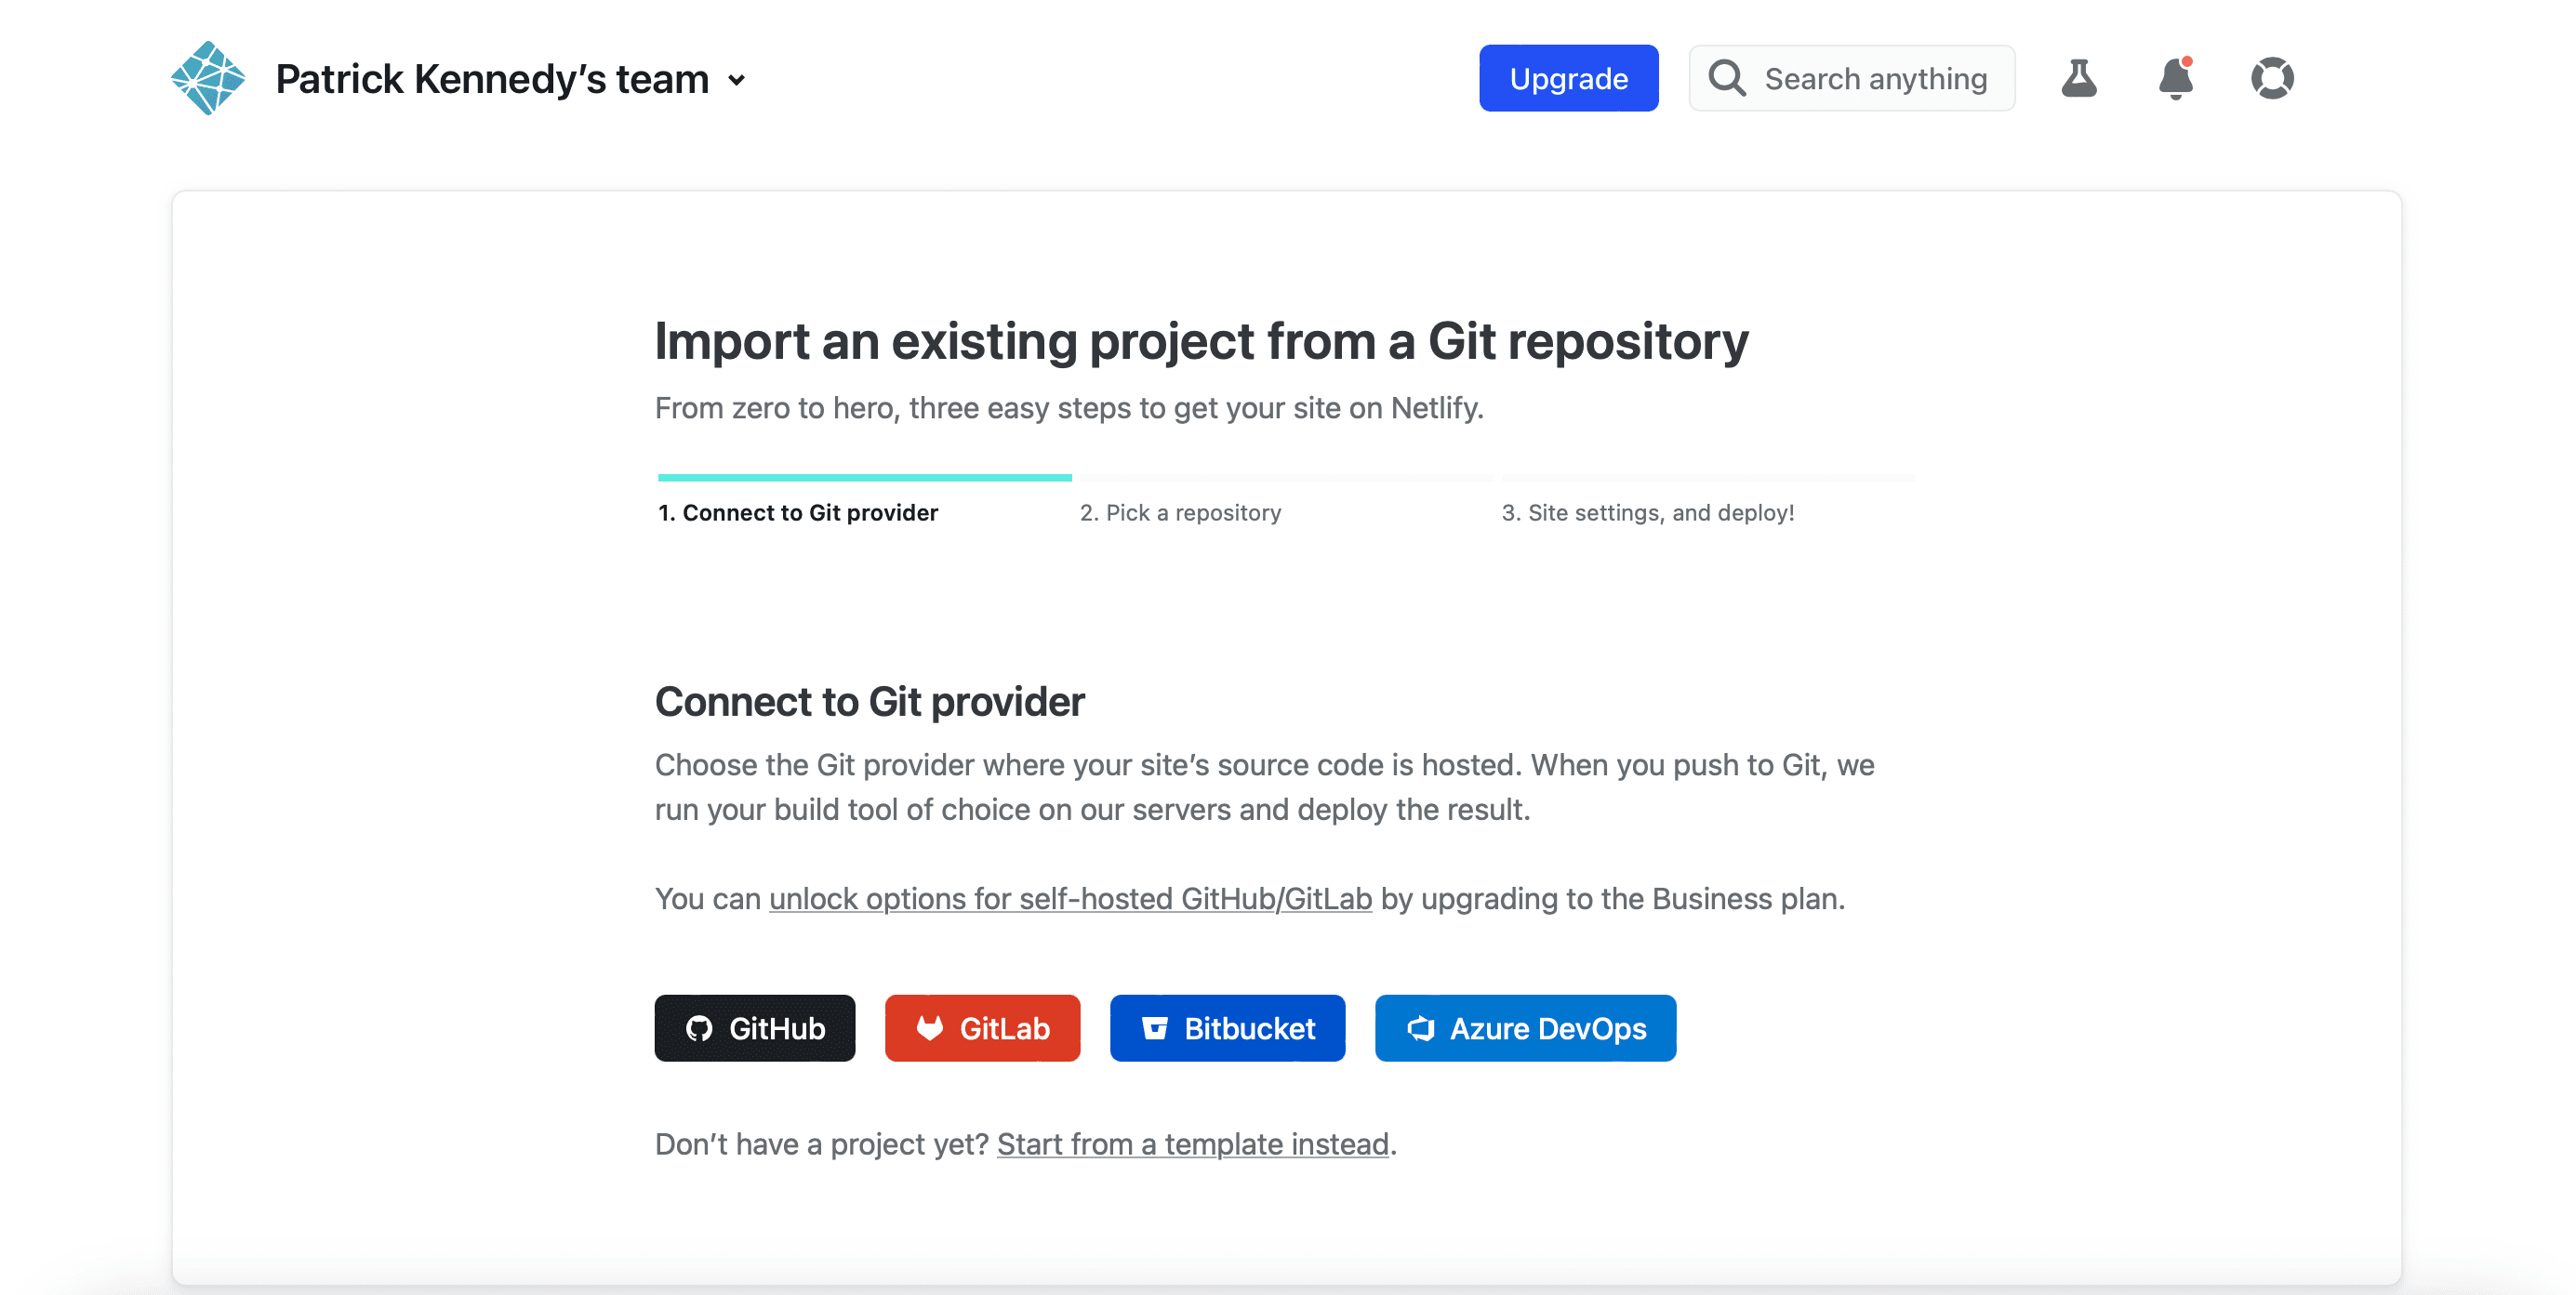
If you haven't connected Netlify to your git hosting service before, there will be an additional step to allow Netlify to access your git repositories. Next, select the git repository that you'd like to host.
Now you can select who the owner of the project is and the branch from which you want to deploy the build (I'm selecting the 'main' branch as this is my stable branch for doing builds from for this project):
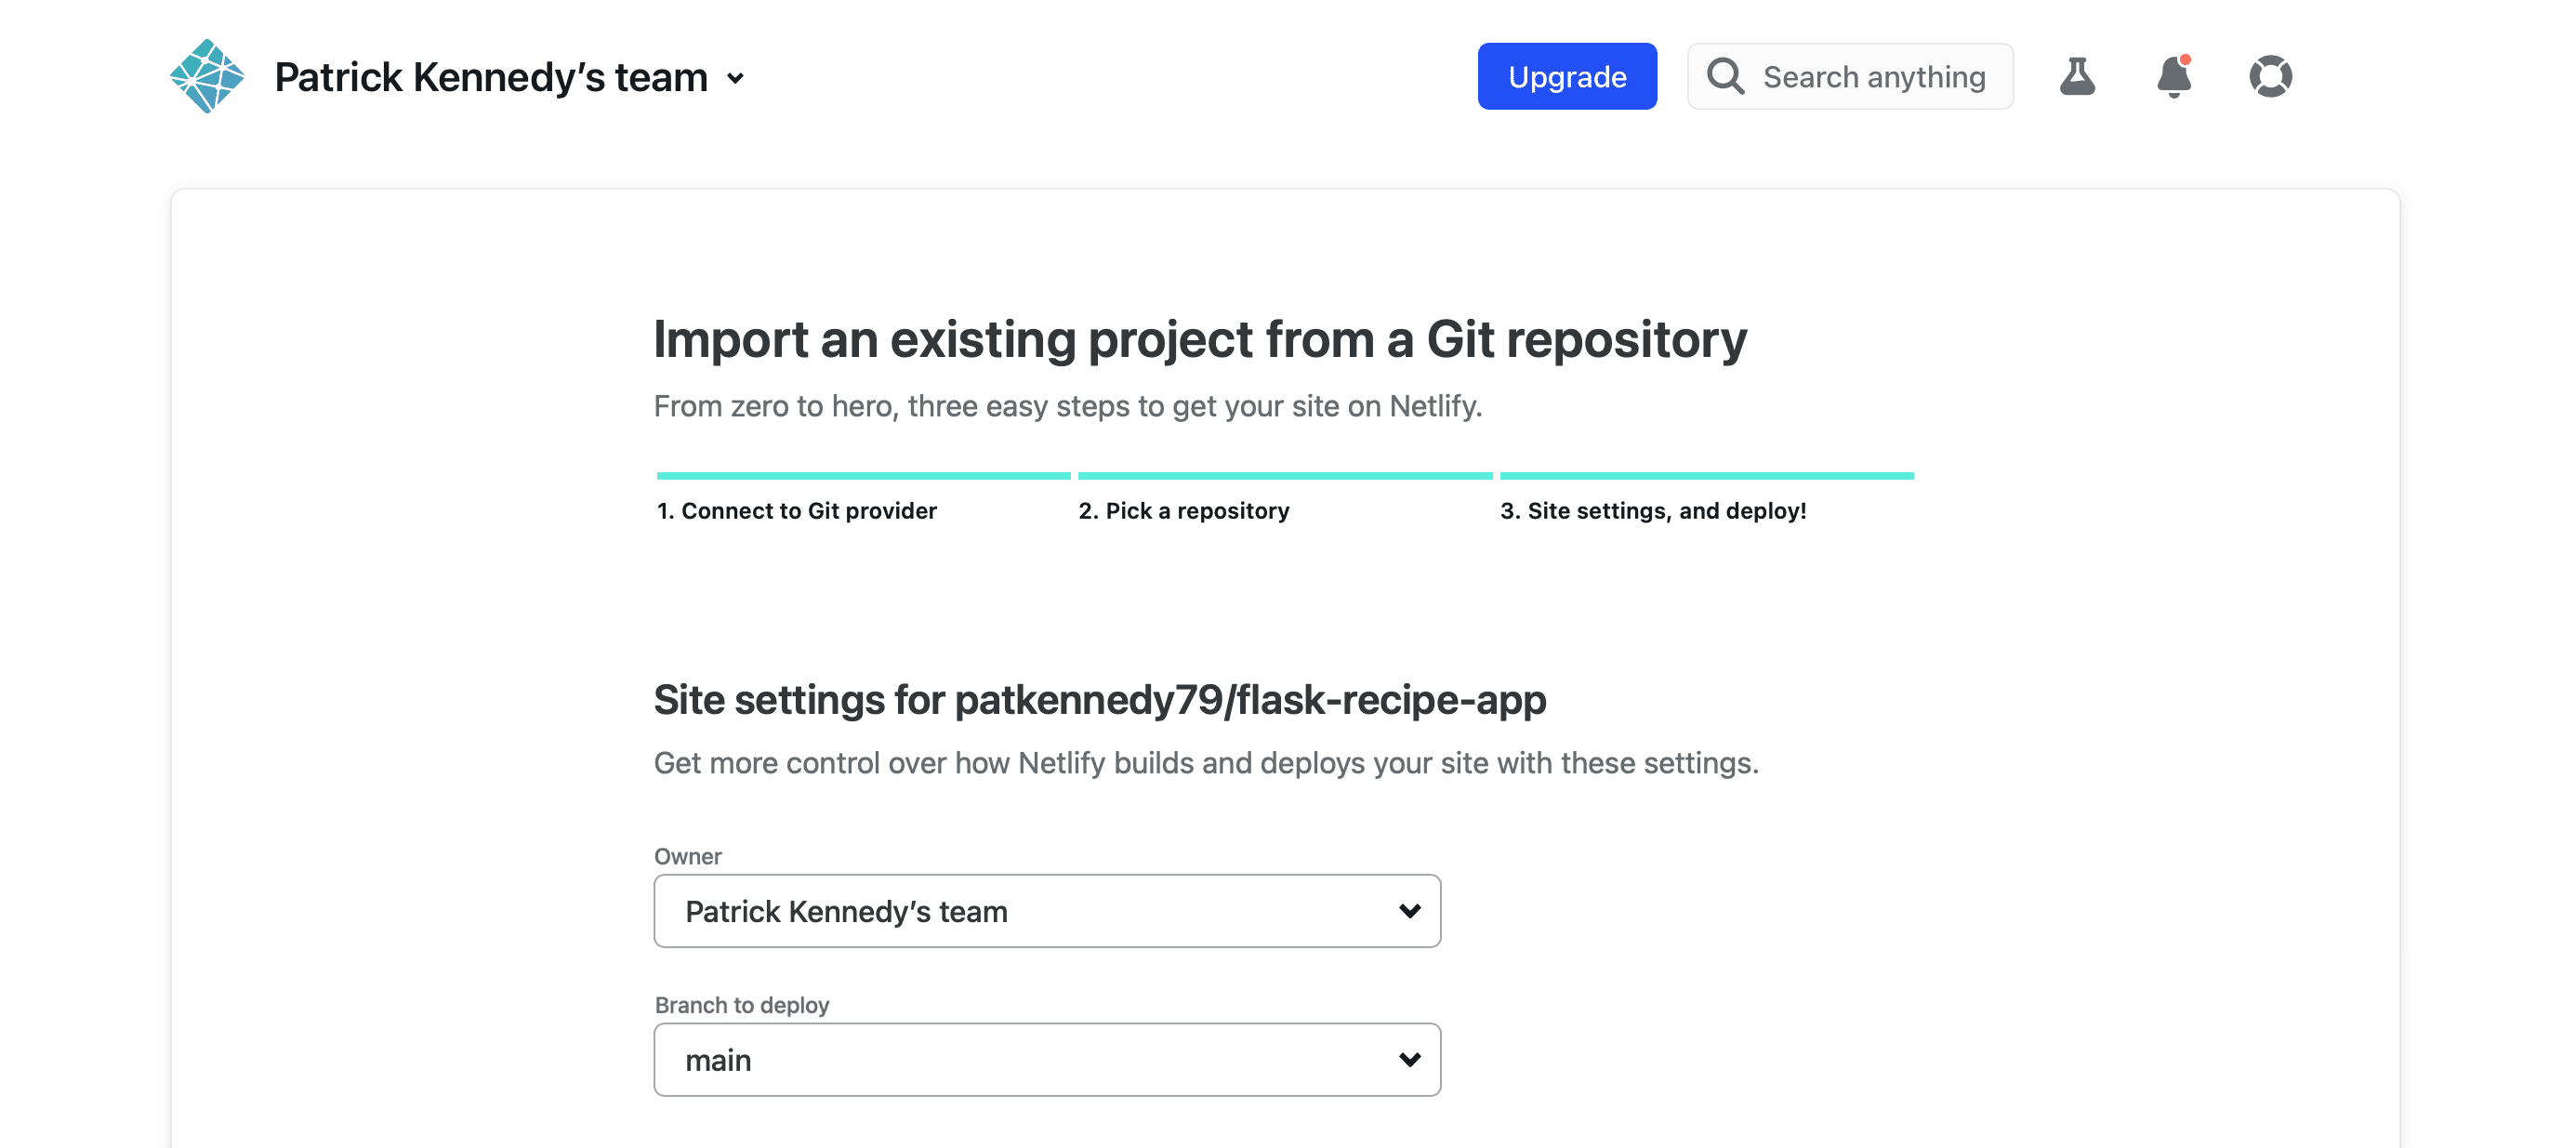
If you're interested in the steps to change the default branch in a git repository from
mastertomain, refer to this very helpful blog post: Rename your Git default branch from master to main (with GitLab screenshots).
Scrolling down further, you now have the option to select the command to run to build your application and where the code should be deployed from:
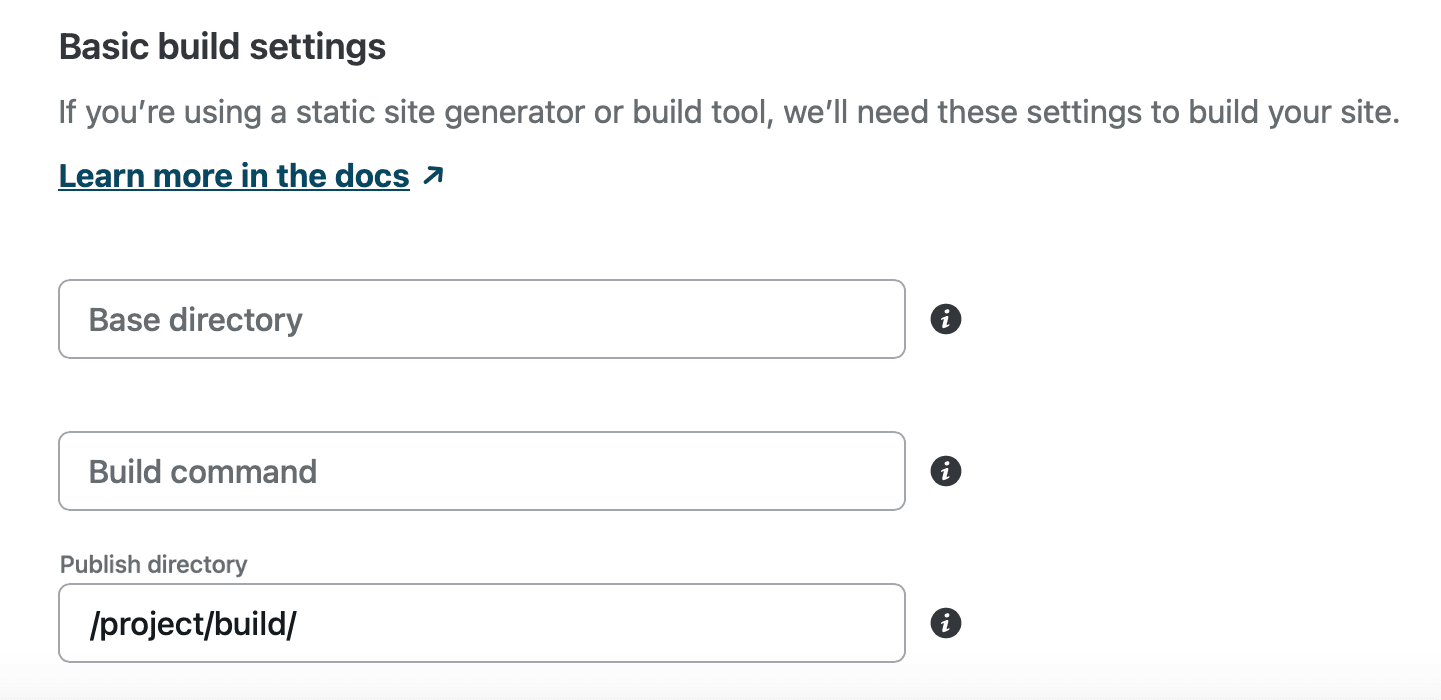
Since a set of static files (HTML, CSS, JavaScript) are being deployed, only the 'Publish directory' needs to be specified as the path to the set of static files: /project/build/
With this configuration set, click on the 'Deploy site' button.
It will take some time (< 1 minute) for Netlify to deploy the site:

You should see a preview of the site and confirmation that the site was deployed.
Click on the link (such as https://vigorous-blackwell-9400a0.netlify.app/) to view the site!
You can now view this web application from any device connected to the Internet!

Workflow
As with a lot of processes, the configuration steps are a bit complex, but now Netlify will notice any new commits on the 'main' branch of your repository (on GitLab, GitHub, or BitBucket) and re-deploy your website using the new commit. Remember: Netlify will publish the files in the "project/build" folder, so make sure to always build the static site before committing changes:
(venv)$ python build.py
To review, the following diagram illustrates the typical workflow for developing a static site using Flask and deploying it to Netlify:

Additional Features of Netlify
Netlify also provides several tools for adding server-like functionality to an application, without actually needing a server-side application. For example:
Conclusion
This tutorial shows how to create a Flask application and then use Frozen-Flask to generate the static files for all the specified routes. The static files are then published to Netlify to deploy the static site.
If you're familiar with developing Flask applications, then this process is a great way to develop static sites that can be easily deployed to the web.
If you're interested in learning more about Flask, check out my course on how to build, test, and deploy a Flask application: Developing Web Applications with Python and Flask.
 Patrick Kennedy