The following is a step-by-step walkthrough of how to set up a basic CRUD app with Vue and Flask. We'll start by scaffolding a new Vue application and then move on to performing the basic CRUD operations through a back-end RESTful API powered by Python and Flask.
Final app:

Main dependencies:
- Vue v3.2.47
- Node v20.0.0
- npm v9.6.4
- Flask v2.2.3
- Python v3.11.3
Contents
Objectives
By the end of this tutorial, you will be able to:
- Explain what Flask is
- Explain what Vue is and how it compares to other UI libraries and front-end frameworks like React and Angular
- Scaffold a Vue project with Vite
- Create and render Vue components in the browser
- Create a Single Page Application (SPA) with Vue components
- Connect a Vue application to a Flask back-end
- Develop a RESTful API with Flask
- Style Vue Components with Bootstrap
- Use the Vue Router to create routes and render components
Flask and Vue
Let's quickly look at each framework.
What is Flask?
Flask is a simple, yet powerful micro web framework for Python, perfect for building RESTful APIs. Like Sinatra (Ruby) and Express (Node), it's minimal and flexible, so you can start small and build up to a more complex app as needed.
First time with Flask? Check out the following two resources:
What is Vue?
Vue is an open-source JavaScript framework used for building user interfaces. It adopted some of the best practices from React and Angular. That said, compared to React and Angular, it's much more approachable, so beginners can get up and running quickly. It's also just as powerful, so it provides all the features you'll need to create modern front-end applications.
For more on Vue, along with the pros and cons of using it vs. React and Angular, review the resources:
- Vue: Comparison with Other Frameworks
- Learn Vue by Building and Deploying a CRUD App
- React vs Angular vs Vue.js
First time with Vue? Take a moment to read through the Introduction from the official Vue guide.
Flask Setup
Begin by creating a new project directory:
$ mkdir flask-vue-crud
$ cd flask-vue-crud
Within "flask-vue-crud", create a new directory called "server". Then, create and activate a virtual environment inside the "server" directory:
$ python3.11 -m venv env
$ source env/bin/activate
(env)$
Feel free to swap out virtualenv and Pip for Poetry or Pipenv. For more, review Modern Python Environments.
Install Flask along with the Flask-CORS extension:
(env)$ pip install Flask==2.2.3 Flask-Cors==3.0.10
Add an app.py file to the newly created "server" directory:
from flask import Flask, jsonify
from flask_cors import CORS


# instantiate the app
app = Flask(__name__)
app.config.from_object(__name__)

# enable CORS
CORS(app, resources={r'/*': {'origins': '*'}})


# sanity check route
@app.route('/ping', methods=['GET'])
def ping_pong():
    return jsonify('pong!')


if __name__ == '__main__':
    app.run()
Why do we need Flask-CORS? In order to make cross-origin requests -- i.e., requests that originate from a different protocol, IP address, domain name, or port -- you need to enable Cross Origin Resource Sharing (CORS). Flask-CORS handles this for us.
It's worth noting that the above setup allows cross-origin requests on all routes, from any domain, protocol, or port. In a production environment, you should only allow cross-origin requests from the domain where the front-end application is hosted. Refer to the Flask-CORS documentation for more info on this.
Run the app:
(env)$ flask run --port=5001 --debug
To test, point your browser at http://localhost:5001/ping. You should see:
"pong!"
Back in the terminal, press Ctrl+C to kill the server and then navigate back to the project root. With that, let's turn our attention to the front-end and get Vue set up.
Vue Setup
We'll be using the powerful create-vue tool, which uses Vite, to generate a customized project boilerplate.
Within "flask-vue-crud", run the following command to initialize a new Vue project:
$ npm create [email protected]
First time with npm? Review the official About npm guide.
This will require you to answer a few questions about the project:
Vue.js - The Progressive JavaScript Framework

✔ Project name: › client
✔ Add TypeScript? › No
✔ Add JSX Support? › No
✔ Add Vue Router for Single Page Application development? › Yes
✔ Add Pinia for state management? › No
✔ Add Vitest for Unit Testing? › No
✔ Add ESLint for code quality? › No
Take a quick look at the generated project structure. It may seem like a lot, but we'll only be dealing with the files and folders in the "src" folder along with the index.html file.
The index.html file is the starting point of our Vue application:
<!DOCTYPE html>
<html lang="en">
  <head>
    <meta charset="UTF-8">
    <link rel="icon" href="/favicon.ico">
    <meta name="viewport" content="width=device-width, initial-scale=1.0">
    <title>Vite App</title>
  </head>
  <body>
    <div id="app"></div>
    <script type="module" src="/src/main.js"></script>
  </body>
</html>
Take note of the <div> element with an id of app. This is a placeholder that Vue will use to attach the generated HTML and CSS to produce the UI.
Turn your attention to the folders inside the "src" folder:
client/src
├── App.vue
├── assets
│   ├── base.css
│   ├── logo.svg
│   └── main.css
├── components
│   ├── HelloWorld.vue
│   ├── TheWelcome.vue
│   ├── WelcomeItem.vue
│   └── icons
│       ├── IconCommunity.vue
│       ├── IconDocumentation.vue
│       ├── IconEcosystem.vue
│       ├── IconSupport.vue
│       └── IconTooling.vue
├── main.js
├── router
│   └── index.js
└── views
    ├── AboutView.vue
    └── HomeView.vue
Breakdown:
| Name | Purpose |
|---|---|
| main.js | app entry point, which loads and initializes Vue along with the root component |
| App.vue | Root component, which is the starting point from which all other components will be rendered |
| "components" | where UI components are stored |
| router/index.js | where URLS are defined and mapped to components |
| "views" | where UI components that are tied to the router are stored |
| "assets" | where static assets, like images and fonts, are stored |
Review the client/src/components/HelloWorld.vue file. This is a Single File component, which is broken up into three different sections:
- template: for component-specific HTML
- script: where the component logic is implemented via JavaScript
- style: for CSS styles
Next, install the dependencies, and then fire up the development server:
$ cd client
$ npm install
$ npm run dev
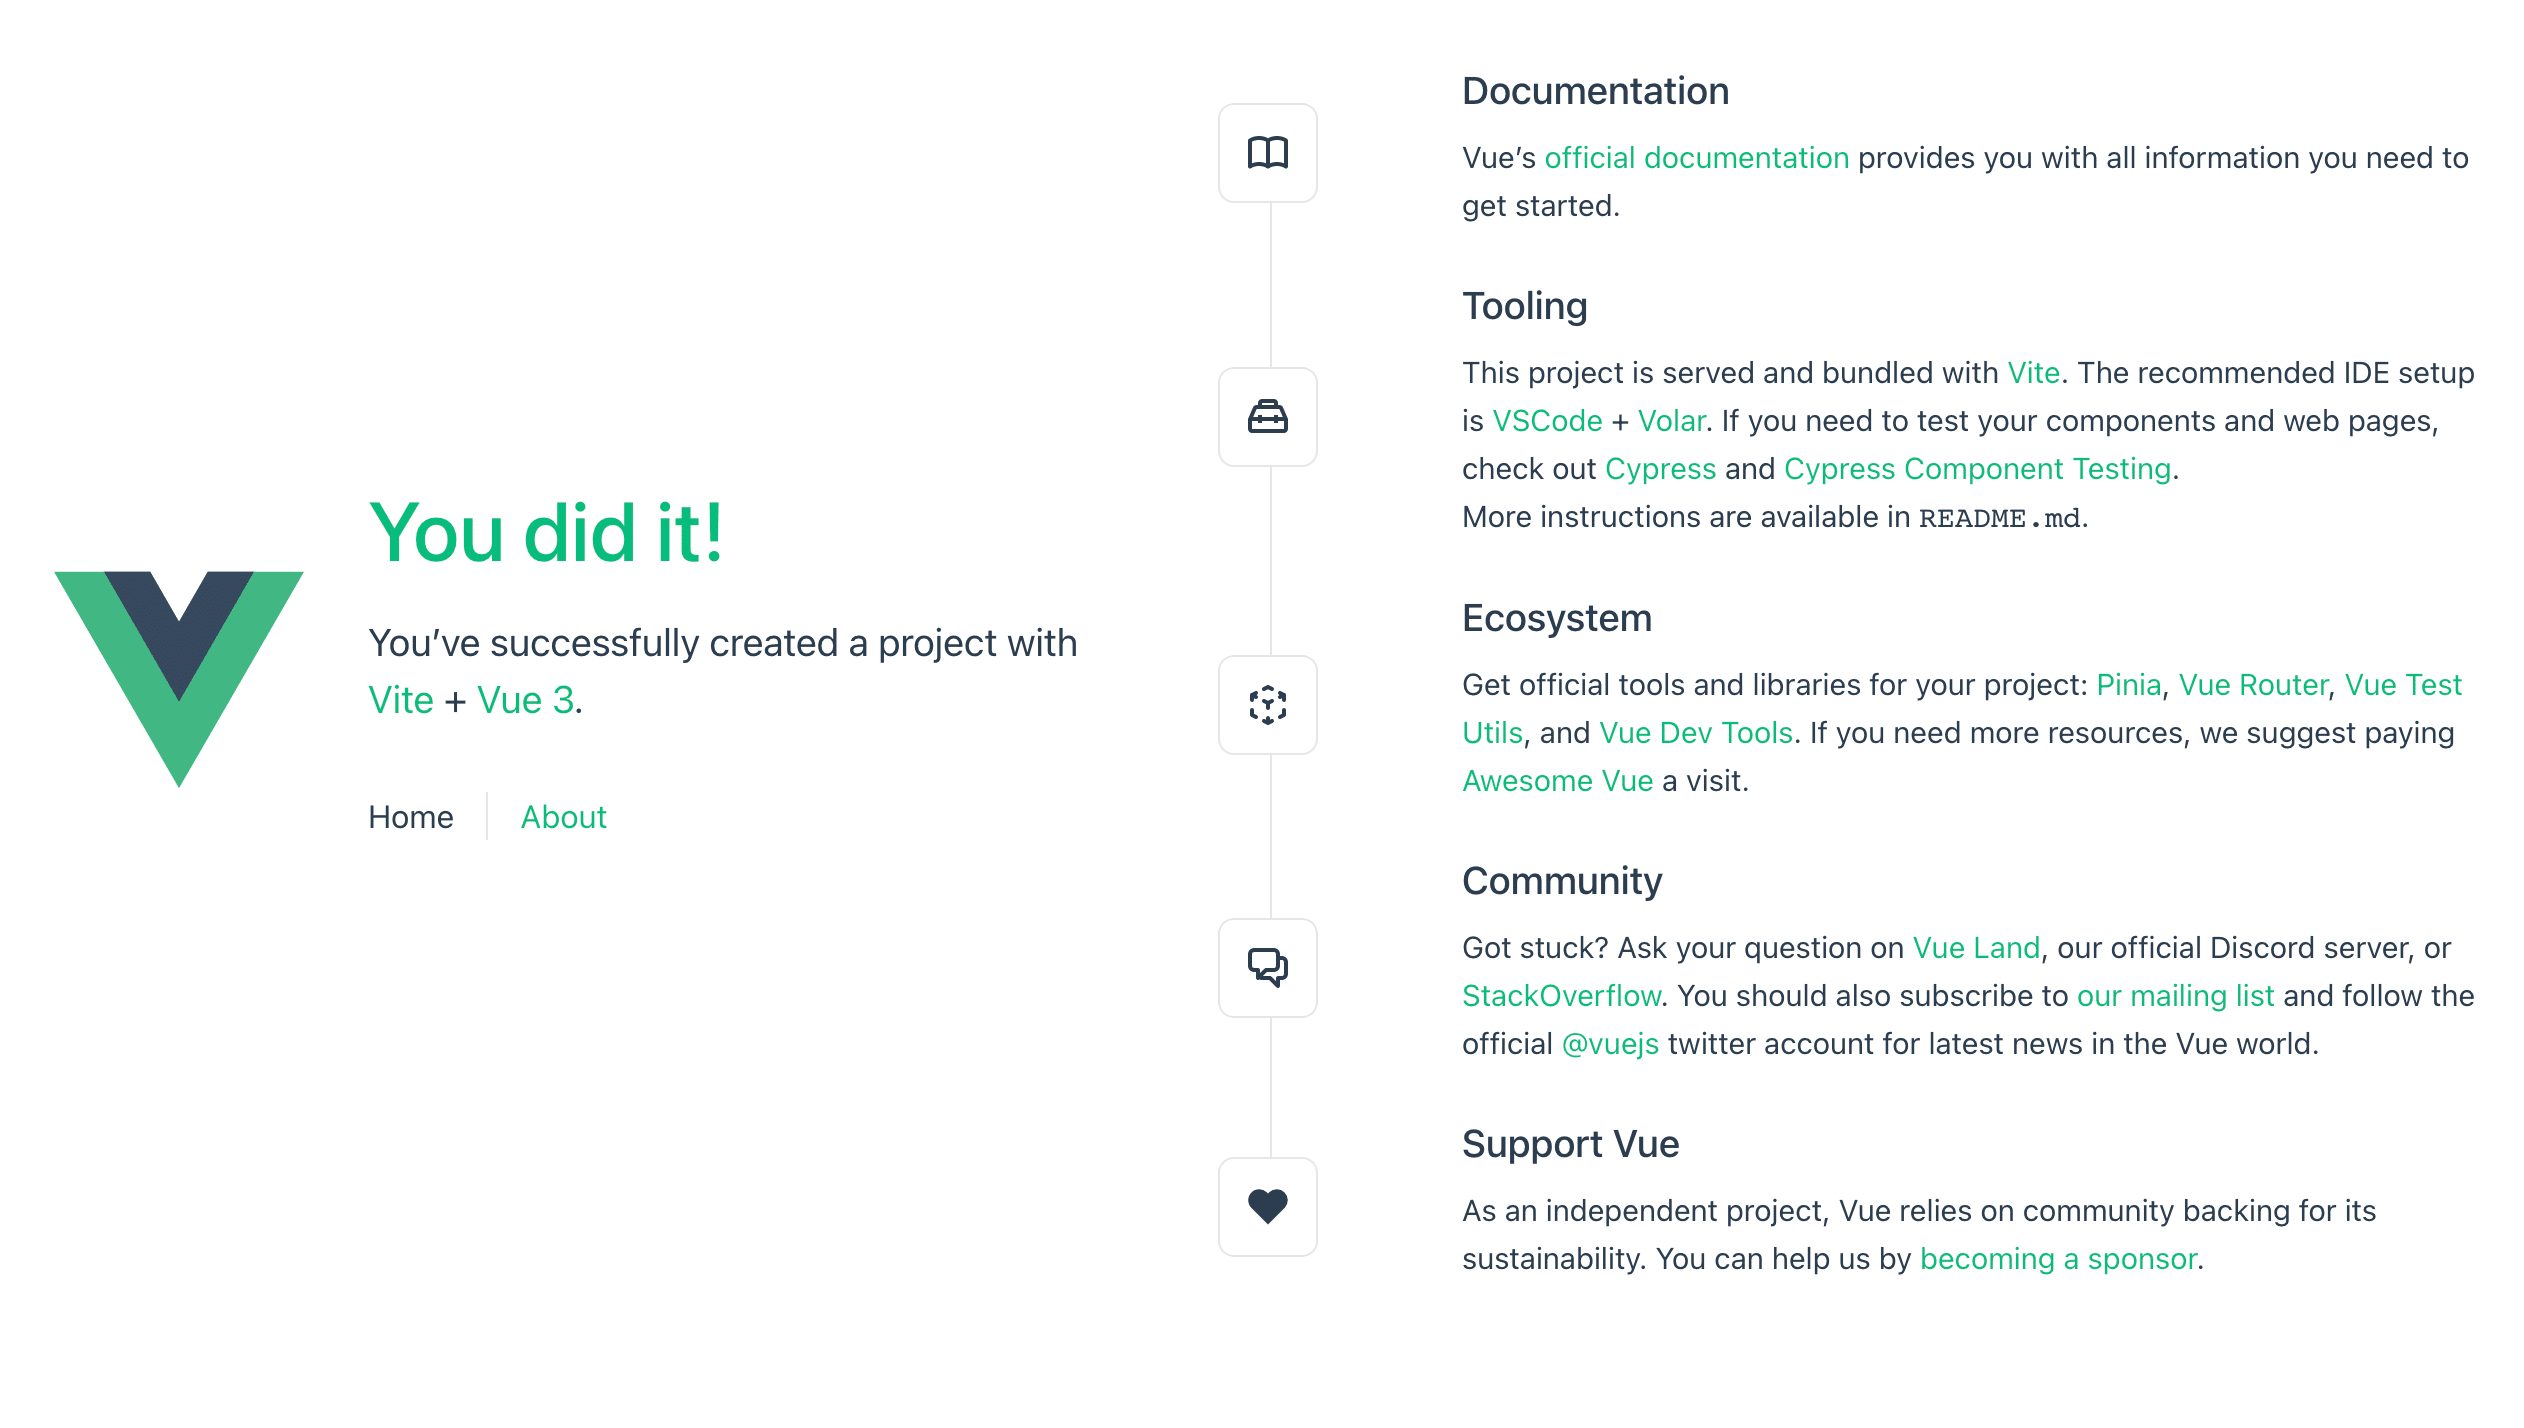
Navigate to http://localhost:5173 in the browser of your choice. You should see the following:
To simplify things, remove the "client/src/views" and "client/src/components/icons" folders as well as the client/src/components/TheWelcome.vue and client/src/components/WelcomeItem.vue components. Then, add a new component to the "client/src/components" folder called Ping.vue:
<template>
  <div>
    <p>{{ msg }}</p>
  </div>
</template>

<script>
export default {
  name: 'Ping',
  data() {
    return {
      msg: 'Hello!',
    };
  },
};
</script>
Update client/src/router/index.js to map '/ping' to the Ping component like so:
import { createRouter, createWebHistory } from 'vue-router'
import Ping from '../components/Ping.vue'

const router = createRouter({
  history: createWebHistory(import.meta.env.BASE_URL),
  routes: [
    {
      path: '/ping',
      name: 'ping',
      component: Ping
    },
  ]
})

export default router
Finally, within client/src/App.vue, remove the navigation along with the styles:
<template>
  <RouterView />
</template>

<script setup>
import { RouterView } from 'vue-router'
</script>
You should now see Hello! in the browser at http://localhost:5173/ping.
To connect the client-side Vue app with the back-end Flask app, we can use the Axios library to send HTTP requests.
Start by installing it:
$ npm install [email protected] --save
Update the script section of the component, in Ping.vue, like so:
<script>
import axios from 'axios';

export default {
  name: 'Ping',
  data() {
    return {
      msg: '',
    };
  },
  methods: {
    getMessage() {
      const path = 'http://localhost:5001/ping';
      axios.get(path)
        .then((res) => {
          this.msg = res.data;
        })
        .catch((error) => {

          console.error(error);
        });
    },
  },
  created() {
    this.getMessage();
  },
};
</script>
Fire up the Flask app in a new terminal window. With the Vue app running in a different terminal window, you should now see pong! in the browser. Essentially, when a response is returned from the back-end, we set msg to the value of data from the response object.
Bootstrap Setup
Next, let's add Bootstrap, a popular CSS framework, to the app so we can quickly add some style.
Install:
$ npm install [email protected] --save
Import the Bootstrap styles to client/src/main.js:
import { createApp } from 'vue'
import App from './App.vue'
import router from './router'
import 'bootstrap/dist/css/bootstrap.css'

import './assets/main.css'

const app = createApp(App)

app.use(router)

app.mount('#app')
Ensure Bootstrap is wired up correctly by using a Button and Container in the Ping component:
<template>
  <div class="container">
    <button type="button" class="btn btn-primary">{{ msg }}</button>
  </div>
</template>
Run the dev server:
$ npm run serve
You should see:

Next, add a new component called Books in a new file called Books.vue:
<template>
  <div class="container">
    <p>books</p>
  </div>
</template>
Update the router:
import { createRouter, createWebHistory } from 'vue-router'
import Books from '../components/Books.vue'
import Ping from '../components/Ping.vue'

const router = createRouter({
  history: createWebHistory(import.meta.env.BASE_URL),
  routes: [
    {
      path: '/',
      name: 'Books',
      component: Books,
    },
    {
      path: '/ping',
      name: 'ping',
      component: Ping
    },
  ]
})

export default router
Update the style section in client/src/App.vue:
<style>
#app {
  margin-top: 60px
}
</style>
Remove the client/src/assets/base.css and client/src/assets/main.css files. Make sure to remove the import './assets/main.css' line in client/src/main.js as well:
import { createApp } from 'vue'
import App from './App.vue'
import router from './router'
import 'bootstrap/dist/css/bootstrap.css'

const app = createApp(App)

app.use(router)

app.mount('#app')
Test:
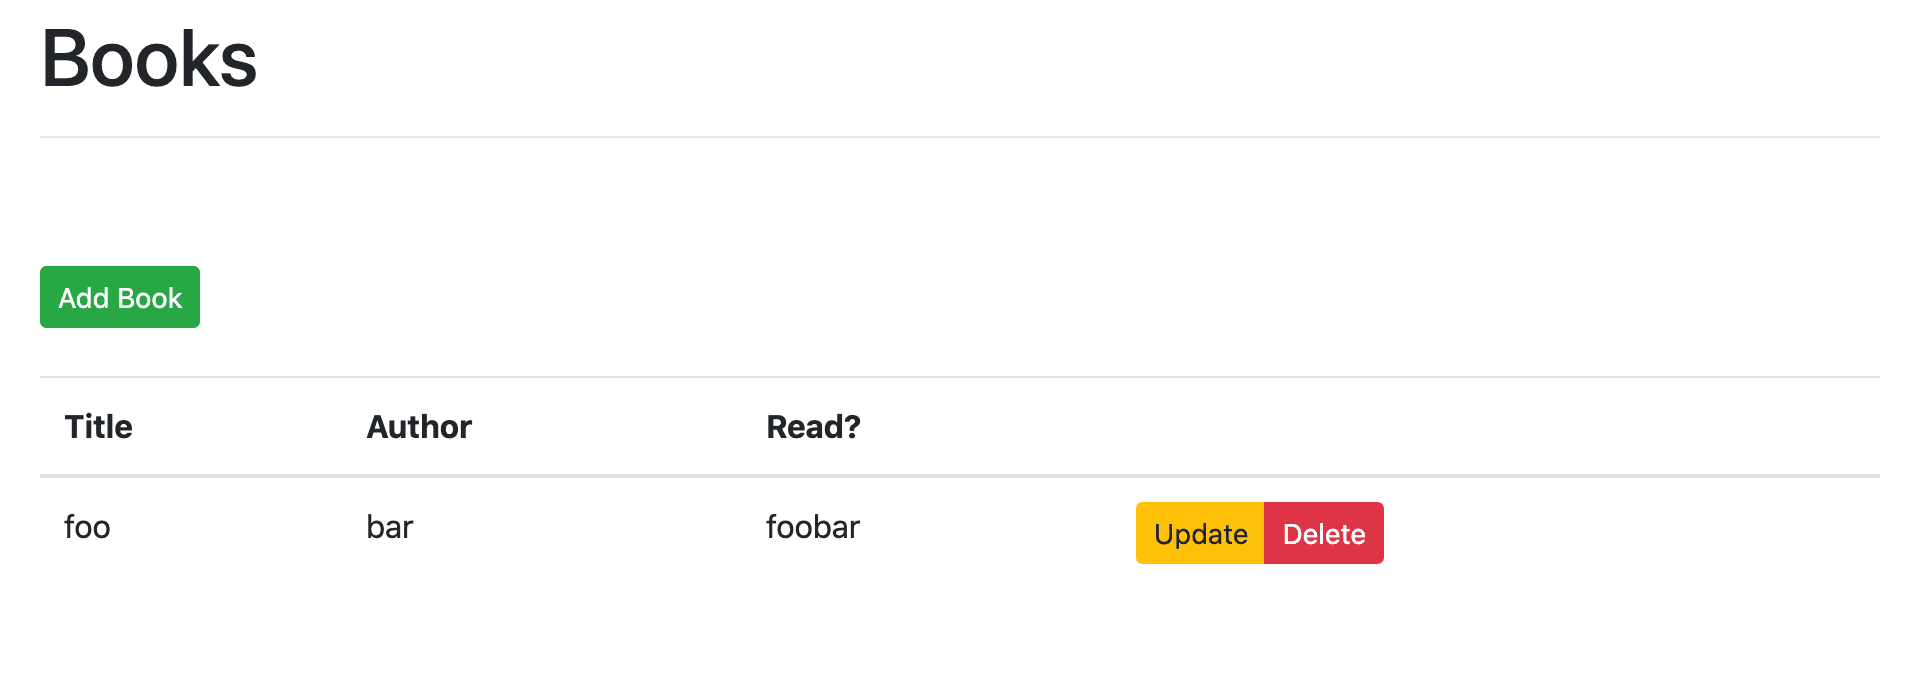
Finally, let's add a quick, Bootstrap-styled table to the Books component:
<template>
  <div class="container">
    <div class="row">
      <div class="col-sm-10">
        <h1>Books</h1>
        <hr><br><br>
        <button type="button" class="btn btn-success btn-sm">Add Book</button>
        <br><br>
        <table class="table table-hover">
          <thead>
            <tr>
              <th scope="col">Title</th>
              <th scope="col">Author</th>
              <th scope="col">Read?</th>
              <th></th>
            </tr>
          </thead>
          <tbody>
            <tr>
              <td>foo</td>
              <td>bar</td>
              <td>foobar</td>
              <td>
                <div class="btn-group" role="group">
                  <button type="button" class="btn btn-warning btn-sm">Update</button>
                  <button type="button" class="btn btn-danger btn-sm">Delete</button>
                </div>
              </td>
            </tr>
          </tbody>
        </table>
      </div>
    </div>
  </div>
</template>
You should now see:
Now we can start building out the functionality of our CRUD app.
What are we Building?
Our goal is to design a back-end RESTful API, powered by Python and Flask, for a single resource -- books. The API itself should follow RESTful design principles, using the basic HTTP verbs: GET, POST, PUT, and DELETE.
We'll also set up a front-end application with Vue that consumes the back-end API:

This tutorial only deals with the happy path. Handling errors is a separate exercise. Check your understanding and add proper error handling on both the front and back-end.
GET Route
Server
Add a list of books to server/app.py:
BOOKS = [
    {
        'title': 'On the Road',
        'author': 'Jack Kerouac',
        'read': True
    },
    {
        'title': 'Harry Potter and the Philosopher\'s Stone',
        'author': 'J. K. Rowling',
        'read': False
    },
    {
        'title': 'Green Eggs and Ham',
        'author': 'Dr. Seuss',
        'read': True
    }
]
Add the route handler:
@app.route('/books', methods=['GET'])
def all_books():
    return jsonify({
        'status': 'success',
        'books': BOOKS
    })
Run the Flask app, if it's not already running, and then manually test out the route at http://localhost:5001/books.
Looking for an extra challenge? Write an automated test for this. Review this resource for more info on testing a Flask app.
Client
Update the component:
<template>
  <div class="container">
    <div class="row">
      <div class="col-sm-10">
        <h1>Books</h1>
        <hr><br><br>
        <button type="button" class="btn btn-success btn-sm">Add Book</button>
        <br><br>
        <table class="table table-hover">
          <thead>
            <tr>
              <th scope="col">Title</th>
              <th scope="col">Author</th>
              <th scope="col">Read?</th>
              <th></th>
            </tr>
          </thead>
          <tbody>
            <tr v-for="(book, index) in books" :key="index">
              <td>{{ book.title }}</td>
              <td>{{ book.author }}</td>
              <td>
                <span v-if="book.read">Yes</span>
                <span v-else>No</span>
              </td>
              <td>
                <div class="btn-group" role="group">
                  <button type="button" class="btn btn-warning btn-sm">Update</button>
                  <button type="button" class="btn btn-danger btn-sm">Delete</button>
                </div>
              </td>
            </tr>
          </tbody>
        </table>
      </div>
    </div>
  </div>
</template>

<script>
import axios from 'axios';

export default {
  data() {
    return {
      books: [],
    };
  },
  methods: {
    getBooks() {
      const path = 'http://localhost:5001/books';
      axios.get(path)
        .then((res) => {
          this.books = res.data.books;
        })
        .catch((error) => {
          console.error(error);
        });
    },
  },
  created() {
    this.getBooks();
  },
};
</script>
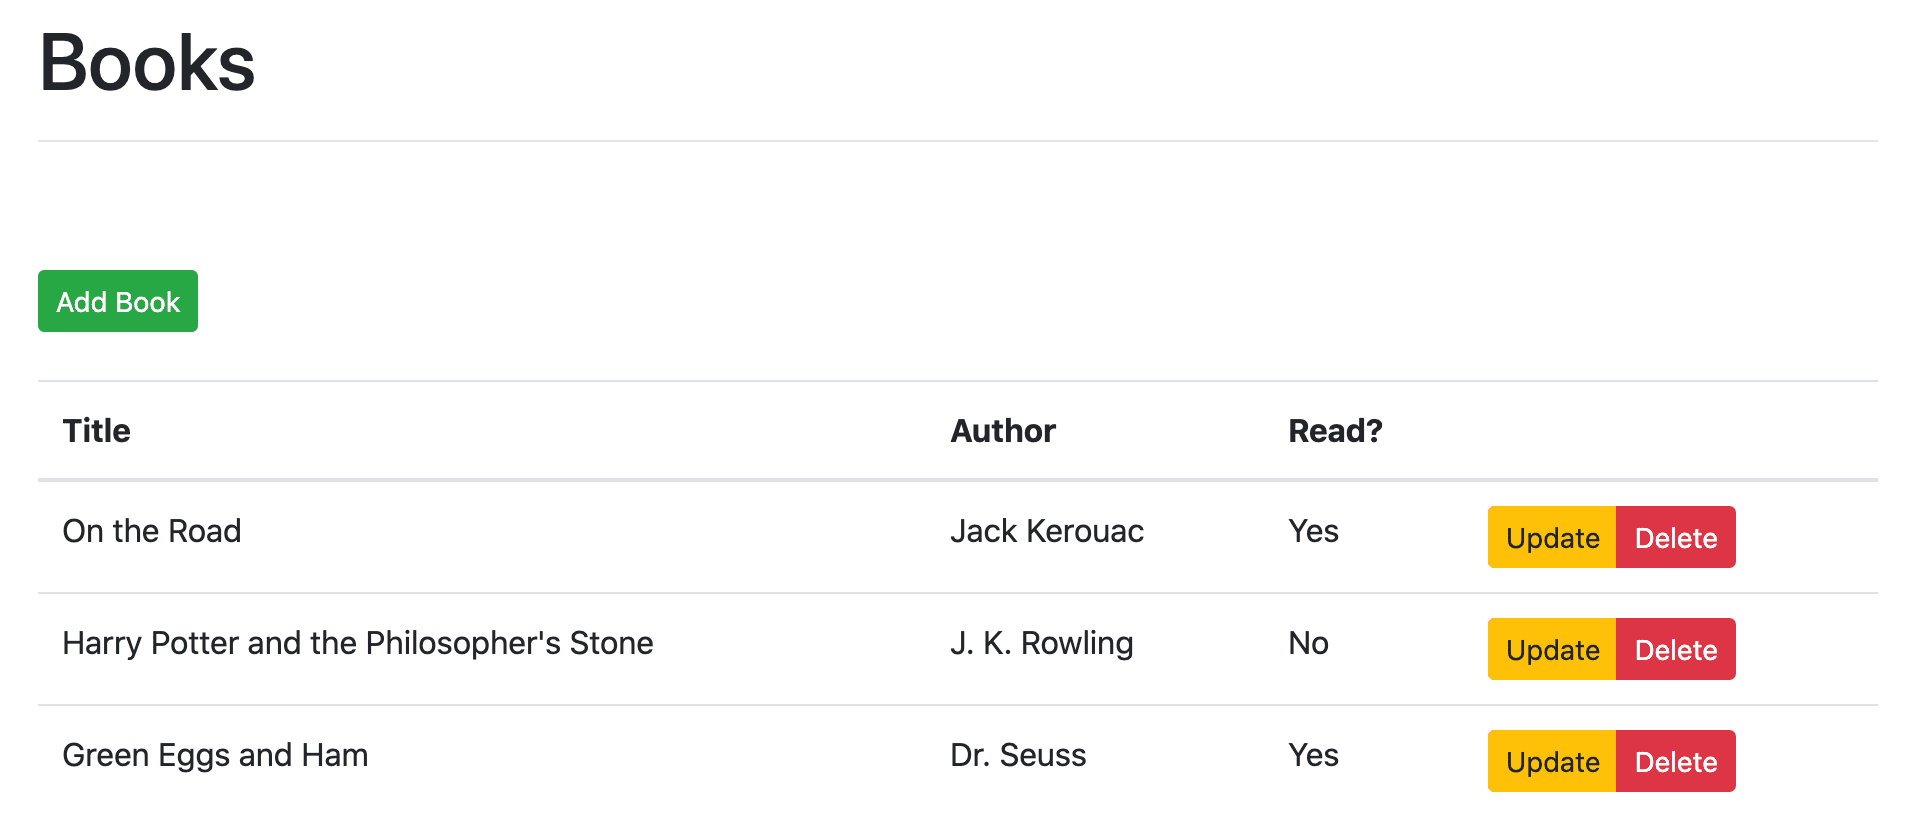
After the component is initialized, the getBooks() method is called via the created lifecycle hook, which fetches the books from the back-end endpoint we just set up.
Review Lifecycle Hooks for more on the component lifecycle and the available methods.
In the template, we iterated through the list of books via the v-for directive, creating a new table row on each iteration. The index value is used as the key. Finally, v-if is then used to render either Yes or No, indicating whether the user has read the book or not.
POST Route
Server
Update the existing route handler to handle POST requests for adding a new book:
@app.route('/books', methods=['GET', 'POST'])
def all_books():
    response_object = {'status': 'success'}
    if request.method == 'POST':
        post_data = request.get_json()
        BOOKS.append({
            'title': post_data.get('title'),
            'author': post_data.get('author'),
            'read': post_data.get('read')
        })
        response_object['message'] = 'Book added!'
    else:
        response_object['books'] = BOOKS
    return jsonify(response_object)
Update the imports:
from flask import Flask, jsonify, request
With the Flask server running, you can test the POST route in a new terminal tab:
$ curl -X POST http://localhost:5001/books -d \
  '{"title": "1Q84", "author": "Haruki Murakami", "read": "true"}' \
  -H 'Content-Type: application/json'
You should see:
{
  "message": "Book added!",
  "status": "success"
}
You should also see the new book in the response from the http://localhost:5001/books endpoint.
What if the title already exists? Or what if a title has more than one author? Check your understanding by handling these cases. Also, how would you handle an invalid payload where the
title,author, and/orreadis missing?
Client
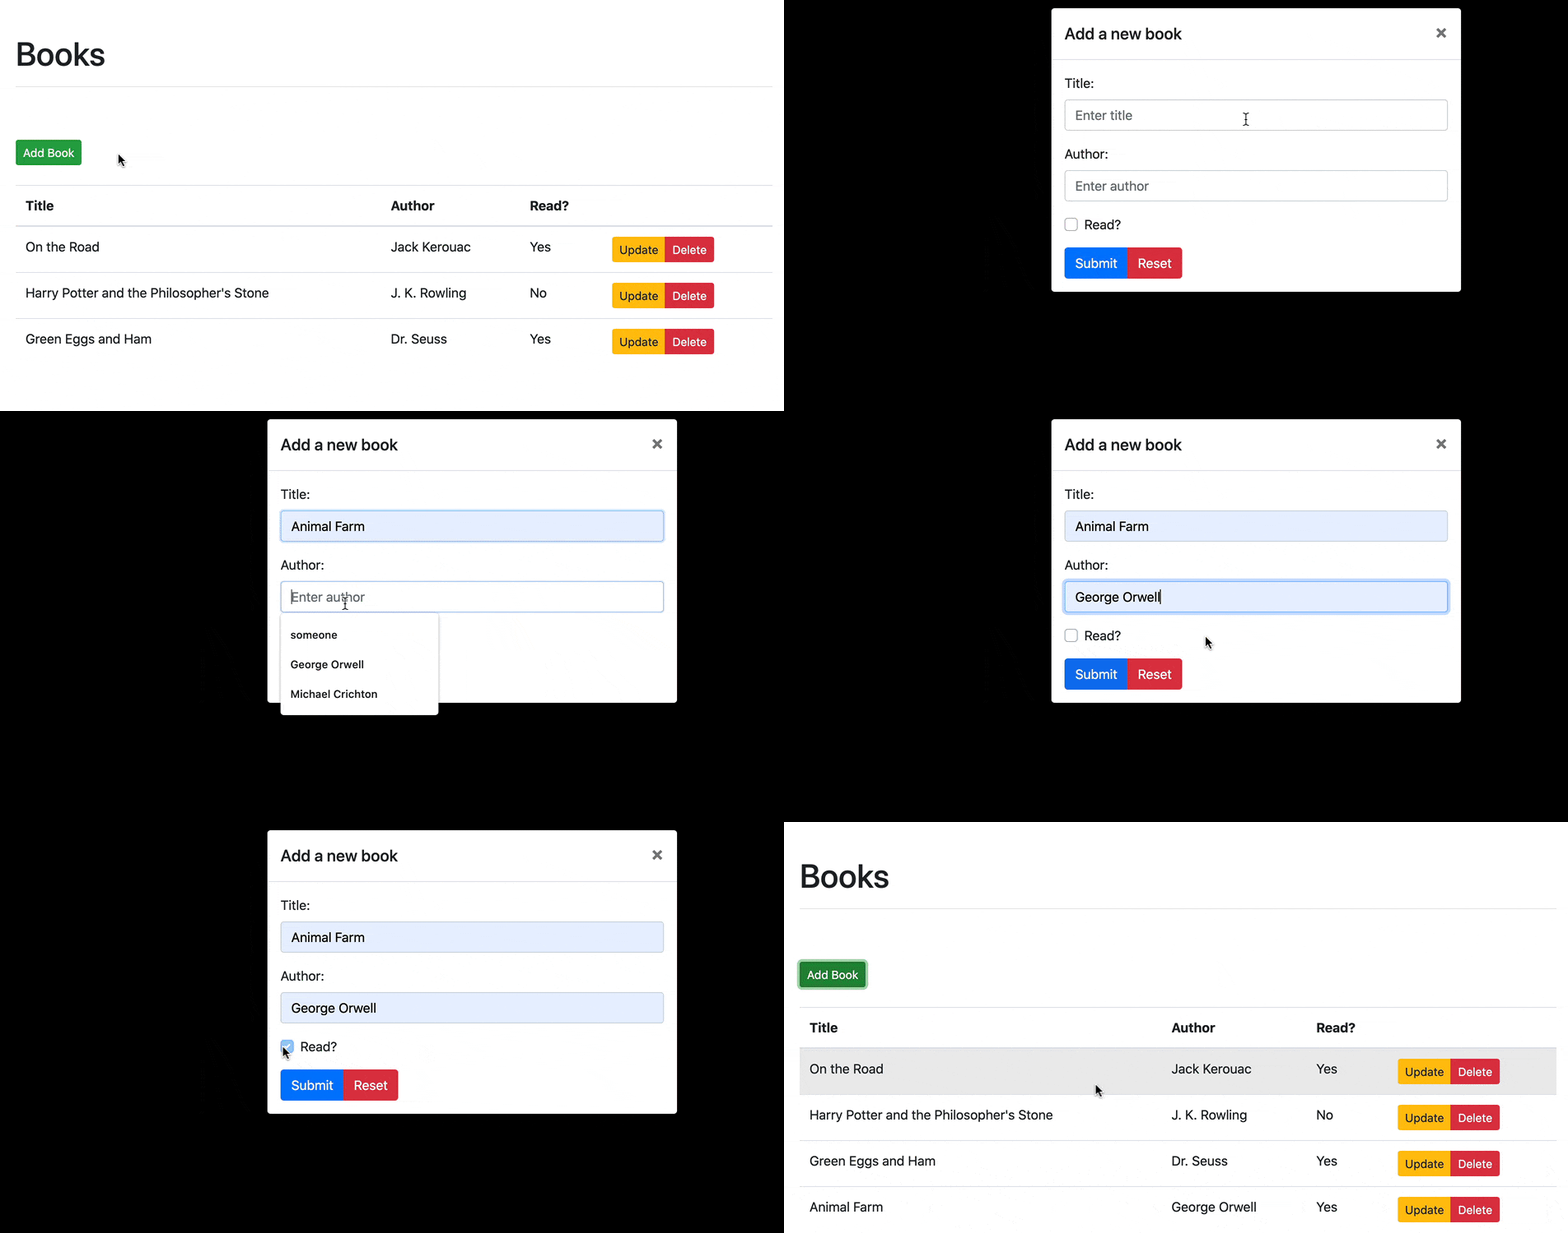
On the client-side, let's add a modal for adding a new book to the Books component, starting with the HTML:
<!-- add new book modal -->
<div
ref="addBookModal"
class="modal fade"
:class="{ show: activeAddBookModal, 'd-block': activeAddBookModal }"
tabindex="-1"
role="dialog">
<div class="modal-dialog" role="document">
<div class="modal-content">
<div class="modal-header">
<h5 class="modal-title">Add a new book</h5>
<button
type="button"
class="close"
data-dismiss="modal"
aria-label="Close"
@click="toggleAddBookModal">
<span aria-hidden="true">×</span>
</button>
</div>
<div class="modal-body">
<form>
<div class="mb-3">
<label for="addBookTitle" class="form-label">Title:</label>
<input
type="text"
class="form-control"
id="addBookTitle"
v-model="addBookForm.title"
placeholder="Enter title">
</div>
<div class="mb-3">
<label for="addBookAuthor" class="form-label">Author:</label>
<input
type="text"
class="form-control"
id="addBookAuthor"
v-model="addBookForm.author"
placeholder="Enter author">
</div>
<div class="mb-3 form-check">
<input
type="checkbox"
class="form-check-input"
id="addBookRead"
v-model="addBookForm.read">
<label class="form-check-label" for="addBookRead">Read?</label>
</div>
<div class="btn-group" role="group">
<button
type="button"
class="btn btn-primary btn-sm"
@click="handleAddSubmit">
Submit
</button>
<button
type="button"
class="btn btn-danger btn-sm"
@click="handleAddReset">
Reset
</button>
</div>
</form>
</div>
</div>
</div>
</div>
<div v-if="activeAddBookModal" class="modal-backdrop fade show"></div>
Add this just before the closing div tag. Take a quick look at the code. v-model is a directive used to bind input values back to the state. You'll see this in action shortly.
Update the script section:
<script>
import axios from 'axios';

export default {
  data() {
    return {
      activeAddBookModal: false,
      addBookForm: {
        title: '',
        author: '',
        read: [],
      },
      books: [],
    };
  },
  methods: {
    addBook(payload) {
      const path = 'http://localhost:5001/books';
      axios.post(path, payload)
        .then(() => {
          this.getBooks();
        })
        .catch((error) => {

          console.log(error);
          this.getBooks();
        });
    },
    getBooks() {
      const path = 'http://localhost:5001/books';
      axios.get(path)
        .then((res) => {
          this.books = res.data.books;
        })
        .catch((error) => {

          console.error(error);
        });
    },
    handleAddReset() {
      this.initForm();
    },
    handleAddSubmit() {
      this.toggleAddBookModal();
      let read = false;
      if (this.addBookForm.read[0]) {
        read = true;
      }
      const payload = {
        title: this.addBookForm.title,
        author: this.addBookForm.author,
        read, // property shorthand
      };
      this.addBook(payload);
      this.initForm();
    },
    initForm() {
      this.addBookForm.title = '';
      this.addBookForm.author = '';
      this.addBookForm.read = [];
    },
    toggleAddBookModal() {
      const body = document.querySelector('body');
      this.activeAddBookModal = !this.activeAddBookModal;
      if (this.activeAddBookModal) {
        body.classList.add('modal-open');
      } else {
        body.classList.remove('modal-open');
      }
    },
  },
  created() {
    this.getBooks();
  },
};
</script>
What's happening here?
addBookFormis bound to the form inputs via, again,v-model. When one is updated, the other will be updated as well, in other words. This is called two-way binding. Take a moment to read about it here. Think about the ramifications of this. Do you think this makes state management easier or harder? How do React and Angular handle this? In my opinion, two-way binding (along with mutability) makes Vue much more approachable than React.handleAddSubmitis fired when the user clicks the submit button. Here, we close the modal (this.toggleAddBookModal();), fire theaddBookmethod, and clear the form (initForm()).addBooksends a POST request to/booksto add a new book.
Review the rest of the changes on your own, referencing the Vue docs as necessary.
Can you think of any potential errors on the client or server? Handle these on your own to improve user experience.
Finally, update the "Add Book" button in the template so that the modal is displayed when the button is clicked:
<button
  type="button"
  class="btn btn-success btn-sm"
  @click="toggleAddBookModal">
  Add Book
</button>
The component should now look like this:
<template>
<div class="container">
<div class="row">
<div class="col-sm-10">
<h1>Books</h1>
<hr><br><br>
<button
type="button"
class="btn btn-success btn-sm"
@click="toggleAddBookModal">
Add Book
</button>
<br><br>
<table class="table table-hover">
<thead>
<tr>
<th scope="col">Title</th>
<th scope="col">Author</th>
<th scope="col">Read?</th>
<th></th>
</tr>
</thead>
<tbody>
<tr v-for="(book, index) in books" :key="index">
<td>{{ book.title }}</td>
<td>{{ book.author }}</td>
<td>
<span v-if="book.read">Yes</span>
<span v-else>No</span>
</td>
<td>
<div class="btn-group" role="group">
<button type="button" class="btn btn-warning btn-sm">Update</button>
<button type="button" class="btn btn-danger btn-sm">Delete</button>
</div>
</td>
</tr>
</tbody>
</table>
</div>
</div>
<!-- add new book modal -->
<div
ref="addBookModal"
class="modal fade"
:class="{ show: activeAddBookModal, 'd-block': activeAddBookModal }"
tabindex="-1"
role="dialog">
<div class="modal-dialog" role="document">
<div class="modal-content">
<div class="modal-header">
<h5 class="modal-title">Add a new book</h5>
<button
type="button"
class="close"
data-dismiss="modal"
aria-label="Close"
@click="toggleAddBookModal">
<span aria-hidden="true">×</span>
</button>
</div>
<div class="modal-body">
<form>
<div class="mb-3">
<label for="addBookTitle" class="form-label">Title:</label>
<input
type="text"
class="form-control"
id="addBookTitle"
v-model="addBookForm.title"
placeholder="Enter title">
</div>
<div class="mb-3">
<label for="addBookAuthor" class="form-label">Author:</label>
<input
type="text"
class="form-control"
id="addBookAuthor"
v-model="addBookForm.author"
placeholder="Enter author">
</div>
<div class="mb-3 form-check">
<input
type="checkbox"
class="form-check-input"
id="addBookRead"
v-model="addBookForm.read">
<label class="form-check-label" for="addBookRead">Read?</label>
</div>
<div class="btn-group" role="group">
<button
type="button"
class="btn btn-primary btn-sm"
@click="handleAddSubmit">
Submit
</button>
<button
type="button"
class="btn btn-danger btn-sm"
@click="handleAddReset">
Reset
</button>
</div>
</form>
</div>
</div>
</div>
</div>
<div v-if="activeAddBookModal" class="modal-backdrop fade show"></div>
</div>
</template>
<script>
import axios from 'axios';
export default {
data() {
return {
activeAddBookModal: false,
addBookForm: {
title: '',
author: '',
read: [],
},
books: [],
};
},
methods: {
addBook(payload) {
const path = 'http://localhost:5001/books';
axios.post(path, payload)
.then(() => {
this.getBooks();
})
.catch((error) => {
console.log(error);
this.getBooks();
});
},
getBooks() {
const path = 'http://localhost:5001/books';
axios.get(path)
.then((res) => {
this.books = res.data.books;
})
.catch((error) => {
console.error(error);
});
},
handleAddReset() {
this.initForm();
},
handleAddSubmit() {
this.toggleAddBookModal();
let read = false;
if (this.addBookForm.read[0]) {
read = true;
}
const payload = {
title: this.addBookForm.title,
author: this.addBookForm.author,
read, // property shorthand
};
this.addBook(payload);
this.initForm();
},
initForm() {
this.addBookForm.title = '';
this.addBookForm.author = '';
this.addBookForm.read = [];
},
toggleAddBookModal() {
const body = document.querySelector('body');
this.activeAddBookModal = !this.activeAddBookModal;
if (this.activeAddBookModal) {
body.classList.add('modal-open');
} else {
body.classList.remove('modal-open');
}
},
},
created() {
this.getBooks();
},
};
</script>
Test it out! Try adding a book:
Alert Component
Next, let's add an Alert component to display a message to the end user after a new book is added. We'll create a new component for this since it's likely that you'll use the functionality in a number of components.
Add a new file called Alert.vue to "client/src/components":
<template>
  <p>It works!</p>
</template>
Then, import it into the script section of the Books component and register the component:
<script>
import axios from 'axios';
import Alert from './Alert.vue';

export default {
  data() {
    return {
      activeAddBookModal: false,
      addBookForm: {
        title: '',
        author: '',
        read: [],
      },
      books: [],
    };
  },
  components: {
    alert: Alert,
  },

  ...

};
</script>
Now, we can reference the new component in the template section:
<template>
  <div class="container">
    <div class="row">
      <div class="col-sm-10">
        <h1>Books</h1>
        <hr><br><br>
        <alert></alert>
        <button
          type="button"
          class="btn btn-success btn-sm"
          @click="toggleAddBookModal">
          Add Book
        </button>
        <br><br>

        ...

      </div>
    </div>

    ...

  </div>
</template>
Refresh the browser. You should now see:

Review Using a Component from the official Vue docs for more info on working with components in other components.
Next, let's add the actual Bootstrap Alert component to client/src/components/Alert.vue:
<template>
  <div>
    <div class="alert alert-success" role="alert">{{ message }}</div>
    <br/>
  </div>
</template>

<script>
export default {
  props: ['message'],
};
</script>
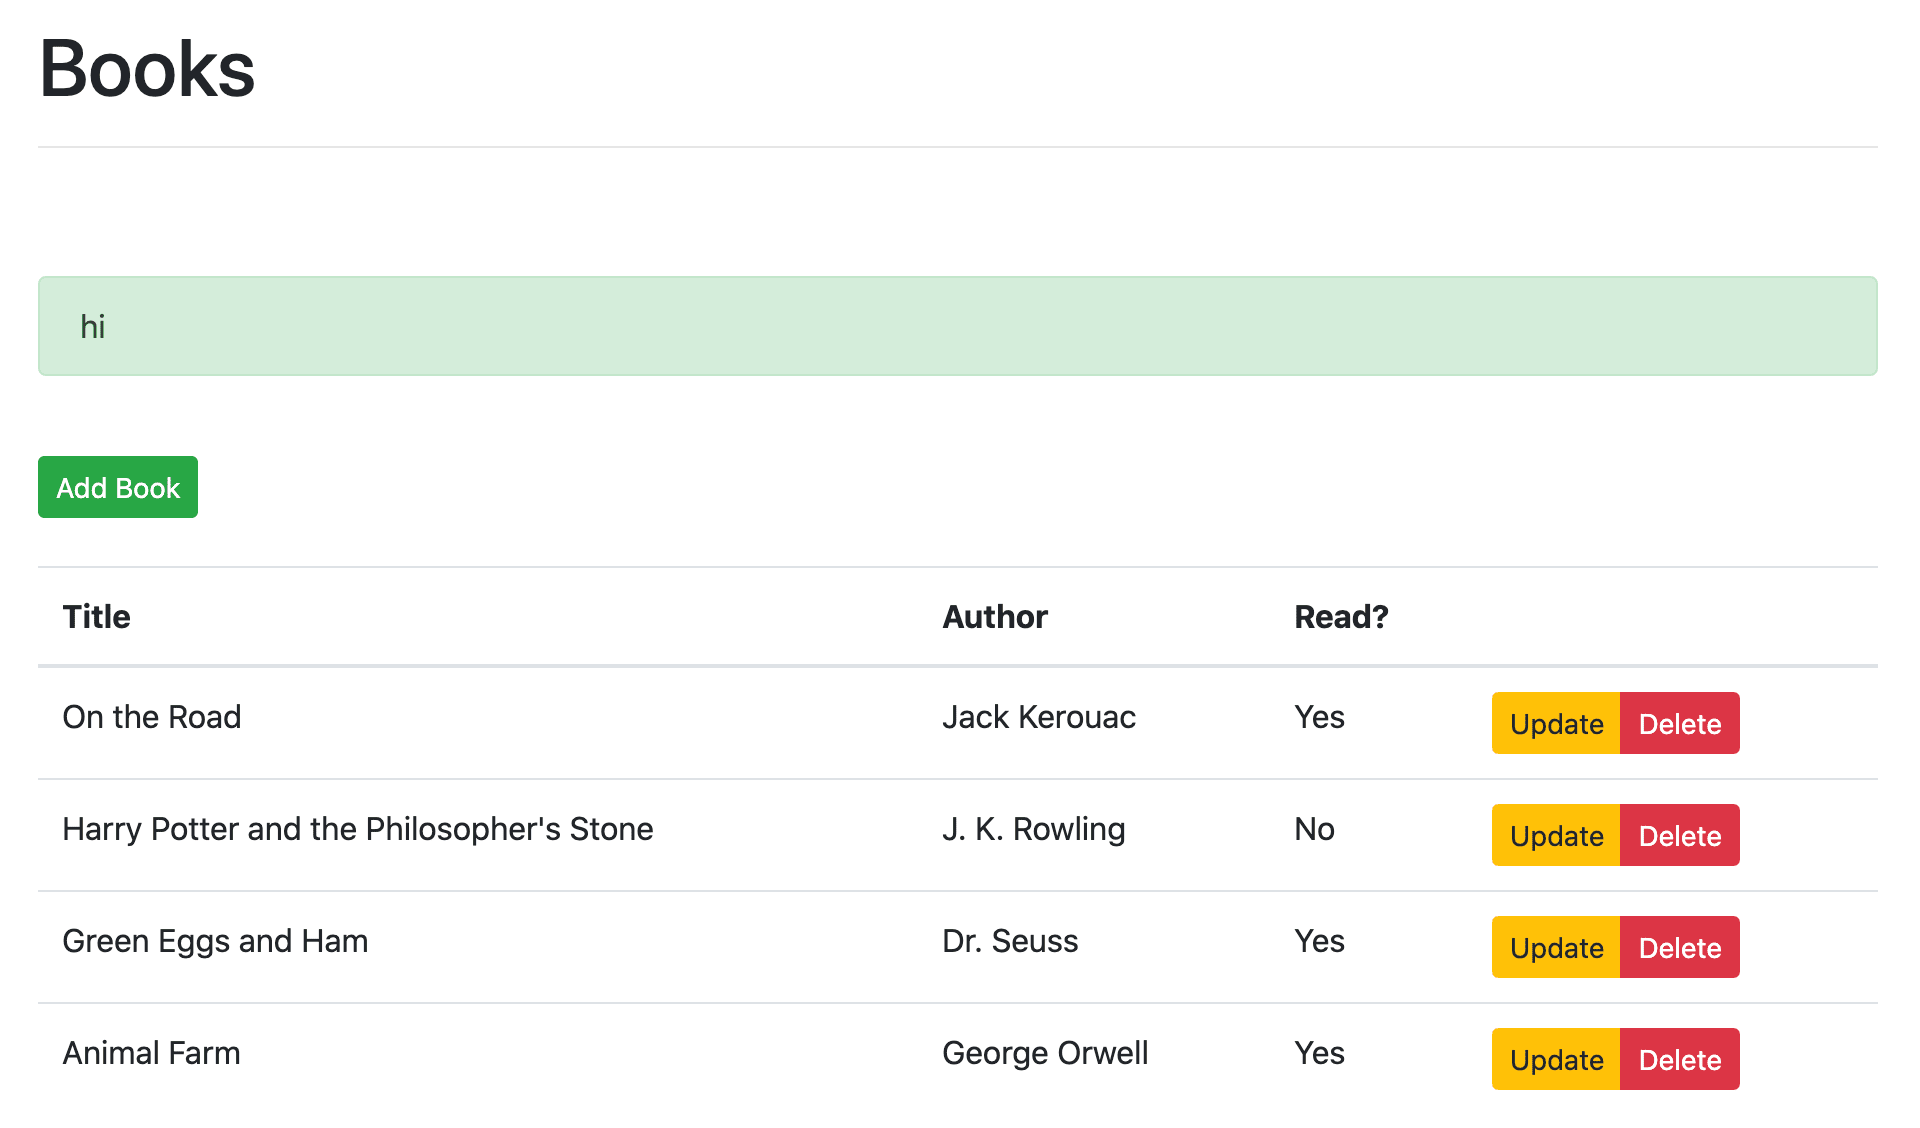
Take note of the props option in the script section. We can pass a message down from the parent component (Books) like so:
<alert message="hi"></alert>
Try this out:
Review the docs for more info on props.
To make it dynamic, so that a custom message is passed down, use a binding expression in Books.vue:
<alert :message="message"></alert>
Add the message to the data options, in Books.vue as well:
data() {
  return {
    activeAddBookModal: false,
    addBookForm: {
      title: '',
      author: '',
      read: [],
    },
    books: [],
    message: '',
  };
},
Then, within addBook, update the message:
addBook(payload) {
  const path = 'http://localhost:5001/books';
  axios.post(path, payload)
    .then(() => {
      this.getBooks();
      this.message = 'Book added!';
    })
    .catch((error) => {
      console.log(error);
      this.getBooks();
    });
},
Finally, add a v-if, so the alert is only displayed if showMessage is true:
<alert :message=message v-if="showMessage"></alert>
Add showMessage to the data:
data() {
  return {
    activeAddBookModal: false,
    addBookForm: {
      title: '',
      author: '',
      read: [],
    },
    books: [],
    message: '',
    showMessage: false,
  };
},
Update addBook again, setting showMessage to true:
addBook(payload) {
  const path = 'http://localhost:5001/books';
  axios.post(path, payload)
    .then(() => {
      this.getBooks();
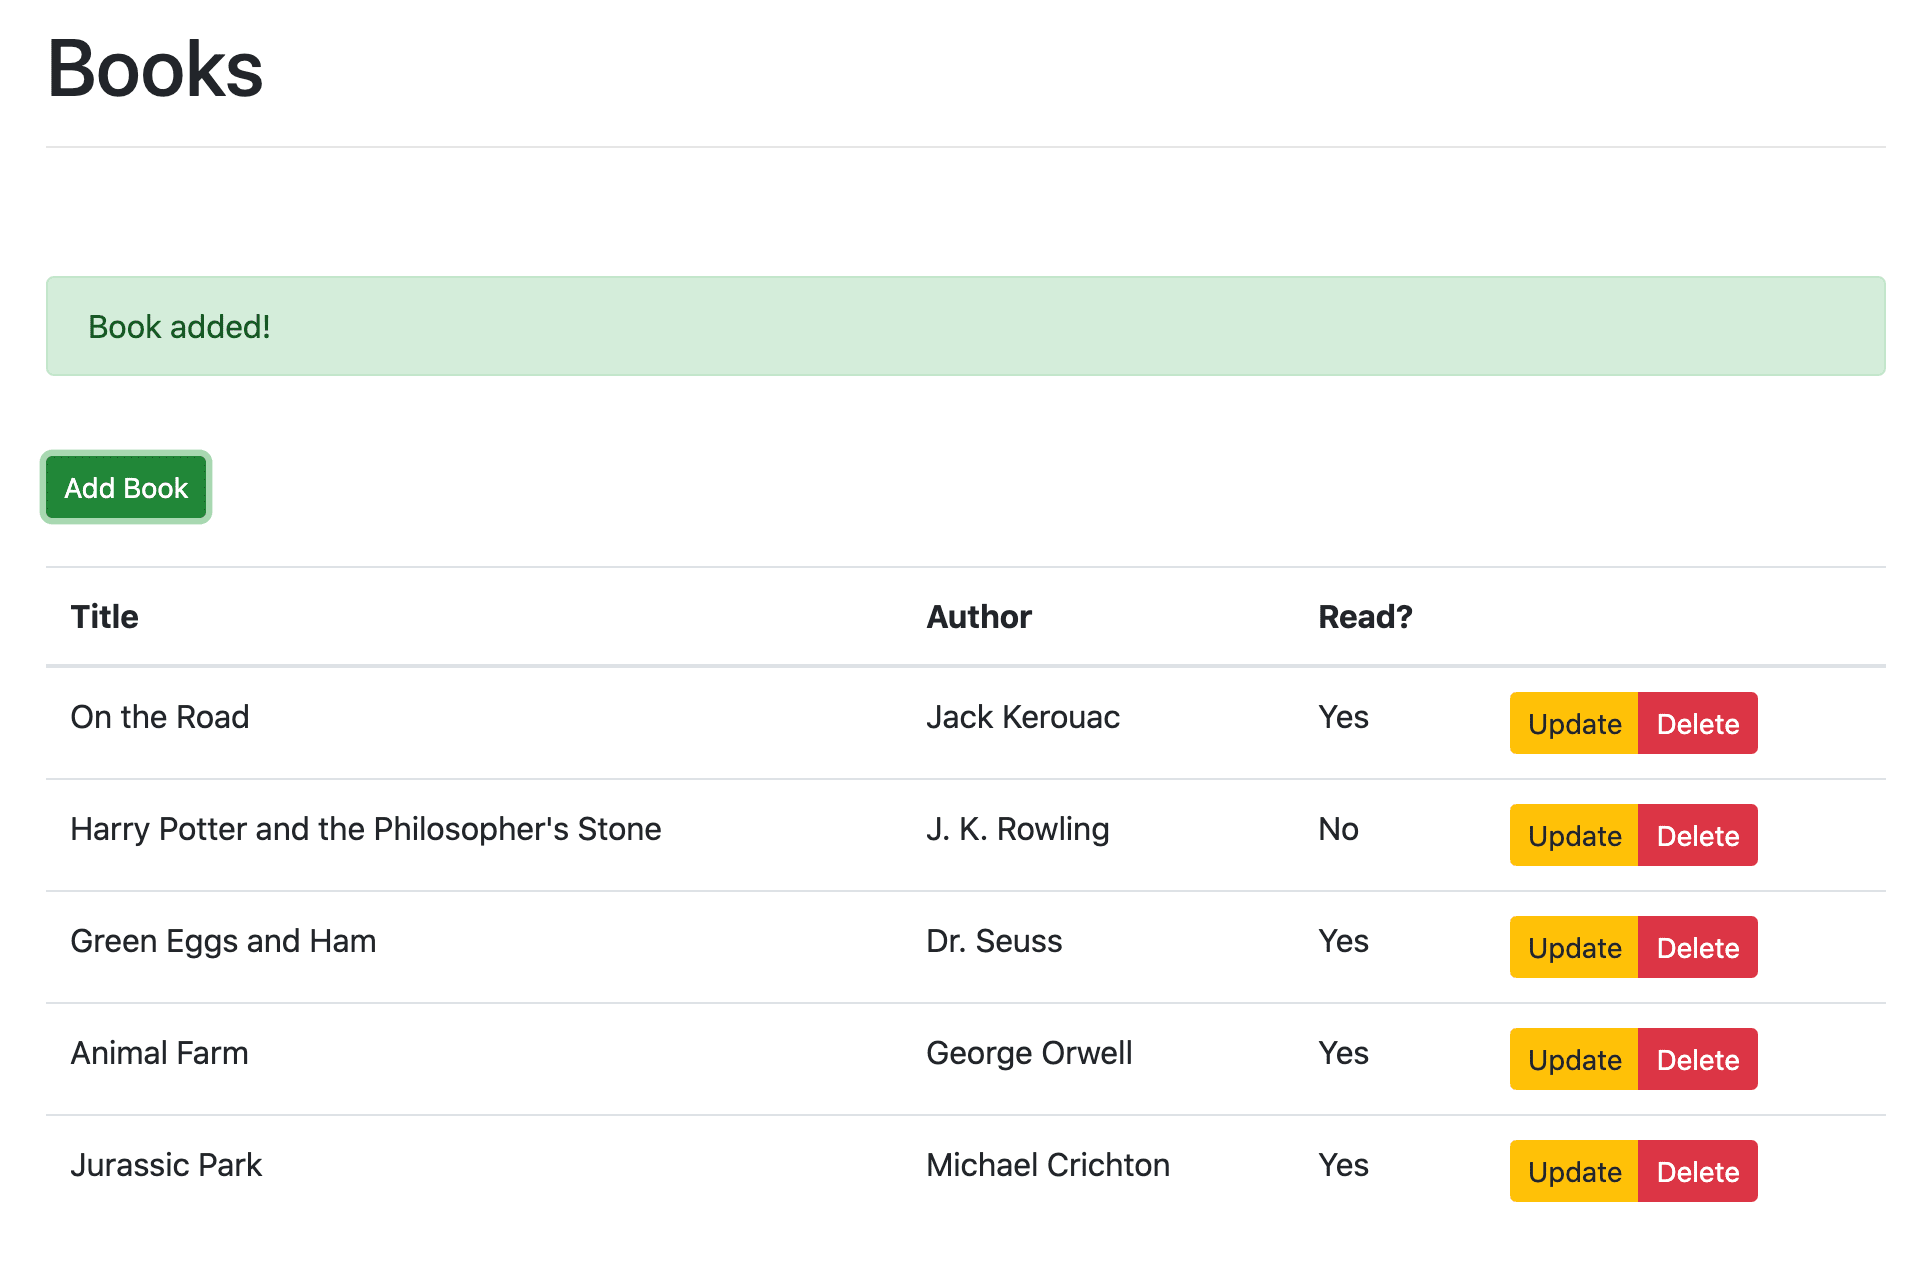
      this.message = 'Book added!';
      this.showMessage = true;
    })
    .catch((error) => {
      console.log(error);
      this.getBooks();
    });
},
Test it out!
Challenges:
- Think about where
showMessageshould be set tofalse. Update your code.- Try using the Alert component to display errors.
- Refactor the alert to be dismissible.
PUT Route
Server
For updates, we'll need to use a unique identifier since we can't depend on the title to be unique. We can use uuid from the Python standard library.
Update BOOKS in server/app.py:
BOOKS = [
    {
        'id': uuid.uuid4().hex,
        'title': 'On the Road',
        'author': 'Jack Kerouac',
        'read': True
    },
    {
        'id': uuid.uuid4().hex,
        'title': 'Harry Potter and the Philosopher\'s Stone',
        'author': 'J. K. Rowling',
        'read': False
    },
    {
        'id': uuid.uuid4().hex,
        'title': 'Green Eggs and Ham',
        'author': 'Dr. Seuss',
        'read': True
    }
]
Don't forget the import:
import uuid
Refactor all_books to account for the unique id when a new book is added:
@app.route('/books', methods=['GET', 'POST'])
def all_books():
    response_object = {'status': 'success'}
    if request.method == 'POST':
        post_data = request.get_json()
        BOOKS.append({
            'id': uuid.uuid4().hex,
            'title': post_data.get('title'),
            'author': post_data.get('author'),
            'read': post_data.get('read')
        })
        response_object['message'] = 'Book added!'
    else:
        response_object['books'] = BOOKS
    return jsonify(response_object)
Add a new route handler:
@app.route('/books/<book_id>', methods=['PUT'])
def single_book(book_id):
    response_object = {'status': 'success'}
    if request.method == 'PUT':
        post_data = request.get_json()
        remove_book(book_id)
        BOOKS.append({
            'id': uuid.uuid4().hex,
            'title': post_data.get('title'),
            'author': post_data.get('author'),
            'read': post_data.get('read')
        })
        response_object['message'] = 'Book updated!'
    return jsonify(response_object)
Add the helper:
def remove_book(book_id):
    for book in BOOKS:
        if book['id'] == book_id:
            BOOKS.remove(book)
            return True
    return False
Take a moment to think about how you would handle the case of an
idnot existing. What if the payload is not correct? Refactor the for loop in the helper as well so that it's more Pythonic.
Client
Steps:
- Add modal and form
- Handle update button click
- Wire up HTTP request
- Alert user
- Handle cancel button click
(1) Add modal and form
First, add a new modal to the template, just below the first modal:
<!-- edit book modal -->
<div
ref="editBookModal"
class="modal fade"
:class="{ show: activeEditBookModal, 'd-block': activeEditBookModal }"
tabindex="-1"
role="dialog">
<div class="modal-dialog" role="document">
<div class="modal-content">
<div class="modal-header">
<h5 class="modal-title">Update</h5>
<button
type="button"
class="close"
data-dismiss="modal"
aria-label="Close"
@click="toggleEditBookModal">
<span aria-hidden="true">×</span>
</button>
</div>
<div class="modal-body">
<form>
<div class="mb-3">
<label for="editBookTitle" class="form-label">Title:</label>
<input
type="text"
class="form-control"
id="editBookTitle"
v-model="editBookForm.title"
placeholder="Enter title">
</div>
<div class="mb-3">
<label for="editBookAuthor" class="form-label">Author:</label>
<input
type="text"
class="form-control"
id="editBookAuthor"
v-model="editBookForm.author"
placeholder="Enter author">
</div>
<div class="mb-3 form-check">
<input
type="checkbox"
class="form-check-input"
id="editBookRead"
v-model="editBookForm.read">
<label class="form-check-label" for="editBookRead">Read?</label>
</div>
<div class="btn-group" role="group">
<button
type="button"
class="btn btn-primary btn-sm"
@click="handleEditSubmit">
Submit
</button>
<button
type="button"
class="btn btn-danger btn-sm"
@click="handleEditCancel">
Cancel
</button>
</div>
</form>
</div>
</div>
</div>
</div>
<div v-if="activeEditBookModal" class="modal-backdrop fade show"></div>
Add the form state to the data part of the script section:
activeEditBookModal: false,
editBookForm: {
  id: '',
  title: '',
  author: '',
  read: [],
},
Challenge: Instead of using a new modal, try using the same modal for handling both POST and PUT requests.
(2) Handle update button click
Update the "update" button in the table:
<button
  type="button"
  class="btn btn-warning btn-sm"
  @click="toggleEditBookModal(book)">
  Update
</button>
Add a new method to show/hide the modal:
toggleEditBookModal(book) {
  if (book) {
    this.editBookForm = book;
  }
  const body = document.querySelector('body');
  this.activeEditBookModal = !this.activeEditBookModal;
  if (this.activeEditBookModal) {
    body.classList.add('modal-open');
  } else{
    body.classList.remove('modal-open');
  }
},
Did you notice that we also updated the values of editBookForm?
Then, add another new method to handle the form submit:
handleEditSubmit() {
  this.toggleEditBookModal(null);
  let read = false;
  if (this.editBookForm.read) read = true;
  const payload = {
    title: this.editBookForm.title,
    author: this.editBookForm.author,
    read,
  };
  this.updateBook(payload, this.editBookForm.id);
},
(3) Wire up HTTP request
updateBook(payload, bookID) {
  const path = `http://localhost:5001/books/${bookID}`;
  axios.put(path, payload)
    .then(() => {
      this.getBooks();
    })
    .catch((error) => {
      console.error(error);
      this.getBooks();
    });
},
(4) Alert user
Update updateBook:
updateBook(payload, bookID) {
  const path = `http://localhost:5001/books/${bookID}`;
  axios.put(path, payload)
    .then(() => {
      this.getBooks();
      this.message = 'Book updated!';
      this.showMessage = true;
    })
    .catch((error) => {
      console.error(error);
      this.getBooks();
    });
},
(5) Handle cancel button click
Add method:
handleEditCancel() {
  this.toggleEditBookModal(null);
  this.initForm();
  this.getBooks(); // why?
},
Update initForm:
initForm() {
  this.addBookForm.title = '';
  this.addBookForm.author = '';
  this.addBookForm.read = [];
  this.editBookForm.id = '';
  this.editBookForm.title = '';
  this.editBookForm.author = '';
  this.editBookForm.read = [];
},
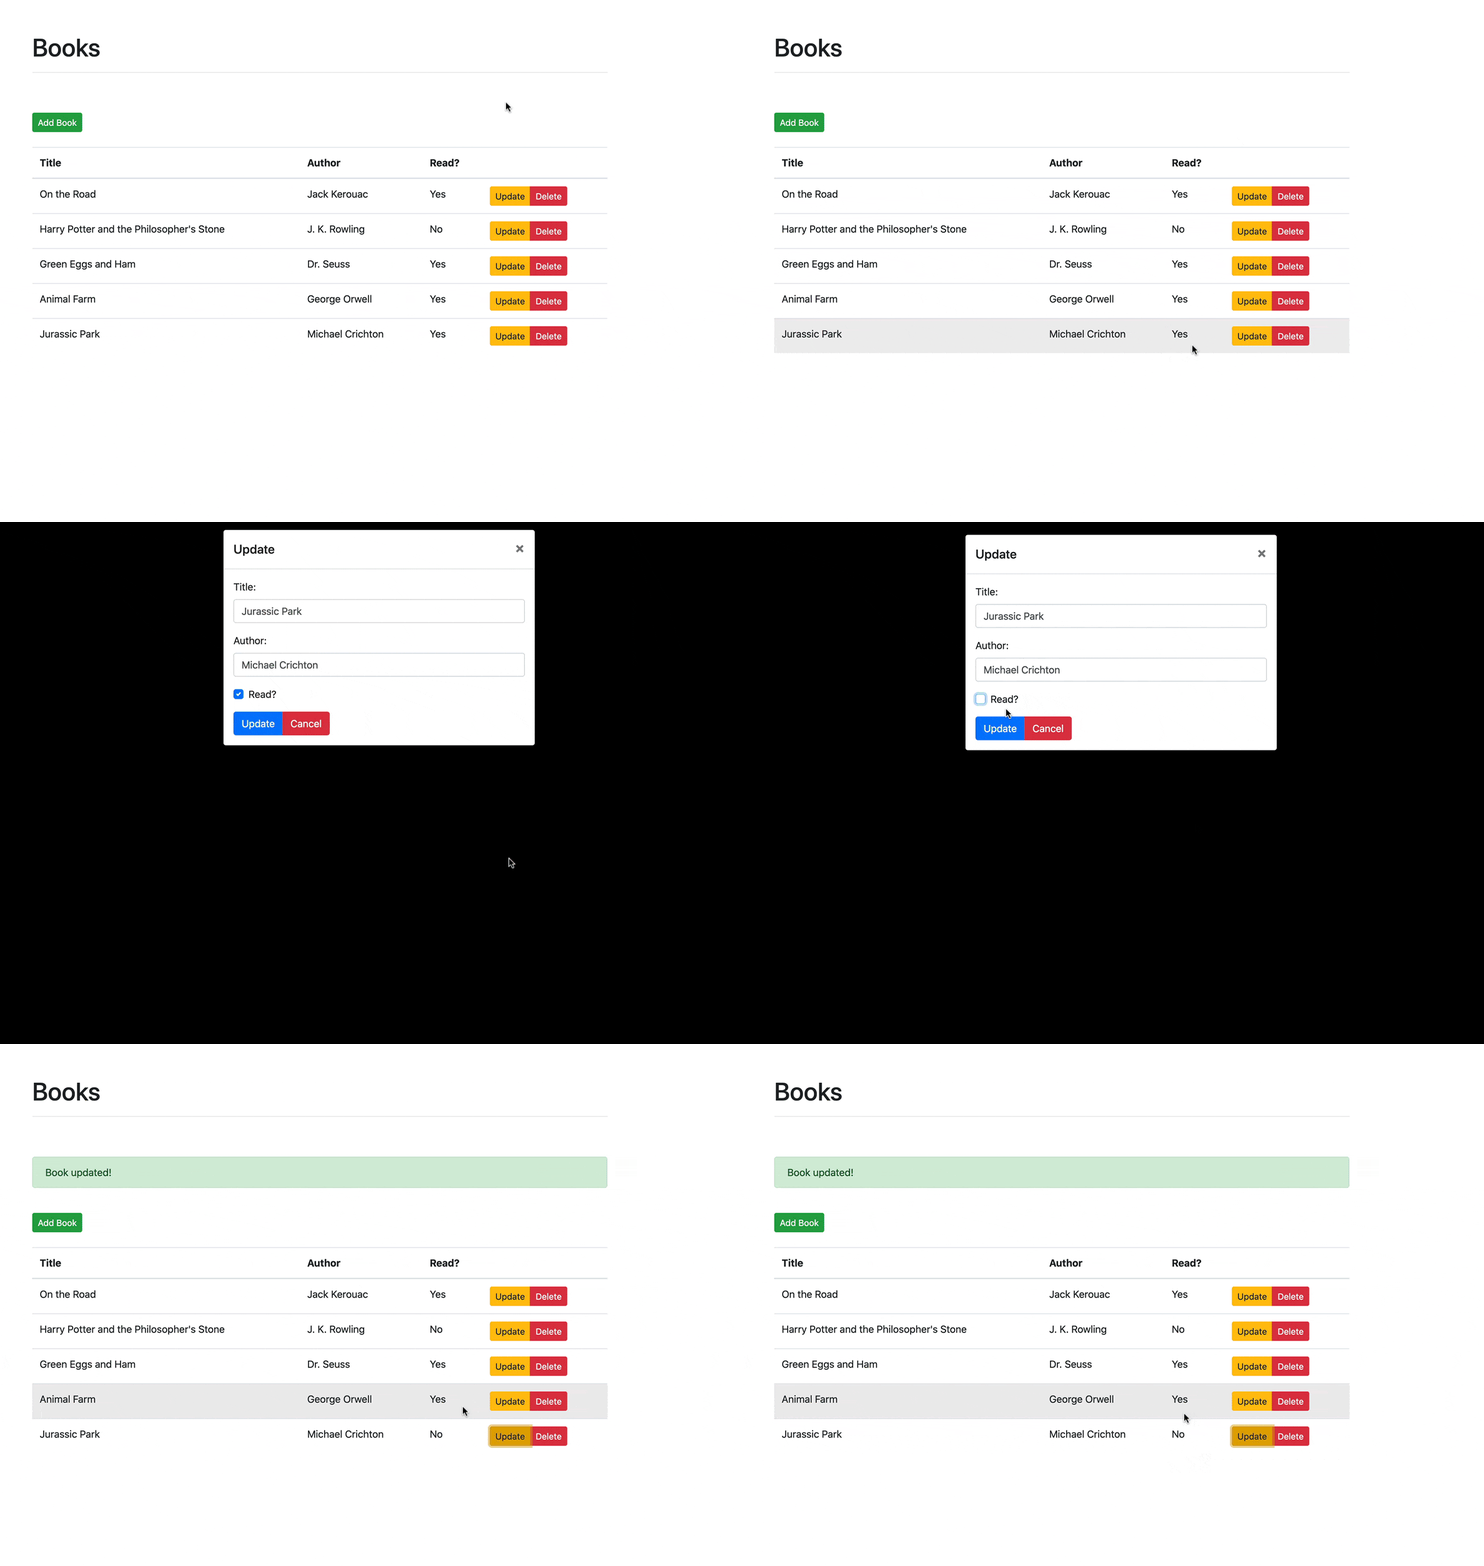
Make sure to review the code before moving on. Once done, test out the application. Ensure the modal is displayed on the button click and that the input values are populated correctly.
Challenges:
- You can clean the component up by moving the methods that make HTTP calls to a utils or services file.
- Also, try to combine some of the methods that contain similar logic, like
handleAddSubmitandhandleEditSubmit.
DELETE Route
Server
Update the route handler:
@app.route('/books/<book_id>', methods=['PUT', 'DELETE'])
def single_book(book_id):
    response_object = {'status': 'success'}
    if request.method == 'PUT':
        post_data = request.get_json()
        remove_book(book_id)
        BOOKS.append({
            'id': uuid.uuid4().hex,
            'title': post_data.get('title'),
            'author': post_data.get('author'),
            'read': post_data.get('read')
        })
        response_object['message'] = 'Book updated!'
    if request.method == 'DELETE':
        remove_book(book_id)
        response_object['message'] = 'Book removed!'
    return jsonify(response_object)
Client
Update the "delete" button like so:
<button
  type="button"
  class="btn btn-danger btn-sm"
  @click="handleDeleteBook(book)">
  Delete
</button>
Add the methods to handle the button click and then remove the book:
handleDeleteBook(book) {
  this.removeBook(book.id);
},
removeBook(bookID) {
  const path = `http://localhost:5001/books/${bookID}`;
  axios.delete(path)
    .then(() => {
      this.getBooks();
      this.message = 'Book removed!';
      this.showMessage = true;
    })
    .catch((error) => {
      console.error(error);
      this.getBooks();
    });
},
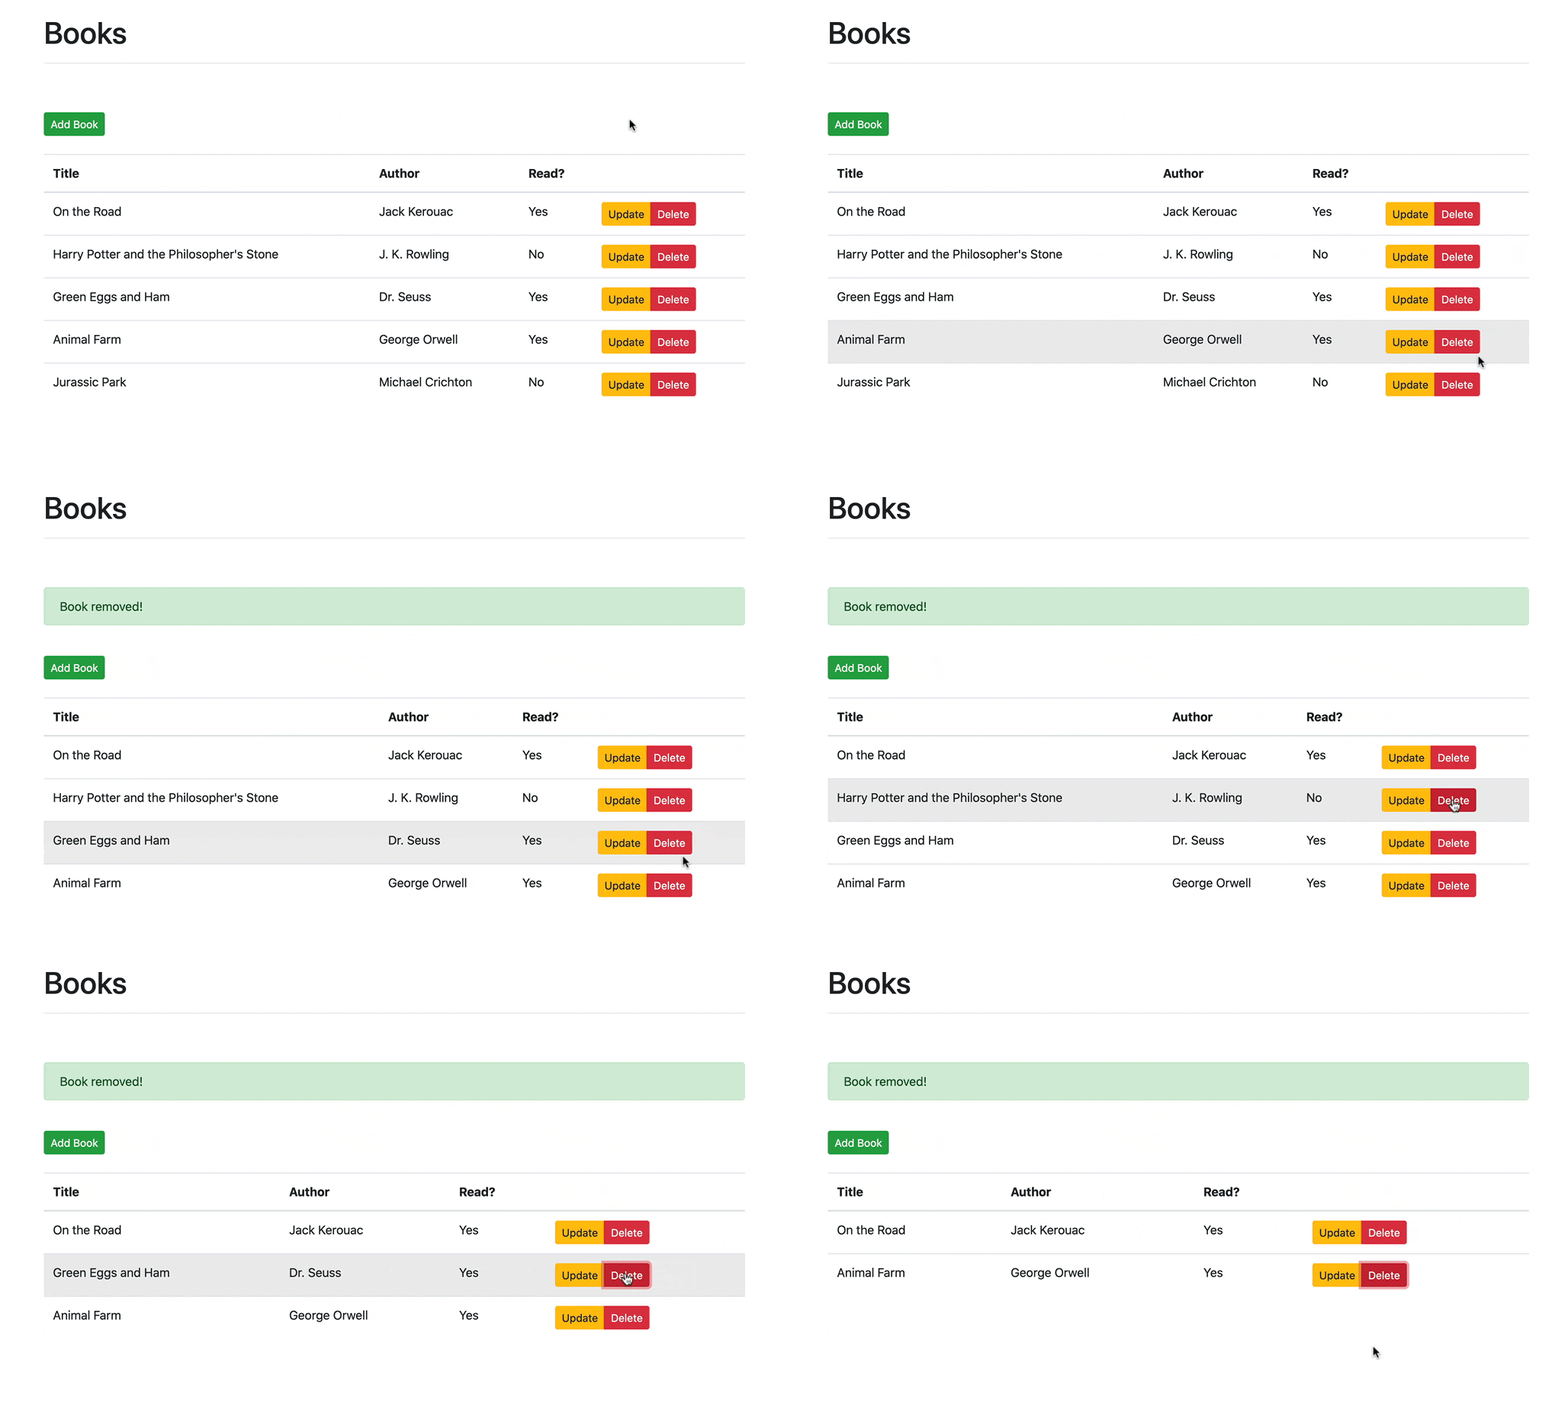
Now, when the user clicks the delete button, the handleDeleteBook method is fired, which, in turn, fires the removeBook method. This method sends the DELETE request to the back-end. When the response comes back, the alert message is displayed and getBooks is ran.
Challenges:
- Instead of deleting on the button click, add a confirmation alert.
- Display a "No books! Please add one." message when no books are present in the table.
Conclusion
This tutorial covered the basics of setting up a CRUD app with Vue and Flask.
Check your understanding by reviewing the objectives from the beginning of this tutorial and going through each of the challenges.
You can find the source code in the flask-vue-crud repo. Thanks for reading.
Looking for more?
- Check out the Accepting Payments with Stripe, Vue.js, and Flask tutorial, which starts where this tutorial leaves off.
- Want to learn how to deploy this app to Heroku? Check out Deploying a Flask and Vue App to Heroku with Docker and Gitlab CI.
 Michael Herman